Перейти к основному содержанию

Lenovo Legion 5 Pro 16ACH6H Battery Replacement

Выберете то, что вам нужно

  1. Lenovo Legion 5 Pro 16ACH6H Battery Replacement, Back cover removal: шаг 1, изображение 1 из 2 Lenovo Legion 5 Pro 16ACH6H Battery Replacement, Back cover removal: шаг 1, изображение 2 из 2
    • Use a Phillips screwdriver to remove the following ten screws securing the back cover to frame:

    • Six 12.7 mm PH00 screws

    • Four 4.2 mm PH00 screws

  2. Lenovo Legion 5 Pro 16ACH6H Battery Replacement, Release the front clips: шаг 2, изображение 1 из 3 Lenovo Legion 5 Pro 16ACH6H Battery Replacement, Release the front clips: шаг 2, изображение 2 из 3 Lenovo Legion 5 Pro 16ACH6H Battery Replacement, Release the front clips: шаг 2, изображение 3 из 3
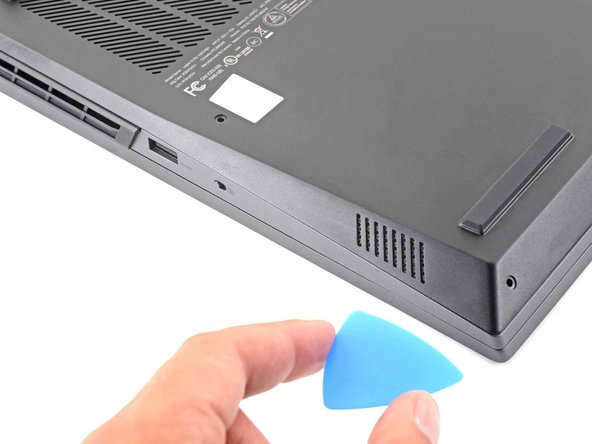
    • Insert the rounded edge of an opening pick between the back cover and the frame in the lower right corner.

  3. Lenovo Legion 5 Pro 16ACH6H Battery Replacement: шаг 3, изображение 1 из 3 Lenovo Legion 5 Pro 16ACH6H Battery Replacement: шаг 3, изображение 2 из 3 Lenovo Legion 5 Pro 16ACH6H Battery Replacement: шаг 3, изображение 3 из 3
    • Angle the pick to about 45˚.

    • Slide the pick along the front edge to release the clips securing the back cover to the frame.

  4. Lenovo Legion 5 Pro 16ACH6H Battery Replacement, Release the right clips: шаг 4, изображение 1 из 3 Lenovo Legion 5 Pro 16ACH6H Battery Replacement, Release the right clips: шаг 4, изображение 2 из 3 Lenovo Legion 5 Pro 16ACH6H Battery Replacement, Release the right clips: шаг 4, изображение 3 из 3
    • Insert the rounded edge of an opening pick between the back cover and the frame on the right edge.

    • Angle the pick to about 30˚ and slide down the right edge until you reach the plastic vents on the side.

  5. Lenovo Legion 5 Pro 16ACH6H Battery Replacement, Release the left clips: шаг 5, изображение 1 из 3 Lenovo Legion 5 Pro 16ACH6H Battery Replacement, Release the left clips: шаг 5, изображение 2 из 3 Lenovo Legion 5 Pro 16ACH6H Battery Replacement, Release the left clips: шаг 5, изображение 3 из 3
    • Repeat the same procedure on the left edge to release the clips.

  6. Lenovo Legion 5 Pro 16ACH6H Battery Replacement, Release the right vent clips: шаг 6, изображение 1 из 3 Lenovo Legion 5 Pro 16ACH6H Battery Replacement, Release the right vent clips: шаг 6, изображение 2 из 3 Lenovo Legion 5 Pro 16ACH6H Battery Replacement, Release the right vent clips: шаг 6, изображение 3 из 3
    • Position the laptop vertically so you can easily access the plastic vents.

    • Slide the rounded edge of an opening pick between the frame and the plastic vents on the right side near the USB-A port.

    • Rotate the pick so that it is positioned on top of the plastic vents.

  7. Lenovo Legion 5 Pro 16ACH6H Battery Replacement: шаг 7, изображение 1 из 2 Lenovo Legion 5 Pro 16ACH6H Battery Replacement: шаг 7, изображение 2 из 2
    • Push the pick between the frame and plastic vents.

    • Slide the pick along the top edge of the plastic vents to release the clips.

  8. Lenovo Legion 5 Pro 16ACH6H Battery Replacement, Release the left vent clips: шаг 8, изображение 1 из 3 Lenovo Legion 5 Pro 16ACH6H Battery Replacement, Release the left vent clips: шаг 8, изображение 2 из 3 Lenovo Legion 5 Pro 16ACH6H Battery Replacement, Release the left vent clips: шаг 8, изображение 3 из 3
    • Slide the rounded edge of an opening pick between the frame and the plastic vents on the left side near the USB-C port.

    • Rotate the pick so that it is positioned on top of the plastic vents.

  9. Lenovo Legion 5 Pro 16ACH6H Battery Replacement: шаг 9, изображение 1 из 2 Lenovo Legion 5 Pro 16ACH6H Battery Replacement: шаг 9, изображение 2 из 2
    • Push the pick between the frame and plastic vents.

    • Slide the pick along the top edge of the plastic vents to release the clips.

  10. Lenovo Legion 5 Pro 16ACH6H Battery Replacement, Remove the back cover: шаг 10, изображение 1 из 3 Lenovo Legion 5 Pro 16ACH6H Battery Replacement, Remove the back cover: шаг 10, изображение 2 из 3 Lenovo Legion 5 Pro 16ACH6H Battery Replacement, Remove the back cover: шаг 10, изображение 3 из 3
    • Lift the back cover up and remove it from the chassis.

    • During reassembly, this is a good point to power on your laptop and test all functions before sealing it up. Be sure to power your laptop back down before you continue working.

  11. Lenovo Legion 5 Pro 16ACH6H Battery Replacement, Disconnect the battery: шаг 11, изображение 1 из 3 Lenovo Legion 5 Pro 16ACH6H Battery Replacement, Disconnect the battery: шаг 11, изображение 2 из 3 Lenovo Legion 5 Pro 16ACH6H Battery Replacement, Disconnect the battery: шаг 11, изображение 3 из 3
    • Use the pointed end of a spudger to push each side of the battery connector to loosen it.

  12. Lenovo Legion 5 Pro 16ACH6H Battery Replacement: шаг 12, изображение 1 из 2 Lenovo Legion 5 Pro 16ACH6H Battery Replacement: шаг 12, изображение 2 из 2
    • Use the flat end of a spudger to push out and disconnect battery cable.

  13. Lenovo Legion 5 Pro 16ACH6H Battery Replacement, Right SSD removal: шаг 13, изображение 1 из 2 Lenovo Legion 5 Pro 16ACH6H Battery Replacement, Right SSD removal: шаг 13, изображение 2 из 2
    • Use a Phillips screwdriver to remove the three 5.1 mm PH00 screws securing the right SSD shield to the motherboard.

    • During reassembly, make sure the hole on the top of the shield aligns with the post on the chassis.

  14. Lenovo Legion 5 Pro 16ACH6H Battery Replacement, Remove the SSD shield: шаг 14, изображение 1 из 3 Lenovo Legion 5 Pro 16ACH6H Battery Replacement, Remove the SSD shield: шаг 14, изображение 2 из 3 Lenovo Legion 5 Pro 16ACH6H Battery Replacement, Remove the SSD shield: шаг 14, изображение 3 из 3
    • Grab the SSD shield and lift up to remove it.

  15. Lenovo Legion 5 Pro 16ACH6H Battery Replacement: шаг 15, изображение 1 из 2 Lenovo Legion 5 Pro 16ACH6H Battery Replacement: шаг 15, изображение 2 из 2
    • Use a Phillips screwdriver to remove the 2.6 mm PH1 screw securing the SSD to the motherboard.

    • The SSD will spring up to about 30˚ when the screw is removed.

  16. Lenovo Legion 5 Pro 16ACH6H Battery Replacement, Remove the right SSD: шаг 16, изображение 1 из 3 Lenovo Legion 5 Pro 16ACH6H Battery Replacement, Remove the right SSD: шаг 16, изображение 2 из 3 Lenovo Legion 5 Pro 16ACH6H Battery Replacement, Remove the right SSD: шаг 16, изображение 3 из 3
    • Grip the edges of the SSD near the screw indent.

    • Gently pull to remove the SSD.

  17. Lenovo Legion 5 Pro 16ACH6H Battery Replacement, Unfasten the battery: шаг 17, изображение 1 из 1
    • Use your Phillips screwdriver to remove the six 5.1 mm-long screws securing the battery.

  18. Lenovo Legion 5 Pro 16ACH6H Battery Replacement, Remove the battery: шаг 18, изображение 1 из 2 Lenovo Legion 5 Pro 16ACH6H Battery Replacement, Remove the battery: шаг 18, изображение 2 из 2
    • Remove the battery from its recess.

Заключение

To reassemble your device, follow these instructions in reverse order.

For optimal performance, calibrate your newly installed battery after completing this guide.

Take your e-waste to an R2 or e-Stewards certified recycler.

Repair didn’t go as planned? Try some basic troubleshooting, or ask our Lenovo Legion answers community for help.

Clay Eickemeyer

Участник с: 09/19/22

65 905 Репутация

Автор 453 руководств

Команда

iFixit Участник iFixit

Staff

135 членов

Автор 16 718 руководств

0 Комментариев

Добавить комментарий

Просмотр статистики:

За последние 24часов: 3

За последние 7 дней: 44

За последние 30 дней: 216

За всё время: 3,317