Перейти к основному содержанию

Lenovo Legion Y530-15ICH Motherboard Replacement

Выберете то, что вам нужно

  1. Lenovo Legion Y530-15ICH Motherboard Replacement, Back Cover: шаг 1, изображение 1 из 1
    • Ensure the device is powered off.

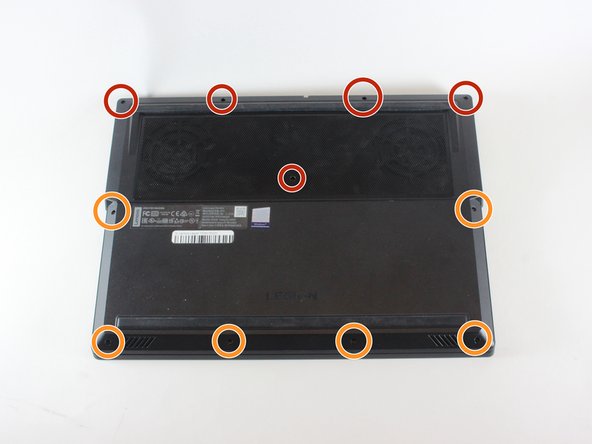
    • Use a PZ00 screwdriver bit to remove the eleven screws securing the back cover.

    • Five 7 mm screws

    • Six 4 mm screws

  2. Lenovo Legion Y530-15ICH Motherboard Replacement: шаг 2, изображение 1 из 2 Lenovo Legion Y530-15ICH Motherboard Replacement: шаг 2, изображение 2 из 2
    • Carefully pry the back cover off the computer using an opening pick.

    • Start at the corner of the laptop and work your way around the side. Gently pull up on the cover until it detaches.

  3. Lenovo Legion Y530-15ICH Motherboard Replacement, Battery: шаг 3, изображение 1 из 1
    • Use a Phillips screwdriver to remove the five 4 mm screws holding the battery in place.

  4. Lenovo Legion Y530-15ICH Motherboard Replacement: шаг 4, изображение 1 из 2 Lenovo Legion Y530-15ICH Motherboard Replacement: шаг 4, изображение 2 из 2
    • Disconnect the battery cable from its motherboard socket by gently pulling it towards the battery.

    • Pull parallel to the battery, not straight up.

    • Now you can safely remove the battery.

  5. Lenovo Legion Y530-15ICH Motherboard Replacement, Fan: шаг 5, изображение 1 из 2 Lenovo Legion Y530-15ICH Motherboard Replacement, Fan: шаг 5, изображение 2 из 2
    • Use a JIS #1 screwdriver to loosen the five spring screws located at the middle of the fan piece.

    • Remove the plastic covering after the screws have been loosened.

    • Spring screws will stay attached to the cover.

  6. Lenovo Legion Y530-15ICH Motherboard Replacement: шаг 6, изображение 1 из 1
    • Use a JIS #1 screwdriver to remove four 4mm screws securing the fans to the device.

  7. Lenovo Legion Y530-15ICH Motherboard Replacement: шаг 7, изображение 1 из 1
    • Unplug the wires connecting the two fans to the motherboard.

    • When doing this, tug carefully from side to side.

  8. Lenovo Legion Y530-15ICH Motherboard Replacement: шаг 8, изображение 1 из 2 Lenovo Legion Y530-15ICH Motherboard Replacement: шаг 8, изображение 2 из 2
    • Lift the fans out of their positions and remove them from the device.

  9. Lenovo Legion Y530-15ICH Motherboard Replacement, Solid State Drive: шаг 9, изображение 1 из 2 Lenovo Legion Y530-15ICH Motherboard Replacement, Solid State Drive: шаг 9, изображение 2 из 2
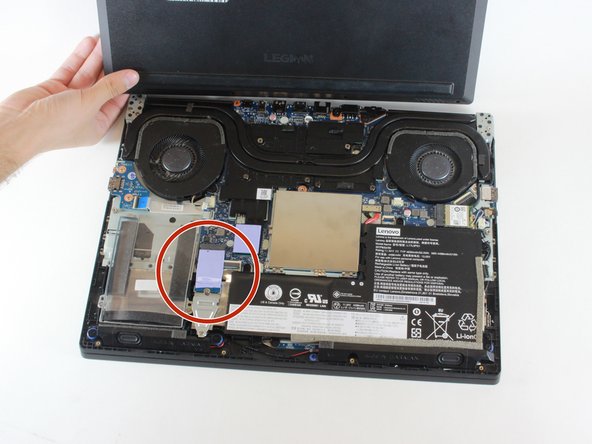
    • Do not remove the thermal pad.

    • Remove one 4mm screw circled in orange in the second picture with a JIS #1 screwdriver.

  10. Lenovo Legion Y530-15ICH Motherboard Replacement: шаг 10, изображение 1 из 2 Lenovo Legion Y530-15ICH Motherboard Replacement: шаг 10, изображение 2 из 2
    • Carefully remove the SSD from its connector.

  11. Lenovo Legion Y530-15ICH Motherboard Replacement, Motherboard: шаг 11, изображение 1 из 2 Lenovo Legion Y530-15ICH Motherboard Replacement, Motherboard: шаг 11, изображение 2 из 2
    • Start by disconnecting the ribbon cable that is near the audio driver. It is recommended to use the iFixit Opening Pick to remove the ribbon cable.

  12. Lenovo Legion Y530-15ICH Motherboard Replacement: шаг 12, изображение 1 из 2 Lenovo Legion Y530-15ICH Motherboard Replacement: шаг 12, изображение 2 из 2
    • Remove three 4mm screws using a JIS #1 screwdriver.

    • Remove the black cover the screws were holding down.

  13. Lenovo Legion Y530-15ICH Motherboard Replacement: шаг 13, изображение 1 из 2 Lenovo Legion Y530-15ICH Motherboard Replacement: шаг 13, изображение 2 из 2
    • Remove the 4mm screw on top of the audio driver using a JIS #1 screwdriver.

    • Pull the audio cables gently off the audio driver.

    • Remove the audio driver from the motherboard.

  14. Lenovo Legion Y530-15ICH Motherboard Replacement: шаг 14, изображение 1 из 1
    • Remove twelve 4mm screws circled in red using a JIS #1 screwdriver.

    • Peel off the Lenovo sticker and remove one 4mm screw with a JIS #1 screwdriver.

  15. Lenovo Legion Y530-15ICH Motherboard Replacement: шаг 15, изображение 1 из 1
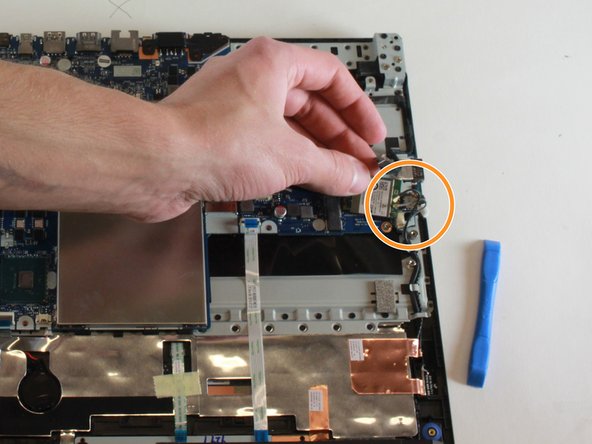
    • Remove two ribbon cables in the circled areas. Gently pull them out of their ports.

  16. Lenovo Legion Y530-15ICH Motherboard Replacement: шаг 16, изображение 1 из 1
    • Remove the final ribbon cable by gently pulling it from its socket.

    • The motherboard is now completely disconnected from the laptop.

  17. Lenovo Legion Y530-15ICH Motherboard Replacement: шаг 17, изображение 1 из 2 Lenovo Legion Y530-15ICH Motherboard Replacement: шаг 17, изображение 2 из 2
    • Gently lift the motherboard out of the housing.

Заключение

To reassemble your device, follow these instructions in reverse order.

4 участников успешно повторили данное руководство.

Kaylie Klausing

Участник с: 02/07/20

776 Репутация

Автор 6 руководств

Команда

Cal Poly, Team S7-G1, Regan Winter 2020 Участник Cal Poly, Team S7-G1, Regan Winter 2020

CPSU-REGAN-W20S7G1

4 членов

Автор 12 руководств

3 Комментариев

Kaylie Klausing

I hope you burn in !&&*

Safwat Ali - Ответить

You fckking piece of $@$*.

DON'T FOLLOW THIS.

FCKKKK YOUUUUU

Safwat Ali - Ответить

What the hell is wrong with this guy?

Safwat Ali is a real jerk - Ответить

Добавить комментарий

Просмотр статистики:

За последние 24часов: 5

За последние 7 дней: 13

За последние 30 дней: 90

За всё время: 7,821