Перейти к основному содержанию

Lenovo Legion Y530-15ICH Speaker Replacement

Выберете то, что вам нужно

  1. Lenovo Legion Y530-15ICH Speaker  Replacement, Back Cover: шаг 1, изображение 1 из 1
    • Ensure the device is powered off.

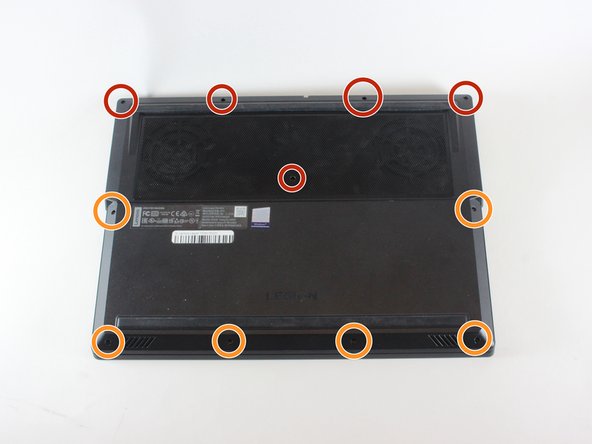
    • Use a PZ00 screwdriver bit to remove the eleven screws securing the back cover.

    • Five 7 mm screws

    • Six 4 mm screws

  2. Lenovo Legion Y530-15ICH Speaker  Replacement: шаг 2, изображение 1 из 2 Lenovo Legion Y530-15ICH Speaker  Replacement: шаг 2, изображение 2 из 2
    • Carefully pry the back cover off the computer using an opening pick.

    • Start at the corner of the laptop and work your way around the side. Gently pull up on the cover until it detaches.

  3. Lenovo Legion Y530-15ICH Speaker  Replacement, Battery: шаг 3, изображение 1 из 1
    • Use a Phillips screwdriver to remove the five 4 mm screws holding the battery in place.

  4. Lenovo Legion Y530-15ICH Speaker  Replacement: шаг 4, изображение 1 из 2 Lenovo Legion Y530-15ICH Speaker  Replacement: шаг 4, изображение 2 из 2
    • Disconnect the battery cable from its motherboard socket by gently pulling it towards the battery.

    • Pull parallel to the battery, not straight up.

    • Now you can safely remove the battery.

  5. Lenovo Legion Y530-15ICH Speaker  Replacement, Speaker: шаг 5, изображение 1 из 1
    • Remove the five screws using the Phillips #0 screwdriver.

  6. Lenovo Legion Y530-15ICH Speaker  Replacement: шаг 6, изображение 1 из 1
    • Gently peel up the copper adhesive.

  7. Lenovo Legion Y530-15ICH Speaker  Replacement: шаг 7, изображение 1 из 1
    • Remove the speakers from the device.

Заключение

To reassemble your device, follow these instructions in reverse order.

Еще один человек закончил это руководство.

Kimberly Caroline Winkler

Участник с: 02/18/21

199 Репутация

Автор 2 руководств

0 Комментариев

Добавить комментарий

Просмотр статистики:

За последние 24часов: 2

За последние 7 дней: 6

За последние 30 дней: 28

За всё время: 1,220