Введение
The screen on the Lenovo Tab 2 A10-70 is a pain in the tush to remove but if you can get past the adhesive it's not to hard!!!! Don't Give up. (Please excuse the pictures in this guide, the preggo body looks even bigger in them!!!!)
Выберете то, что вам нужно
-
-
It is extremely easy to remove the plastic casing. Just slide your spudger (or fingernail if they are strong) around the edge to remove
-
-
-
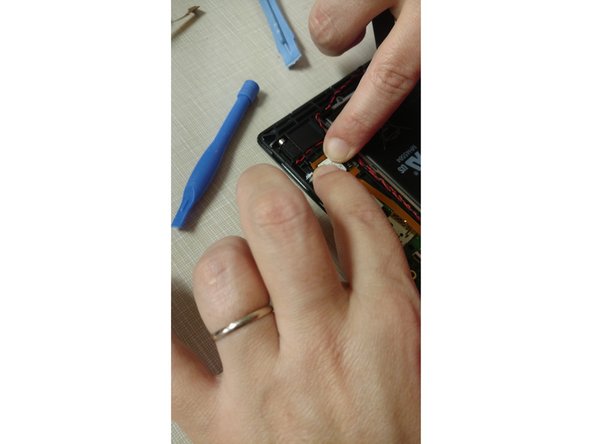
Using your fingernail or tweezers lift the holding flap and disconnect the digitizer cable for the old screen
-
-
-
Please be very careful!, This glass shatters easily and shards will go flying if you are rough
-
The glass is connected to the frame and LCD by the world's strongest adhesive, .... took me well over an hour to remove the old screen
-
Using a heat gun (high powered blow dryer) or those of you lucky enough to have an iopener kit slowly heat your way around the glass, start in a corner and work your spudger in.
-
Make sure you slide your spudger straight in to avoid the lcd There is a nice gap but the adhesive is two part!
-
-
-
-
Clean your Edges
-
Using your spudger or a razor knife clean off any left behind adhesive
-
-
-
Carefully Slide the digitizer cable through the opening in the case
-
Flip over case and reconnect the new digitizer cable
-
I then tested to make sure the screen and digitizer worked before adhesive :)
-
-
-
The Screen I ordered came with adhesive already on it, but I added some 3M tape too
-
Press the Screen firmly into place
-
Then replace the back cover!
-


To reassemble your device, follow these instructions in reverse order.
To reassemble your device, follow these instructions in reverse order.
Отменить: Я не выполнил это руководство.
18 участников успешно повторили данное руководство.
9 Комментариев
Hi Amber,
Thank you for the guide.
How's the replacement screen quality? Can I know where you bought the screen from? I need to replace my screen. Thinking of buying it from the same supplier. Would want a screen with adhesive too.
Thanks
Richard.
I don't quite know but it looks like a regular bootleg one
I just completed this, using a proper heat Gun it took about 10 minutes.
Ebay screen, oem tagged, apparently no adhesive on it.
I love the guide and you have encouraged me to try to replace my screen. Where did you order the replacement screen and did you order just the new glass?
Thanks,
Jack
did you replace the glass/digitiser only, or did you also replace the lcd ? the title suggests glass/digitiser but step 6 refers to a "new screen" sorry for the confusion
++https://youtu.be/etxKSTK3Gno?t=8m19s++
Is that black tape important? I wasn't lucky and it was torn.
I have more of a question, But first I want to say THANK YOU !!!!, I was diagnosed with a “rare” form of advanced MS, so that ended my 20+ years of being an auto (anything) DC TECH,to a halt, BUT I still can do all of my own repairs, now handy capped, but I always find a way to make up for what ever is in my way. Any way my screens are all good, but after repairing the micro USB I then found I removed the tracer “harness” the wrong way, before I order a new main board, do you have any tips or trix?
Rich K,……primaryms@aol.com THANX A TON!!
A good starting point could be the charging port.
lassedollerup - Ответить