Перейти к основному содержанию

Lenovo Tab 2 A8 Audio/Video Port Replacement

Выберете то, что вам нужно

  1. Lenovo Tab 2 A8 Audio/Video Port Replacement, Removing the Back Panel: шаг 1, изображение 1 из 3 Lenovo Tab 2 A8 Audio/Video Port Replacement, Removing the Back Panel: шаг 1, изображение 2 из 3 Lenovo Tab 2 A8 Audio/Video Port Replacement, Removing the Back Panel: шаг 1, изображение 3 из 3
    • Place the tablet face down on a soft, stable surface that will protect the screen.

    • Next, Scrape off the seal over the screw in the back of the tablet with a Metal Spudger.

    • Use the Phillips #000 Screwdriver to remove the M1.4 × 2.5 screw.

    • If the seal covering the screw has already been removed, please proceed to the next step in the process.

    • As the screw is small, you may wish to extract it using a pair of tweezers.

  2. Lenovo Tab 2 A8 Audio/Video Port Replacement: шаг 2, изображение 1 из 3 Lenovo Tab 2 A8 Audio/Video Port Replacement: шаг 2, изображение 2 из 3 Lenovo Tab 2 A8 Audio/Video Port Replacement: шаг 2, изображение 3 из 3
    • Starting on the side, work your way around the the tablet to pop off the back cover. You will want to utilize a metal Spudger for this.

    • Some force may be required initially to pry the back cover off.

    • Note that the button tabs for this device are loose inside the case and will fall out when opening.

  3. Lenovo Tab 2 A8 Audio/Video Port Replacement, Motherboard: шаг 3, изображение 1 из 3 Lenovo Tab 2 A8 Audio/Video Port Replacement, Motherboard: шаг 3, изображение 2 из 3 Lenovo Tab 2 A8 Audio/Video Port Replacement, Motherboard: шаг 3, изображение 3 из 3
    • Using the Phillips #000 screwdriver, remove the four M1.4 × 2.5 screws holding the motherboard in place.

    • Because the screws are small, it is a good idea to remove them with a pair of tweezers.

  4. Lenovo Tab 2 A8 Audio/Video Port Replacement: шаг 4, изображение 1 из 3 Lenovo Tab 2 A8 Audio/Video Port Replacement: шаг 4, изображение 2 из 3 Lenovo Tab 2 A8 Audio/Video Port Replacement: шаг 4, изображение 3 из 3
    • Remove the M1.4 × 2.5 screw securing the battery lead to the battery with the Phillips #000 screwdriver.

    • With a pair of tweezers, gently move the battery lead so it will not obstruct the motherboard.

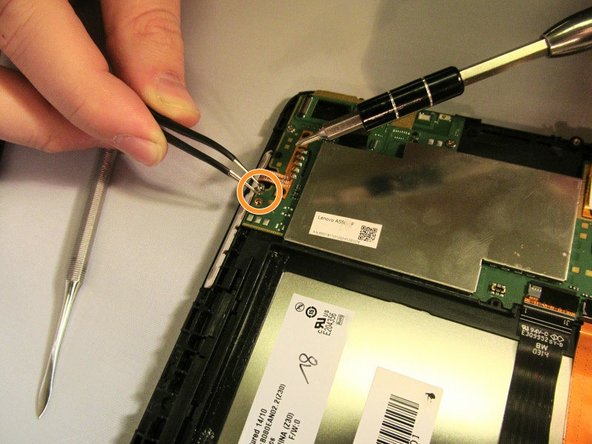
    • With a pair of tweezers, carefully unplug the strip connecting the screen to the motherboard.

    • The strip connecting the screen to the motherboard is firmly in place and may require some careful use of strength to unplug it.

  5. Lenovo Tab 2 A8 Audio/Video Port Replacement: шаг 5, изображение 1 из 1
    • Remove the motherboard by lifting the top edge and pulling outward to free it from the small tabs that hold it in place.

    • The small tabs can be broken if the motherboard is pried up too forcefully.

    • The button tabs are fastened to the motherboard by a small adhesive strip. Take care in removing the motherboard to avoid tearing the wires.

  6. Lenovo Tab 2 A8 Audio/Video Port Replacement, Audio/Video Port: шаг 6, изображение 1 из 2 Lenovo Tab 2 A8 Audio/Video Port Replacement, Audio/Video Port: шаг 6, изображение 2 из 2
    • Flip the motherboard to its back side.

    • Desolder the six audio/visual port contact points.

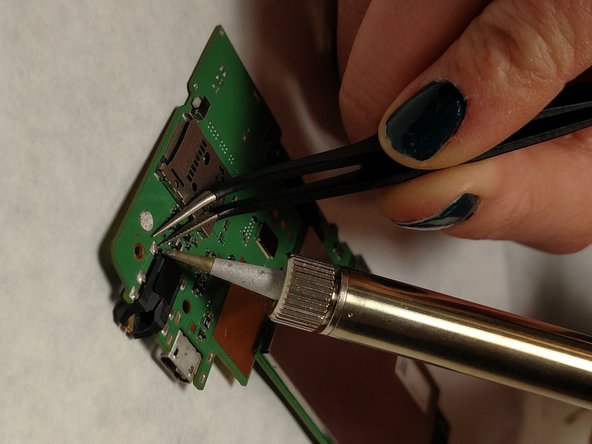
    • Use tweezers to remove the existing audio jack to remove from the motherboard entirely.

Заключение

To reassemble your device, follow these instructions in reverse order.

Еще один человек закончил это руководство.

Taylor Smith

Участник с: 01/26/17

382 Репутация

Автор 2 руководств

Команда

IUPUI, Team 2-4, Baechle Spring 2017 Участник IUPUI, Team 2-4, Baechle Spring 2017

IUPUI-BAECHLE-S17S2G4

4 членов

Автор 9 руководств

0 Комментариев

Добавить комментарий

Просмотр статистики:

За последние 24часов: 0

За последние 7 дней: 1

За последние 30 дней: 3

За всё время: 558