Перейти к основному содержанию

Lenovo ThinkPad Edge E520 CD Disk Drive Replacement

Выберете то, что вам нужно

  1. Lenovo ThinkPad Edge E520 CD Disk Drive Replacement, Battery: шаг 1, изображение 1 из 1
    • Power off and unplug the computer before the start of these steps.

    • Close the laptop lid.

  2. Lenovo ThinkPad Edge E520 CD Disk Drive Replacement: шаг 2, изображение 1 из 2 Lenovo ThinkPad Edge E520 CD Disk Drive Replacement: шаг 2, изображение 2 из 2
    • Flip the computer so that the back is facing upwards.

    • Locate the switch used to release the battery.

    • The switch should be located towards the hinge of the laptop near the battery pack and have a lock icon associated with it.

  3. Lenovo ThinkPad Edge E520 CD Disk Drive Replacement: шаг 3, изображение 1 из 2 Lenovo ThinkPad Edge E520 CD Disk Drive Replacement: шаг 3, изображение 2 из 2
    • Slide the switch towards the unlocked lock icon.

    • While holding it in the unlocked position, slide the battery towards the hinge.

    • Fully separate the battery pack from the back of the laptop.

  4. Lenovo ThinkPad Edge E520 CD Disk Drive Replacement, Back Plate: шаг 4, изображение 1 из 2 Lenovo ThinkPad Edge E520 CD Disk Drive Replacement, Back Plate: шаг 4, изображение 2 из 2
    • Flip over the laptop and position it with the battery being furthest away from you.

    • Remove the four screws on the edges of the T-Shaped plate with a Phillips #0 screwdriver.

    • Remove the T-Shaped plate from the back of the computer. It should come off easily if all four aforementioned screws are removed.

    • Screw length 6.35 mm, head 3.175 mm

  5. Lenovo ThinkPad Edge E520 CD Disk Drive Replacement, Keyboard: шаг 5, изображение 1 из 1
    • Remove the battery from the back of the device

    • Unscrew the two 3.175 mm diameter and 6.35 mm length screws with keyboard symbols pointing at them using a Phillips head screwdriver.

  6. Lenovo ThinkPad Edge E520 CD Disk Drive Replacement: шаг 6, изображение 1 из 3 Lenovo ThinkPad Edge E520 CD Disk Drive Replacement: шаг 6, изображение 2 из 3 Lenovo ThinkPad Edge E520 CD Disk Drive Replacement: шаг 6, изображение 3 из 3
    • Turn the laptop back over so that the keyboard is facing you.

    • Use your hands to separate the keyboard from the laptop

  7. Lenovo ThinkPad Edge E520 CD Disk Drive Replacement, Front Compartment Case: шаг 7, изображение 1 из 1
    • Remove all remaining screws on the back of the device.

    • Screw length 6.35 mm, head 3.175 mm Screws behind battery length 3.175 mm, head 3.175 mm

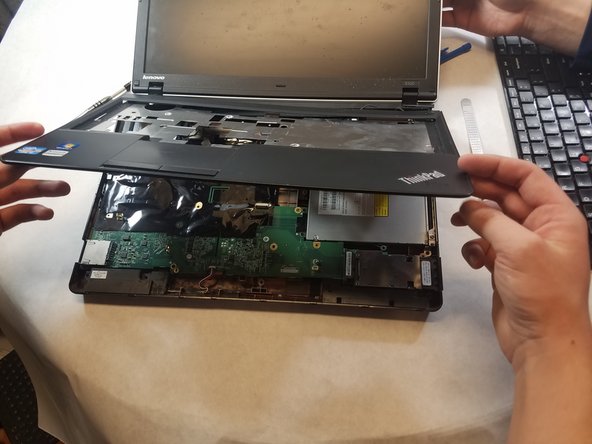
  8. Lenovo ThinkPad Edge E520 CD Disk Drive Replacement: шаг 8, изображение 1 из 3 Lenovo ThinkPad Edge E520 CD Disk Drive Replacement: шаг 8, изображение 2 из 3 Lenovo ThinkPad Edge E520 CD Disk Drive Replacement: шаг 8, изображение 3 из 3
    • Flip device back over and open the screen.

    • Insert the prying tool on one edge of the case and follow along all four edges until the case frees up.

    • Remove the case.

  9. Lenovo ThinkPad Edge E520 CD Disk Drive Replacement, CD Disk Drive: шаг 9, изображение 1 из 2 Lenovo ThinkPad Edge E520 CD Disk Drive Replacement, CD Disk Drive: шаг 9, изображение 2 из 2
    • The silver block contains two screws.

    • Unscrew the two screws to remove the clamp that holds the disk drive in place.

    • Screw length 6.35 mm, head 3.175 mm

    • Remove the screws holding the disk drive in place and then slide outwards to remove

    • Screw length 6.35 mm, head 3.175 mm

Заключение

To reassemble your device, follow these instructions in reverse order.

Andrew Martin

Участник с: 03/01/18

202 Репутация

Автор 2 руководств

Команда

UMass Dartmouth, Team S1-G2, Simcock Spring 2018 Участник UMass Dartmouth, Team S1-G2, Simcock Spring 2018

UMASSD-SIMCOCK-S18S1G2

4 членов

Автор 12 руководств

0 Комментариев

Добавить комментарий

Просмотр статистики:

За последние 24часов: 0

За последние 7 дней: 2

За последние 30 дней: 4

За всё время: 355