Перейти к основному содержанию

Lenovo ThinkPad X1 Yoga (6th Gen) Motherboard Replacement

Выберете то, что вам нужно

  1. Lenovo ThinkPad X1 Yoga (6th Gen) Motherboard Replacement, Base Panel: шаг 1, изображение 1 из 3 Lenovo ThinkPad X1 Yoga (6th Gen) Motherboard Replacement, Base Panel: шаг 1, изображение 2 из 3 Lenovo ThinkPad X1 Yoga (6th Gen) Motherboard Replacement, Base Panel: шаг 1, изображение 3 из 3
    • Use a Phillips #1 screwdriver to remove the five 5.0 mm screws from the base panel.

    • Wedge a spudger between the base panel and chassis, and pry around the entire perimeter until you hear a pop and the base panel releases.

    • Lift the base panel up and off of the chassis.

  2. Lenovo ThinkPad X1 Yoga (6th Gen) Motherboard Replacement, Battery: шаг 2, изображение 1 из 3 Lenovo ThinkPad X1 Yoga (6th Gen) Motherboard Replacement, Battery: шаг 2, изображение 2 из 3 Lenovo ThinkPad X1 Yoga (6th Gen) Motherboard Replacement, Battery: шаг 2, изображение 3 из 3
    • Use a Phillips #1 screwdriver to remove the five 4.5 mm screws securing the battery.

    • Lift the battery up and out.

  3. Lenovo ThinkPad X1 Yoga (6th Gen) Motherboard Replacement, Coin Cell Battery: шаг 3, изображение 1 из 2 Lenovo ThinkPad X1 Yoga (6th Gen) Motherboard Replacement, Coin Cell Battery: шаг 3, изображение 2 из 2
    • Use a spudger to pry the coin cell battery until it releases from the chassis.

    • There is an adhesive holding the battery in place; patiently pry around the coin cell until it releases from the housing, and don't use excessive force.

  4. Lenovo ThinkPad X1 Yoga (6th Gen) Motherboard Replacement: шаг 4, изображение 1 из 3 Lenovo ThinkPad X1 Yoga (6th Gen) Motherboard Replacement: шаг 4, изображение 2 из 3 Lenovo ThinkPad X1 Yoga (6th Gen) Motherboard Replacement: шаг 4, изображение 3 из 3
    • Use a spudger to "walk" out the coin cell's plug from its motherboard port, gently levering from each side until it releases.

    • Lift the coin cell battery out.

  5. Lenovo ThinkPad X1 Yoga (6th Gen) Motherboard Replacement, Speaker: шаг 5, изображение 1 из 3 Lenovo ThinkPad X1 Yoga (6th Gen) Motherboard Replacement, Speaker: шаг 5, изображение 2 из 3 Lenovo ThinkPad X1 Yoga (6th Gen) Motherboard Replacement, Speaker: шаг 5, изображение 3 из 3
    • Use a Phillips #1 screwdriver to remove the four 1.8 mm screws.

  6. Lenovo ThinkPad X1 Yoga (6th Gen) Motherboard Replacement: шаг 6, изображение 1 из 3 Lenovo ThinkPad X1 Yoga (6th Gen) Motherboard Replacement: шаг 6, изображение 2 из 3 Lenovo ThinkPad X1 Yoga (6th Gen) Motherboard Replacement: шаг 6, изображение 3 из 3
    • Use the spudger to lift the flap covering the speaker wire.

    • Starting at the top of the right speaker, follow the wire connected to the top of the left speaker. Use the tip of a spudger to free the wire from the plastic brackets it lies under.

    • Starting from near the bottom-left side of the right speaker, follow the lower wire, unseating the speaker cable as you go.

  7. Lenovo ThinkPad X1 Yoga (6th Gen) Motherboard Replacement: шаг 7, изображение 1 из 3 Lenovo ThinkPad X1 Yoga (6th Gen) Motherboard Replacement: шаг 7, изображение 2 из 3 Lenovo ThinkPad X1 Yoga (6th Gen) Motherboard Replacement: шаг 7, изображение 3 из 3
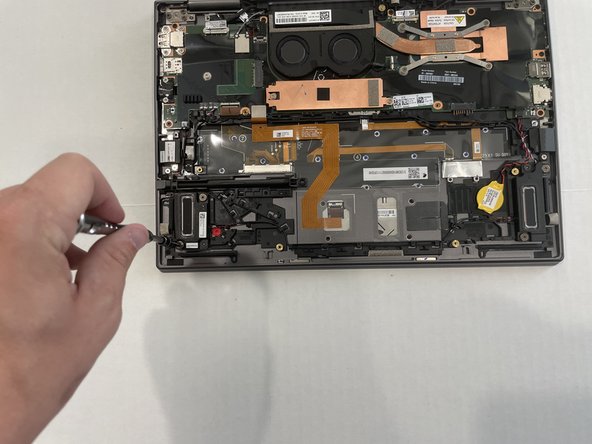
    • Place your fingernails behind each of the plastic tabs on the speaker's plug and pull directly backwards until the plug releases from its port.

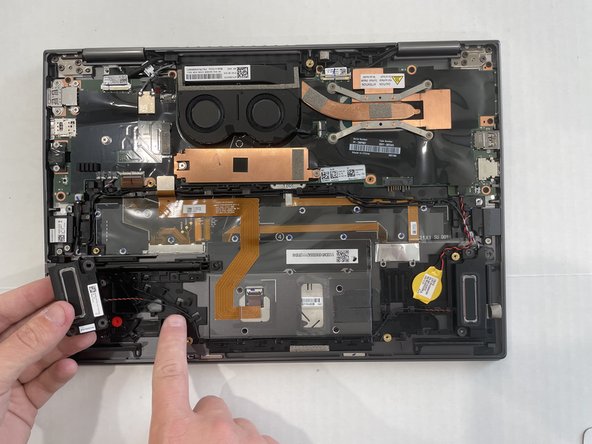
    • Lift the speakers up and out.

  8. Lenovo ThinkPad X1 Yoga (6th Gen) Motherboard Replacement, SSD: шаг 8, изображение 1 из 3 Lenovo ThinkPad X1 Yoga (6th Gen) Motherboard Replacement, SSD: шаг 8, изображение 2 из 3 Lenovo ThinkPad X1 Yoga (6th Gen) Motherboard Replacement, SSD: шаг 8, изображение 3 из 3
    • Use a Phillips #1 screwdriver to remove the two 2.2 mm screws securing the copper plate over the SSD.

    • Lift the copper plate up and out.

  9. Lenovo ThinkPad X1 Yoga (6th Gen) Motherboard Replacement: шаг 9, изображение 1 из 1
    • Gently lift up on the left side of the SSD, then pull it to the left to remove it from its socket.

  10. Lenovo ThinkPad X1 Yoga (6th Gen) Motherboard Replacement, Fan: шаг 10, изображение 1 из 2 Lenovo ThinkPad X1 Yoga (6th Gen) Motherboard Replacement, Fan: шаг 10, изображение 2 из 2
    • Use a Phillips #000 screwdriver to loosen the four 5 mm captive screws.

    • The captive screws will stay attached to the fan as you remove it.

  11. Lenovo ThinkPad X1 Yoga (6th Gen) Motherboard Replacement: шаг 11, изображение 1 из 3 Lenovo ThinkPad X1 Yoga (6th Gen) Motherboard Replacement: шаг 11, изображение 2 из 3 Lenovo ThinkPad X1 Yoga (6th Gen) Motherboard Replacement: шаг 11, изображение 3 из 3
    • Place the pointed tip of a spudger behind the small plastic tab on either side, and "walk" the fan's connector out of its port, alternating between tabs, until the plug disconnects.

    • Lift the fan up and out.

  12. Lenovo ThinkPad X1 Yoga (6th Gen) Motherboard Replacement, Motherboard: шаг 12, изображение 1 из 2 Lenovo ThinkPad X1 Yoga (6th Gen) Motherboard Replacement, Motherboard: шаг 12, изображение 2 из 2
    • Use a Phillips #1 screwdriver to remove the two 5.0 mm screws that secure the headphone jack.

    • Use tweezers to lift the headphone jack to the right to free it from the chassis.

  13. Lenovo ThinkPad X1 Yoga (6th Gen) Motherboard Replacement: шаг 13, изображение 1 из 2 Lenovo ThinkPad X1 Yoga (6th Gen) Motherboard Replacement: шаг 13, изображение 2 из 2
    • Use a Phillips #1 screwdriver to remove the four 3.0 mm screws that secure the USB port.

    • Use tweezers to pull the USB port to the right to free it from the chassis.

  14. Lenovo ThinkPad X1 Yoga (6th Gen) Motherboard Replacement: шаг 14, изображение 1 из 3 Lenovo ThinkPad X1 Yoga (6th Gen) Motherboard Replacement: шаг 14, изображение 2 из 3 Lenovo ThinkPad X1 Yoga (6th Gen) Motherboard Replacement: шаг 14, изображение 3 из 3
    • Use a Phillips #1 screwdriver to remove the nine 3.2 mm screws from the motherboard.

    • Use a plastic spudger to lift the flaps covering the pins. Disconnect the pins from the motherboard.

    • Use a plastic spudger to disconnect the two wires connected to the CPU.

    • Use a plastic spudger to disconnect the pin on the bottom left of the motherboard.

  15. Lenovo ThinkPad X1 Yoga (6th Gen) Motherboard Replacement: шаг 15, изображение 1 из 1
    • Lift up the motherboard on the left hand side.

    • Pull the motherboard to the left to free from the body chassis.

Заключение

To reassemble your device, follow these instructions in reverse order.

Heath Tankersley

Участник с: 10/03/22

109 Репутация

1 руководство автора

Команда

0 Комментариев

Добавить комментарий

Просмотр статистики:

За последние 24часов: 2

За последние 7 дней: 11

За последние 30 дней: 51

За всё время: 811