Перейти к основному содержанию

Lenovo ThinkPad X280 Display Assembly

Выберете то, что вам нужно

  1. Lenovo ThinkPad X280 Display Assembly, Display Assembly: шаг 1, изображение 1 из 1
    • Lay the computer flat on the back of the screen.

  2. Lenovo ThinkPad X280 Display Assembly: шаг 2, изображение 1 из 1
    • Use the metal spudger to pry the screen away from the assembly.

  3. Lenovo ThinkPad X280 Display Assembly: шаг 3, изображение 1 из 1
    • The screen will fold down over the keyboard, exposing the connections.

  4. Lenovo ThinkPad X280 Display Assembly: шаг 4, изображение 1 из 2 Lenovo ThinkPad X280 Display Assembly: шаг 4, изображение 2 из 2
    Инструмент, используемый на этом этапе:
    Tweezers
    $4.99
    Купить
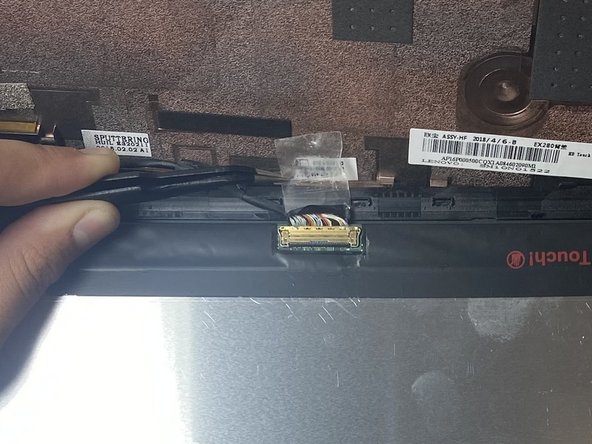
    • Use tweezers to gently remove the tape that secures the connector.

    • Lift the bracket on the bottom of the connector, and gently remove the bundled cable.

  5. Lenovo ThinkPad X280 Display Assembly: шаг 5, изображение 1 из 1
    • Remove the screen.

Заключение

To reassemble your device, follow these instructions in reverse order.

Еще один человек закончил это руководство.

Hannah Bryn Cullen

Участник с: 10/03/22

415 Репутация

Автор 3 руководств

Команда

Один комментарий

Anyone tried modding the screen with a 13.3" screen? I heard the screen part number is N133HCE-GP1, but you need to cut the bezels, and rewire the camera module and stuff.

Azrael - Ответить

Добавить комментарий

Просмотр статистики:

За последние 24часов: 2

За последние 7 дней: 20

За последние 30 дней: 62

За всё время: 1,180