Перейти к основному содержанию

Lenovo Vibe Z2 Pro Battery Replacement

Выберете то, что вам нужно

  1. Lenovo Vibe Z2 Pro Battery Replacement, Lenovo Vibe Z2 Pro Backplate Disassembly: шаг 1, изображение 1 из 2 Lenovo Vibe Z2 Pro Battery Replacement, Lenovo Vibe Z2 Pro Backplate Disassembly: шаг 1, изображение 2 из 2
    • Remove the 4.9 mm torx head screws located on the camera plate on the back of the phone

  2. Lenovo Vibe Z2 Pro Battery Replacement: шаг 2, изображение 1 из 1
    • Remove the 3.65 mm Torx head screws at the bottom of the phone.

  3. Lenovo Vibe Z2 Pro Battery Replacement: шаг 3, изображение 1 из 2 Lenovo Vibe Z2 Pro Battery Replacement: шаг 3, изображение 2 из 2
    • Remove the SIM card tray by pushing a pin into the hole on the side of the phone.

  4. Lenovo Vibe Z2 Pro Battery Replacement: шаг 4, изображение 1 из 2 Lenovo Vibe Z2 Pro Battery Replacement: шаг 4, изображение 2 из 2
    • Push the Spudger along the gap between the phone and the backplate to separate them.

  5. Lenovo Vibe Z2 Pro Battery Replacement: шаг 5, изображение 1 из 1
    • Carefully pull the backplate away from the phone.

  6. Lenovo Vibe Z2 Pro Battery Replacement, Battery: шаг 6, изображение 1 из 2 Lenovo Vibe Z2 Pro Battery Replacement, Battery: шаг 6, изображение 2 из 2
    • Peel away protective the film using your hands.

  7. Lenovo Vibe Z2 Pro Battery Replacement: шаг 7, изображение 1 из 2 Lenovo Vibe Z2 Pro Battery Replacement: шаг 7, изображение 2 из 2
    • Remove any adhesive strips holding the battery in place gently using a fingernail or spudger.

    • The regular black nylon spudger should be used whenever possible, especially around batteries.

  8. Lenovo Vibe Z2 Pro Battery Replacement: шаг 8, изображение 1 из 1
    • Disconnect the orange battery ribbon cable by gently lifting with a spudger.

  9. Lenovo Vibe Z2 Pro Battery Replacement: шаг 9, изображение 1 из 3 Lenovo Vibe Z2 Pro Battery Replacement: шаг 9, изображение 2 из 3 Lenovo Vibe Z2 Pro Battery Replacement: шаг 9, изображение 3 из 3
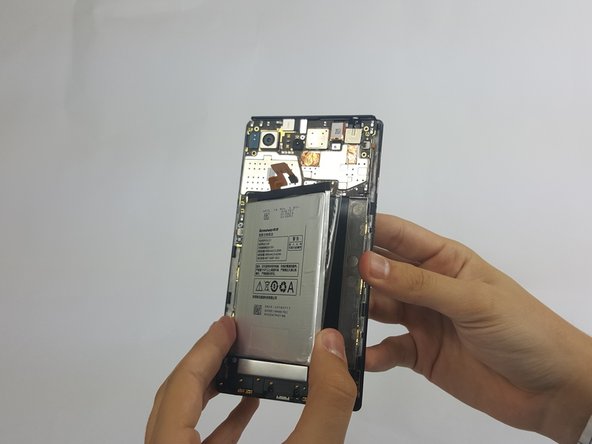
    • Insert a fingernail or spudger into either side of the battery and lift upward.

    • Remove the battery from phone.

Заключение

To reassemble your device, follow these instructions in reverse order.

4 участников успешно повторили данное руководство.

Bryan Sepulveda

Участник с: 09/15/16

547 Репутация

Автор 3 руководств

Команда

USF Tampa, Team 18-3, Blackwell Fall 2016 Участник USF Tampa, Team 18-3, Blackwell Fall 2016

USFT-BLACKWELL-F16S18G3

4 членов

Автор 12 руководств

2 Комментариев

Where to buy such battery?

Damir Dominko - Ответить

wala pa po ba dito s pinas ng bl230?

eduardo santos - Ответить

Добавить комментарий

Просмотр статистики:

За последние 24часов: 0

За последние 7 дней: 5

За последние 30 дней: 12

За всё время: 3,361