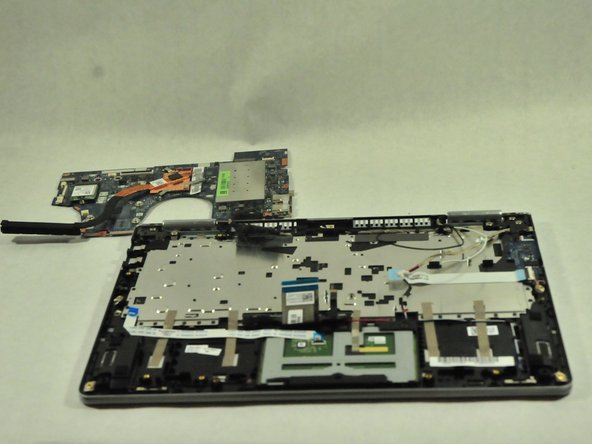
Перейти к основному содержанию

Lenovo Yoga 710-14IKB Motherboard Replacement

Выберете то, что вам нужно

  1. Lenovo Yoga 710-14IKB Motherboard Replacement, Back Cover: шаг 1, изображение 1 из 1
    • Ensure your device is completely OFF before starting this guide.

    • Use a Torx T4 screwdriver to unscrew the nine 5 mm screws holding the cover in place.

    • Use a Torx T4 screwdriver to unscrew the 8 mm screw in the center.

    • When, reassembling, make sure not to tighten the screws too much or you may risk cracking the plastic cover.

  2. Lenovo Yoga 710-14IKB Motherboard Replacement: шаг 2, изображение 1 из 3 Lenovo Yoga 710-14IKB Motherboard Replacement: шаг 2, изображение 2 из 3 Lenovo Yoga 710-14IKB Motherboard Replacement: шаг 2, изображение 3 из 3
    • Use the plastic opening tool to pry the cover up and away from the laptop, starting at one end and working your way around the cover.

    • The cover is large and flat and made of thin plastic. It cracks easily, so make sure not to pry too hard.

  3. Lenovo Yoga 710-14IKB Motherboard Replacement, Battery: шаг 3, изображение 1 из 2 Lenovo Yoga 710-14IKB Motherboard Replacement, Battery: шаг 3, изображение 2 из 2
    • Use a Phillips #00 screwdriver to remove the four 3 mm screws holding the battery in place.

    • Be careful not to cross-thread the screws. Also, don't let the screws fall down into the laptop case.

  4. Lenovo Yoga 710-14IKB Motherboard Replacement: шаг 4, изображение 1 из 2 Lenovo Yoga 710-14IKB Motherboard Replacement: шаг 4, изображение 2 из 2
    • Use your fingers or an opening tool to slide the battery connector out of its motherboard socket.

  5. Lenovo Yoga 710-14IKB Motherboard Replacement: шаг 5, изображение 1 из 1
    • Remove the battery.

  6. Lenovo Yoga 710-14IKB Motherboard Replacement, SSD: шаг 6, изображение 1 из 2 Lenovo Yoga 710-14IKB Motherboard Replacement, SSD: шаг 6, изображение 2 из 2
    • Use a Phillips #00 screwdriver to remove the 3mm screw on the SSD.

  7. Lenovo Yoga 710-14IKB Motherboard Replacement: шаг 7, изображение 1 из 2 Lenovo Yoga 710-14IKB Motherboard Replacement: шаг 7, изображение 2 из 2
    • Use your fingers to lift up the SSD and pull away from the socket removing it from the laptop.

  8. Lenovo Yoga 710-14IKB Motherboard Replacement, Motherboard: шаг 8, изображение 1 из 1
    • Use a PH00 screwdriver to remove the nine 3mm screws.

  9. Lenovo Yoga 710-14IKB Motherboard Replacement: шаг 9, изображение 1 из 2 Lenovo Yoga 710-14IKB Motherboard Replacement: шаг 9, изображение 2 из 2
    • Disconnect the indicated cables from the motherboard.

    • Be careful when removing cables. Do not pull or yank cables from their slots.

    • Remove the motherboard.

    • If you want to fully remove the motherboard, you must desolder the display cable.

Заключение

To reassemble your device, follow these instructions in reverse order.

3 участников успешно повторили данное руководство.

Evan Cruzen

Участник с: 11/01/18

253 Репутация

Автор 2 руководств

Команда

UMass Dartmouth, Team S5-G8, Gulbrandsen Fall 2018 Участник UMass Dartmouth, Team S5-G8, Gulbrandsen Fall 2018

UMASSD-GULBRANDSEN-F18S5G8

3 членов

Автор 9 руководств

0 Комментариев

Добавить комментарий

Просмотр статистики:

За последние 24часов: 0

За последние 7 дней: 8

За последние 30 дней: 17

За всё время: 2,848