Перейти к основному содержанию

Lenovo Yoga 730-13IKB Touchpad Replacement

Выберете то, что вам нужно

  1. Lenovo Yoga 730-13IKB Touchpad Replacement, Back Case: шаг 1, изображение 1 из 3 Lenovo Yoga 730-13IKB Touchpad Replacement, Back Case: шаг 1, изображение 2 из 3 Lenovo Yoga 730-13IKB Touchpad Replacement, Back Case: шаг 1, изображение 3 из 3
    • Power off the laptop and place it facedown on a non-scratching surface.

    • Remove the nine T5 screws fastening the back case.

  2. Lenovo Yoga 730-13IKB Touchpad Replacement: шаг 2, изображение 1 из 3 Lenovo Yoga 730-13IKB Touchpad Replacement: шаг 2, изображение 2 из 3 Lenovo Yoga 730-13IKB Touchpad Replacement: шаг 2, изображение 3 из 3
    • Slide a plastic opening tool underneath the back case near the screen hinges. Gently pry up on either side.

    • Slide the opening tool underneath the back case next to the middle screw hole at either side of the case. Gently pry up.

    • You may hear popping sounds as the tabs securing the case release. This is normal. If the case does not move, try prying at a different angle/position.

  3. Lenovo Yoga 730-13IKB Touchpad Replacement: шаг 3, изображение 1 из 1
    • Remove the back case by pulling up near the screen hinges and lifting diagonally away from the laptop.

    • Go slowly to avoid breaking any connecting tabs.

  4. Lenovo Yoga 730-13IKB Touchpad Replacement, Battery: шаг 4, изображение 1 из 2 Lenovo Yoga 730-13IKB Touchpad Replacement, Battery: шаг 4, изображение 2 из 2
    • Remove the four 3.5mm Phillips #0 screws securing the battery.

  5. Lenovo Yoga 730-13IKB Touchpad Replacement: шаг 5, изображение 1 из 3 Lenovo Yoga 730-13IKB Touchpad Replacement: шаг 5, изображение 2 из 3 Lenovo Yoga 730-13IKB Touchpad Replacement: шаг 5, изображение 3 из 3
    • Disconnect the battery cable by gently pulling it straight out of the connector.

    • The battery connector does not lock and requires light pressure to insert and remove. To reinstall the battery cable, hold onto the black housing and push it into the motherboard connector.

  6. Lenovo Yoga 730-13IKB Touchpad Replacement: шаг 6, изображение 1 из 3 Lenovo Yoga 730-13IKB Touchpad Replacement: шаг 6, изображение 2 из 3 Lenovo Yoga 730-13IKB Touchpad Replacement: шаг 6, изображение 3 из 3
    • Remove the battery by pulling up near the white label and lifting diagonally away from the laptop.

    • Consider using a plastic opening tool to gently pry up near the white label if the battery seems stuck.

    • To reinstall the battery, carefully align its mounting holes with the plastic pins on the laptop frame.

  7. Lenovo Yoga 730-13IKB Touchpad Replacement, Touchpad: шаг 7, изображение 1 из 2 Lenovo Yoga 730-13IKB Touchpad Replacement, Touchpad: шаг 7, изображение 2 из 2
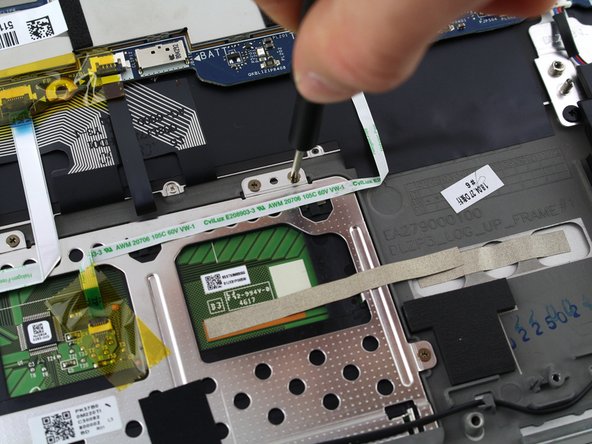
    • Use a Phillips #00 screwdriver to remove the six 2.5mm screws holding down the touch pad.

  8. Lenovo Yoga 730-13IKB Touchpad Replacement: шаг 8, изображение 1 из 1
    • Peel back the fabric adhesive strap holding the speaker wire to the touchpad.

    • Using light heat from a hairdryer or heat gun may help loosen the adhesive.

  9. Lenovo Yoga 730-13IKB Touchpad Replacement: шаг 9, изображение 1 из 1
    • Peel off the fingerprint sensor cable glued to the top of the touchpad.

    • Light heat from a hairdryer or heat gun may help loosen the adhesive.

  10. Lenovo Yoga 730-13IKB Touchpad Replacement: шаг 10, изображение 1 из 1
    • Slightly pull up the metal strap connecting the touchpad and the laptop frame.

    • The metal strap is not glued down and only needs to be disconnected, not removed, from the laptop frame.

  11. Lenovo Yoga 730-13IKB Touchpad Replacement: шаг 11, изображение 1 из 3 Lenovo Yoga 730-13IKB Touchpad Replacement: шаг 11, изображение 2 из 3 Lenovo Yoga 730-13IKB Touchpad Replacement: шаг 11, изображение 3 из 3
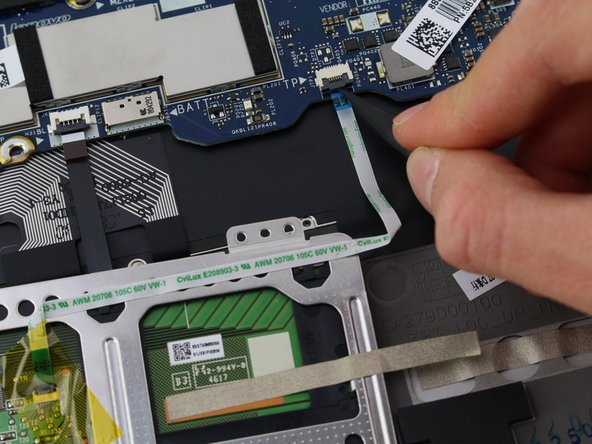
    • Peel the yellow tape off of the touchpad connector.

    • Gently push the gray tab up on the connector using a spudger. Pull out the cable.

  12. Lenovo Yoga 730-13IKB Touchpad Replacement: шаг 12, изображение 1 из 1
    • Hold the top of the touchpad and gently pull up.

    • Lift the touchpad diagonally away from the laptop.

    • The laptop screen is now visible through the touchpad cutout. Be careful not to drop anything on it.

Заключение

To reassemble your device, follow these instructions in reverse order.

Colin Reay

Участник с: 01/23/20

848 Репутация

Автор 5 руководств

Команда

Cal Poly, Team S1-G1, White Winter 2020 Участник Cal Poly, Team S1-G1, White Winter 2020

CPSU-WHITE-W20S1G1

3 членов

Автор 14 руководств

0 Комментариев

Добавить комментарий

Просмотр статистики:

За последние 24часов: 1

За последние 7 дней: 8

За последние 30 дней: 24

За всё время: 1,047