Введение
Follow this guide to replace the fingerprint reader in your Lenovo Yoga 910-13IKB. If you have ensured that the finger you are trying to sign in with has been properly registered and the reader is clean of any grease or debris, but the reader still fails to correctly recognize your finger, it may need to be replaced. While this replacement is one of the longer ones in terms of time for this device, it is still quick and easy to do, requiring only a JIS #00 screwdriver.
Выберете то, что вам нужно
-
-
Turn the laptop over and remove the ten Torx T5 screws along the perimeter of the bottom panel.
-
Remove the panel.
-
-
-
Remove all 4 screws attached to the battery with a small Phillips head screwdriver.
-
Each screw on the back is M2 x 1.7mm
-
After the screws are taken out, remove the battery.
-
-
-
Remove all 6 screws attached to the trackpad with a small Phillips head screwdriver.
-
Each screw on the back is M2 x 1.7mm
-
Detach the ribbon cable connected to the trackpad using a wedge device.
-
Remove the trackpad using a wedge device
-
-
-
Remove all 6 screws attached to the USB ports on both sides of the device with a small Philips head screwdriver.
-
Detach both ribbon cables attached to each USB port with a wedge device, then detach the USB ports.
-
-
-
-
Remove all 4 screws attached to SSD stick with a small Phillips head screwdriver.
-
Pull the SSD stick directly to the right until it shifts out of place to remove it.
-
The storage chip above it (further away from you) may also simply be detached by pulling it directly to the right until it clicks out.
-
-
-
Remove all 4 screws attached to both fans, and the back connector strip (long metal piece furthest from you with screws in it) with a small Phillips head screwdriver
-
Remove the back connector strip using a wedge device to pry it off of the device
-
With the back connector strip removed, pry the fans (which are attached) using a wedge device and the fans will now be maintainable.
-
-
-
Disconnect the battery cable from its motherboard socket by gently pulling it towards the battery. The spudger tool may be needed to lift the flap seal.
-
Lift the battery out.
-
-
-
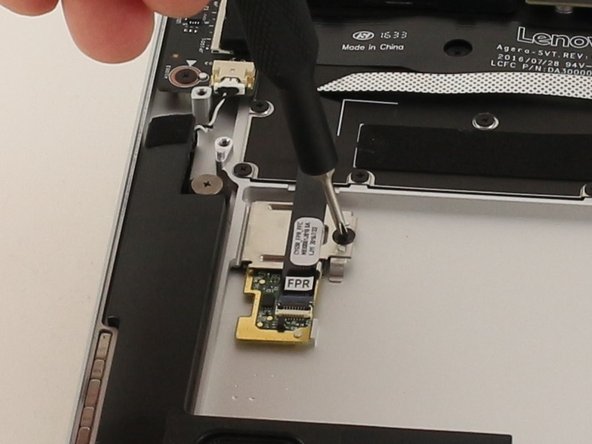
Remove the one 3mm JIS #00 screw on the right side of the silver component.
-
-
-
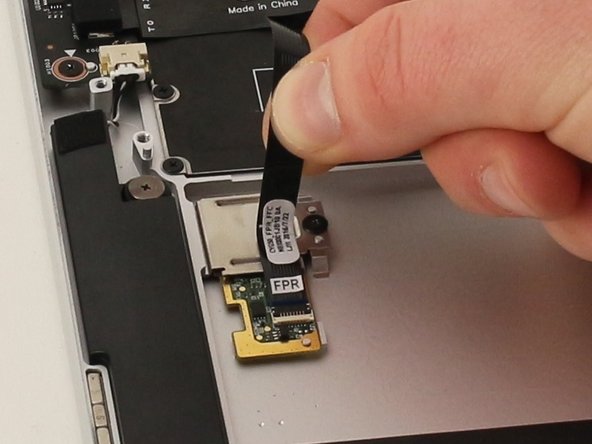
Lift the metal housing out and set it aside. This component holds the reader in place.
-


To reassemble your device, follow these instructions in reverse order.
To reassemble your device, follow these instructions in reverse order.
Отменить: Я не выполнил это руководство.
Еще один человек закончил это руководство.

Команда

Cal Poly, Team S1-G5, White Winter 2020 Участник Cal Poly, Team S1-G5, White Winter 2020
CPSU-WHITE-W20S1G5
4 членов
Автор 14 руководств