Перейти к основному содержанию

Lenovo Yoga 920-13IKB Screen Replacement

Выберете то, что вам нужно

  1. Lenovo Yoga 920-13IKB Screen Replacement, Screen: шаг 1, изображение 1 из 3 Lenovo Yoga 920-13IKB Screen Replacement, Screen: шаг 1, изображение 2 из 3 Lenovo Yoga 920-13IKB Screen Replacement, Screen: шаг 1, изображение 3 из 3
    • Rotate the device into tablet mode so the device’s screen is facing up.

  2. Lenovo Yoga 920-13IKB Screen Replacement: шаг 2, изображение 1 из 3 Lenovo Yoga 920-13IKB Screen Replacement: шаг 2, изображение 2 из 3 Lenovo Yoga 920-13IKB Screen Replacement: шаг 2, изображение 3 из 3
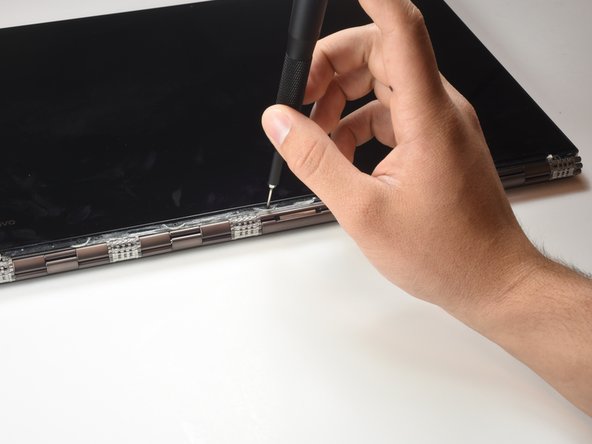
    • Pry the metal cover up from the bottom of the screen with the iFixit Opening Tool to reveal the corners of the white adhesive strip.

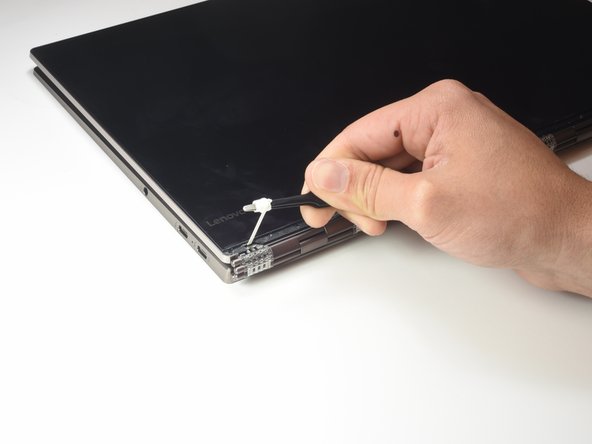
    • Pull the metal cover off the device until it's completely free.

    • Clean off the old adhesive and straighten the metal cover when reassembling.

    • Use a new adhesive when reassembling.

    • Avoid bending the metal cover to prevent damage to the device.

    • If you’re really struggling, you may pry from the opposite side, but be careful not to damage the screen or metal cover.

  3. Lenovo Yoga 920-13IKB Screen Replacement: шаг 3, изображение 1 из 2 Lenovo Yoga 920-13IKB Screen Replacement: шаг 3, изображение 2 из 2
    • Remove the eight 3mm Phillips #000 screws that were below the metal cover to loosen the screen.

  4. Lenovo Yoga 920-13IKB Screen Replacement: шаг 4, изображение 1 из 3 Lenovo Yoga 920-13IKB Screen Replacement: шаг 4, изображение 2 из 3 Lenovo Yoga 920-13IKB Screen Replacement: шаг 4, изображение 3 из 3
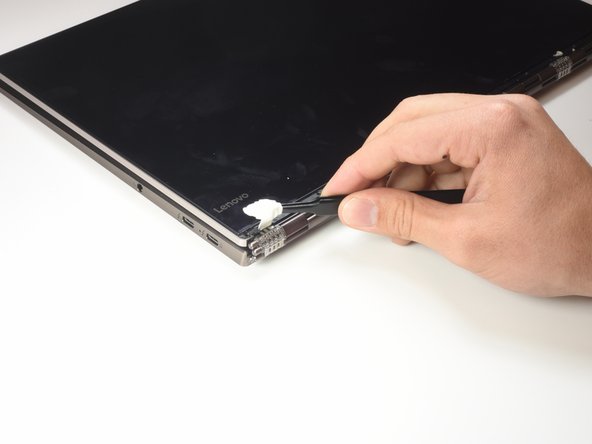
    • Pull out the white adhesives using the iFixit Tweezers.

    • Roll the tape around the iFixit Tweezers to remove successfully.

  5. Lenovo Yoga 920-13IKB Screen Replacement: шаг 5, изображение 1 из 1
    • Pry up the screen with the iFixit Opening Tool.

  6. Lenovo Yoga 920-13IKB Screen Replacement: шаг 6, изображение 1 из 2 Lenovo Yoga 920-13IKB Screen Replacement: шаг 6, изображение 2 из 2
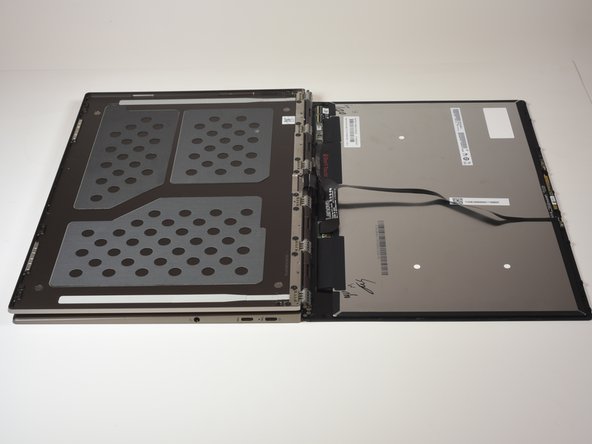
    • Lift the screen with your hands and place the the screen face down, keeping the device in the same location.

  7. Lenovo Yoga 920-13IKB Screen Replacement: шаг 7, изображение 1 из 1
    • Flip up the black tab on the connector at the top of the screen with the iFixit Opening Tool.

  8. Lenovo Yoga 920-13IKB Screen Replacement: шаг 8, изображение 1 из 1
    • Use the iFixit Tweezers to remove the ribbon cable from the connector.

  9. Lenovo Yoga 920-13IKB Screen Replacement: шаг 9, изображение 1 из 1
    • Flip up the black tab on the smallest connector at the bottom of the screen with the iFixit Opening Tool.

  10. Lenovo Yoga 920-13IKB Screen Replacement: шаг 10, изображение 1 из 1
    • Use the iFixit Tweezers to remove the ribbon cable from the connector.

  11. Lenovo Yoga 920-13IKB Screen Replacement: шаг 11, изображение 1 из 1
    • Flip up the thick black cable at the bottom of the screen with your thumb.

    • Use the iFixit Opening Tool to lift up the brass tab to free up the cable.

  12. Lenovo Yoga 920-13IKB Screen Replacement: шаг 12, изображение 1 из 1
    • Remove the ribbon cable from the connector to detach the screen from the device.

Заключение

To reassemble your device, follow these instructions in reverse order.

Еще один человек закончил это руководство.

Alyssa McCulloch

Участник с: 01/24/19

1 906 Репутация

Автор 9 руководств

Команда

Cal Poly, Team S2-G3, White Winter 2019 Участник Cal Poly, Team S2-G3, White Winter 2019

CPSU-WHITE-W19S2G3

4 членов

Автор 29 руководств

5 Комментариев

Does this also appy to the Yoga 910-13IBK?

Tony Salazar - Ответить

Alyssa, I am about to tackle this job to replace a cracked screen - I greatly appreciate your guide. In step 2 you recommend using new adhesive. What adhesive is recommended exactly?

Bradley Buege - Ответить

See this youtube video from Lenovo on LCD tape, how to find what kind, how to remove it, and how to reapply it.

https://www.youtube.com/watch?v=EeUM312_...

Robert -

You missed the camera transfer step. I completed the screen replacement only to find no camera for Zoom. Then realized the this procedure didn’t cover the camera transfer.

ddurbin1 - Ответить

Ok, 15 minutes to complete this is ridiculous. A seasoned person couldn't do this in 15 minutes, especially when removing and replacing adhesive, etc. That must be a typo.

Syber Geek - Ответить

Добавить комментарий

Просмотр статистики:

За последние 24часов: 1

За последние 7 дней: 7

За последние 30 дней: 34

За всё время: 5,545