Перейти к основному содержанию

Lenovo Yoga C930-13IKB Coolant Fan Replacement

Выберете то, что вам нужно

  1. Lenovo Yoga C930-13IKB Coolant Fan Replacement, Back Cover: шаг 1, изображение 1 из 1
    • Flip the device over so that the underside is facing up.

    • Remove the six 3.5 mm T5 Torx screws.

  2. Lenovo Yoga C930-13IKB Coolant Fan Replacement: шаг 2, изображение 1 из 2 Lenovo Yoga C930-13IKB Coolant Fan Replacement: шаг 2, изображение 2 из 2
    • Pry off the back cover using the plastic opening tool.

    • Loosen the back cover in multiple spots using the opening tool, then remove the whole back.

    • You may have to run the plastic tool along the edges until you find a small gap to separate the back cover from the laptop.

    • Do not use a metal tool when working with your device.

  3. Lenovo Yoga C930-13IKB Coolant Fan Replacement: шаг 3, изображение 1 из 2 Lenovo Yoga C930-13IKB Coolant Fan Replacement: шаг 3, изображение 2 из 2
    • Carefully lift the cover off with your hands.

  4. Lenovo Yoga C930-13IKB Coolant Fan Replacement, Coolant Fans: шаг 4, изображение 1 из 1
    • Remove the four 3 mm Phillips #0 screws from the fan assembly.

  5. Lenovo Yoga C930-13IKB Coolant Fan Replacement: шаг 5, изображение 1 из 1
    • Remove the four 2 mm Phillips #00 screws from the fans themselves.

  6. Lenovo Yoga C930-13IKB Coolant Fan Replacement: шаг 6, изображение 1 из 1
    • Unscrew the three 3 mm Phillips #0 screws on the heatsink.

  7. Lenovo Yoga C930-13IKB Coolant Fan Replacement: шаг 7, изображение 1 из 2 Lenovo Yoga C930-13IKB Coolant Fan Replacement: шаг 7, изображение 2 из 2
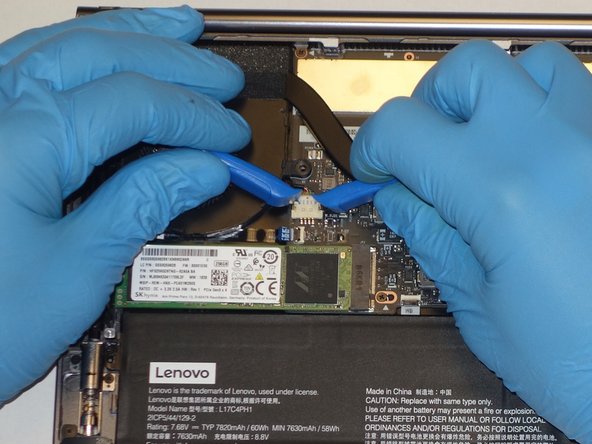
    • Use a plastic opening tool to remove the two small, white power cable connectors for each of the two fans.

  8. Lenovo Yoga C930-13IKB Coolant Fan Replacement: шаг 8, изображение 1 из 1
    • Gently lift the fan assembly out of the laptop.

    • Be sure to clean and reapply thermal paste to the heatsink during reassembly.

Заключение

To reassemble your device, follow these instructions in reverse order. Remember to apply fresh thermal paste to the heatsink during reassembly.

Еще один человек закончил это руководство.

Josiah Grayson Sawyer

Участник с: 09/17/20

514 Репутация

Автор 3 руководств

0 Комментариев

Добавить комментарий

Просмотр статистики:

За последние 24часов: 1

За последние 7 дней: 17

За последние 30 дней: 55

За всё время: 1,403