Перейти к основному содержанию

Logitech Extreme 3D Pro Main Joystick Spring Replacement

Выберете то, что вам нужно

  1. Logitech Extreme 3D Pro Main Joystick Spring Replacement, Disassembly of the handle: шаг 1, изображение 1 из 1
    • Remove these three Phillips #1 screws:

    • Two 10mm screws.

    • One 7mm screw.

  2. Logitech Extreme 3D Pro Main Joystick Spring Replacement: шаг 2, изображение 1 из 1
    • Using your fingers, lower the rubber boot to reveal two screws underneath the joystick.

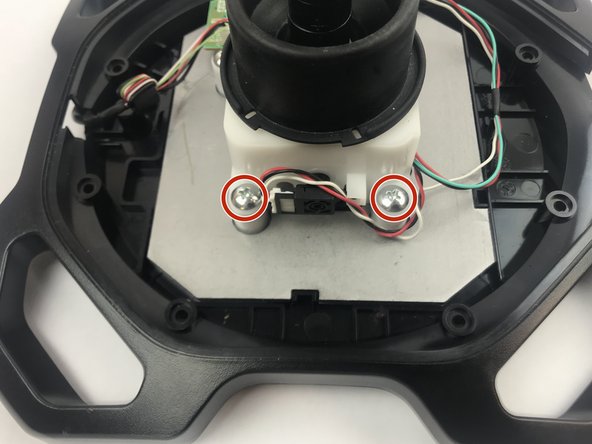
    • Remove the two 10mm Phillips #1 screws.

  3. Logitech Extreme 3D Pro Main Joystick Spring Replacement: шаг 3, изображение 1 из 2 Logitech Extreme 3D Pro Main Joystick Spring Replacement: шаг 3, изображение 2 из 2
    • Pull apart the joystick chassis by hand.

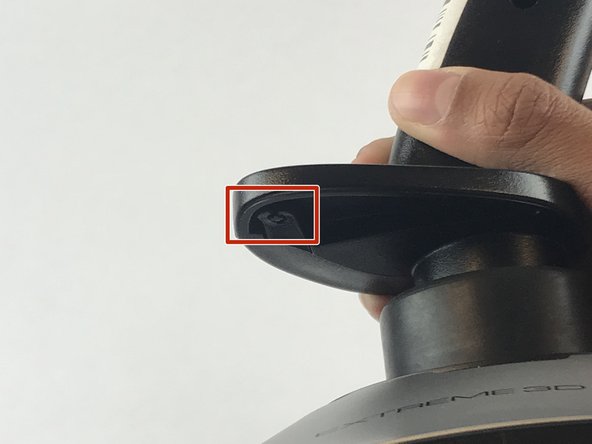
    • Release this clip located underneath the hand rest

    • The circuit board will be loose and may fall down.

  4. Logitech Extreme 3D Pro Main Joystick Spring Replacement, Disassembly of the base: шаг 4, изображение 1 из 1
    • Remove the eight 10mm Phillips #1 screws from the bottom.

  5. Logitech Extreme 3D Pro Main Joystick Spring Replacement: шаг 5, изображение 1 из 3 Logitech Extreme 3D Pro Main Joystick Spring Replacement: шаг 5, изображение 2 из 3 Logitech Extreme 3D Pro Main Joystick Spring Replacement: шаг 5, изображение 3 из 3
    • Flip the joystick upright.

    • Lift up the sliver base cover and feed the loose circuit board through.

    • Careful with the wires still attached to the silver base cover from the bottom of the joystick.

  6. Logitech Extreme 3D Pro Main Joystick Spring Replacement, Main Joystick Spring: шаг 6, изображение 1 из 2 Logitech Extreme 3D Pro Main Joystick Spring Replacement, Main Joystick Spring: шаг 6, изображение 2 из 2
    • Disconnect the wire from the motherboard.

  7. Logitech Extreme 3D Pro Main Joystick Spring Replacement: шаг 7, изображение 1 из 2 Logitech Extreme 3D Pro Main Joystick Spring Replacement: шаг 7, изображение 2 из 2
    • Remove this plug from the motherboard.

  8. Logitech Extreme 3D Pro Main Joystick Spring Replacement: шаг 8, изображение 1 из 2 Logitech Extreme 3D Pro Main Joystick Spring Replacement: шаг 8, изображение 2 из 2
    • Remove the four 10mm Phillips #1 screws from the joystick base.

  9. Logitech Extreme 3D Pro Main Joystick Spring Replacement: шаг 9, изображение 1 из 1
    • Remove the joystick assembly.

  10. Logitech Extreme 3D Pro Main Joystick Spring Replacement: шаг 10, изображение 1 из 1
    • Remove the white plastic piece on top of the spring.

    • The white plastic will be covered in a lubricant.

  11. Logitech Extreme 3D Pro Main Joystick Spring Replacement: шаг 11, изображение 1 из 1
    • Remove the Spring

    • The spring will be covered in lubricant.

Заключение

To reassemble your device, follow these instructions in reverse order.

5 участников успешно повторили данное руководство.

Emanuel Canela

Участник с: 01/25/18

1 297 Репутация

Автор 7 руководств

Команда

USF Tampa, Team S7-G1, Passmore Spring 2018 Участник USF Tampa, Team S7-G1, Passmore Spring 2018

USFT-PASSMORE-S18S7G1

4 членов

Автор 7 руководств

6 Комментариев

um, what kind of spring is that and where/how would I get a replacement?

Swift Foxe - Ответить

Where can I find a replacement spring?

ande3224@bellsouth.net - Ответить

Anyone found a source for replacement springs?

Chandler - Ответить

You can cut the top 360 degrees off the spring with a Dremel cutoff tool, that reduces the work require to operate the stick by about half.

Frank Clarke - Ответить

Добавить комментарий

Просмотр статистики:

За последние 24часов: 5

За последние 7 дней: 34

За последние 30 дней: 109

За всё время: 11,269