Перейти к основному содержанию

Logitech G500 Cord Replacement

Выберете то, что вам нужно

  1. Logitech G500 Cord Replacement, Cord: шаг 1, изображение 1 из 1
    • It's very common for this cord to fray with continued use. Let's open up this mouse and replace the cord!

    It is a poor design. They should have put a rubber booth on the cable.

    pbartkovjak - Ответить

  2. Logitech G500 Cord Replacement: шаг 2, изображение 1 из 3 Logitech G500 Cord Replacement: шаг 2, изображение 2 из 3 Logitech G500 Cord Replacement: шаг 2, изображение 3 из 3
    • Pry off the three feet to reveal screws.

    • It is easy to split the pads in half so make sure your spudger gets underneath both layers.

    A knife will do too. Just be careful.

    pbartkovjak - Ответить

  3. Logitech G500 Cord Replacement: шаг 3, изображение 1 из 2 Logitech G500 Cord Replacement: шаг 3, изображение 2 из 2
    • Locate the hidden screw hole behind the Logitech sticker.

    • Puncture the sticker to access the screw.

    • Sometimes the screw head will not be removable because the sticker may get in the way. This is fine; just make sure the screw stays inside and you don't lose it.

    • Remove all five Phillips screws.

  4. Logitech G500 Cord Replacement: шаг 4, изображение 1 из 1
    • Now, or at any time, you may wish to remove the weighted cartridge inside of the mouse. It is best if you do it at or before this step, but it is not necessary.

  5. Logitech G500 Cord Replacement: шаг 5, изображение 1 из 1
    • With all screws removed, carefully pry the top of the mouse away from the body.

    • There is a cable securing the top of the mouse to the body. Do not remove the case too far or this may break.

  6. Logitech G500 Cord Replacement: шаг 6, изображение 1 из 2 Logitech G500 Cord Replacement: шаг 6, изображение 2 из 2
    • Using a spudger, lift the ZIF cable guard.

    • Remove the cable from the upper housing. The upper housing can now be set aside.

    • On the bottom right of the top circuit board is a revision number. The rev. 3 mouse has a soldered red wire between this board and the top half of the mouse. For rev. 3 mice, leave the ZIF cable in place and proceed.

  7. Logitech G500 Cord Replacement: шаг 7, изображение 1 из 2 Logitech G500 Cord Replacement: шаг 7, изображение 2 из 2
    • Remove the three Phillips screws to free the weight cartridge holder.

    • Lift the weight cartridge holder from the body.

  8. Logitech G500 Cord Replacement: шаг 8, изображение 1 из 2 Logitech G500 Cord Replacement: шаг 8, изображение 2 из 2
    • Pry the pin securing the mouse wheel and housing to the left.

    • Remove the mouse wheel and housing.

    • Save the two tiny springs under the wheel in a safe place until reassembly. Not reinstalling these springs will cause the mouse to malfunction.

    The springs go in the very front, on top of the transparent piece. It was hard for me to figure out the latest time around :)

    Adam Hintz - Ответить

  9. Logitech G500 Cord Replacement: шаг 9, изображение 1 из 1
    • Remove the two parallel screws holding a black piece of plastic to the mouse body.

  10. Logitech G500 Cord Replacement: шаг 10, изображение 1 из 2 Logitech G500 Cord Replacement: шаг 10, изображение 2 из 2
    • Remove two screws securing the bottom circuit board to the bottom plate of the mouse.

    This screw is a bit tricky during reassembly. A magnetized screwdriver tip did the trick.

    pbartkovjak - Ответить

  11. Logitech G500 Cord Replacement: шаг 11, изображение 1 из 2 Logitech G500 Cord Replacement: шаг 11, изображение 2 из 2
    • Remove the final two Phillips screws near the top of the mouse holding the circuit boards to the plate.

    • There is a transparent plastic part between the two boards. Remember to reinstall this during reassembly.

    Yes, the transparent piece goes between the boards and needs to be reinserted before the boards are secured to the black bottom case.

    pbartkovjak - Ответить

  12. Logitech G500 Cord Replacement: шаг 12, изображение 1 из 3 Logitech G500 Cord Replacement: шаг 12, изображение 2 из 3 Logitech G500 Cord Replacement: шаг 12, изображение 3 из 3
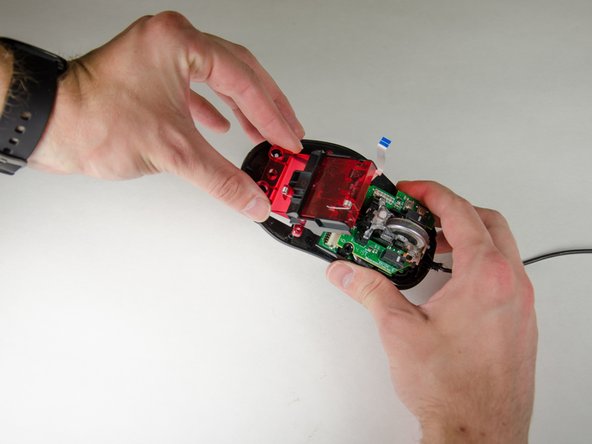
    • Pull the circuit boards loose from the bottom plate.

    • You may need to use a spudger to pry the circuit free.

    • The mouse cable is glued to the bottom plate, so do not quickly yank the circuit boards away.

    • The circuit boards are not very strongly attached to each other; do not pull hard on the top board or they may separate, damaging the device.

  13. Logitech G500 Cord Replacement: шаг 13, изображение 1 из 1
    • Carefully pry on each side of the mouse connector until the cable comes free.

    • Since you don't care about the condition of the cable after you're done, an occasional light tug on the cable will help you determine if it is loose enough to be freed.

    A flat screwdriver did the trick here for me.

    pbartkovjak - Ответить

Заключение

To reassemble your device, follow these instructions in reverse order.

29 участников успешно повторили данное руководство.

Adam Hintz

Участник с: 04/12/10

2 547 Репутация

1 руководство автора

14 Комментариев

Very helpful guide, thanks.

heretik - Ответить

thanks for the explanations.

pcinpact - Ответить

Thanks for the guide! Despite being super careful with the springs they managed to flick out when I was screwing the circuit board back in, one was never to be seen again. Thankfully the middle mouse button seems to work fine with just one!

Davios Sparr - Ответить

No way would have been able to successfully replace the cable without this guide. Thanks for the very detailed steps, and clear pictures!

Al Y - Ответить

I concur… Really helpful and easy to follow. And you saved me about $50 on a new mouse

John B - Ответить

Hi, Phillips #00 Screwdriver didn’t work for me after step8. P00 doesn’t loose those screws, Only its tip is touching to screws, the hole on the screw head is too shallow. Any suggestions?

endererisen - Ответить

Alternative tools:

Philips screwdriver, knife and flat screwdriver, magnetic screwdriver tip

pbartkovjak - Ответить

Inside my G500 there's an additional wire soldered between the main PCB and the one that holds the side buttons. It has enough length to allow for disassembly but I did have to take care not to pull on it.

Yuki Saitou (YukiS) - Ответить

What are the switch model used for the scroll wheel side click buttons (labeled SW7 and SW8) on the board? I want to get them replaced.

Wantei Warjri - Ответить

Is there a way to fix the cable instead of replacing it?

Kleber Martins - Ответить

I used this guide to re-solder the clicker components. My mouse is back to life. Thank you so much!

I will leave a couple notes for who may have other problems like myself.

1. if you rip the zif cable, it’s a standard 10 pin ZIF (sometimes referred to as FLEX) cable, contacts on same side, width 0.5cm, length anything above 6cm will do, I got 10.

2. Clicker components are available on ebay or aliexpress with the model number D2FC-F-7N. Didn’t try dissecting other mouses, the feel just wouldn’t be the same.

Alp Sayin - Ответить

Awsome tutorial! Thanks man.

Alexander Anachkov - Ответить

Thanks - This guide did the trick, my cable was frayed and disconnecting/reconnecting. £5 cable from eBay with replacement feet pads too.

Nigel - Ответить

Добавить комментарий

Просмотр статистики:

За последние 24часов: 2

За последние 7 дней: 13

За последние 30 дней: 69

За всё время: 25,435