Перейти к основному содержанию

Logitech G700s Left and Right Mouse Button Disassembly

Выберете то, что вам нужно

  1. Logitech G700s Left and Right Mouse Button Disassembly, Top Case Replacement: шаг 1, изображение 1 из 1
    • Remove the batteries from the mouse.

    • Use a plastic opening tool to peel up the four mouse feet.

  2. Logitech G700s Left and Right Mouse Button Disassembly: шаг 2, изображение 1 из 2 Logitech G700s Left and Right Mouse Button Disassembly: шаг 2, изображение 2 из 2
    • Remove the five 5.5mm Phillips #00 screws found underneath the mouse feet.

  3. Logitech G700s Left and Right Mouse Button Disassembly: шаг 3, изображение 1 из 3 Logitech G700s Left and Right Mouse Button Disassembly: шаг 3, изображение 2 из 3 Logitech G700s Left and Right Mouse Button Disassembly: шаг 3, изображение 3 из 3
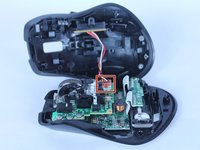
    • Pull the top of the mouse off of the bottom half.

    • There's a wire connecting the two halves.

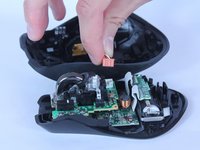
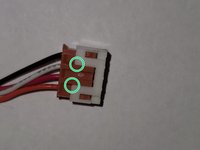
    • Unplug the programmable buttons from the motherboard.

    • The white pin housing on the motherboard may come off while unplugging. In that case, use tool to pry between at location indicated to separate them and insert the housing back onto the motherboard.

  4. Logitech G700s Left and Right Mouse Button Disassembly, Logitech G700s Left and Right Mouse Button Disassembly: шаг 4, изображение 1 из 2 Logitech G700s Left and Right Mouse Button Disassembly, Logitech G700s Left and Right Mouse Button Disassembly: шаг 4, изображение 2 из 2
    • Pop the right button piston off the ledge thingy

    • Then pop the left button piston off

    • It can take a bit of force to pop them off.

  5. Logitech G700s Left and Right Mouse Button Disassembly: шаг 5, изображение 1 из 2 Logitech G700s Left and Right Mouse Button Disassembly: шаг 5, изображение 2 из 2
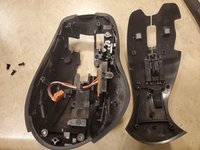
    • Remove the three Philips head screws holding the left and right button clicker in place

  6. Logitech G700s Left and Right Mouse Button Disassembly: шаг 6, изображение 1 из 2 Logitech G700s Left and Right Mouse Button Disassembly: шаг 6, изображение 2 из 2
    • Remove the left and right button & G13 & scroll wheel lock assembly from the top shell assembly.

    • You can push on indicated locations to gain leverage

Заключение

To reassemble your device, follow these instructions in reverse order.

dennis97519

Участник с: 10/18/11

450 Репутация

Автор 3 руководств

0 Комментариев

Добавить комментарий

Просмотр статистики:

За последние 24часов: 0

За последние 7 дней: 15

За последние 30 дней: 44

За всё время: 1,727