Введение
disassembling the desk-speaker of the Logitech Z4 to access the driver and soldering points of the cable.
as you can see my speakers are quite old (around 2007 i belive) and the dissassembly did leave some more scratches and nicks, nothing that influenced the function of the speaker though.
the goal of the disassembly was to replace the cable that had a short close to the plug located at the sub-woofer.
Выберете то, что вам нужно
-
-
Use a PH2 screwdriver to remove the two screws on the back of the speaker.
-
the speaker has a cinch connector to plug in to the sub-woofer.
-
-
-
removing the decorative front panel with a plastic pick (guitar picks work great). it is quite sturdy but the adhesive film on the back of it is strong, so go slow or heat it up with a hairdryer.
-
-
-
-
removing the main screws for the speaker housing. using the same driver (PH2) we can remove the 8 screws holding the main speaker assembly together.
-
-
-
opening the speaker housing by prying it up evenly on all sides with the plastic pick.
-
it can be tapped lightly on the desk to make it fall out at the end of the process.
-
-
-
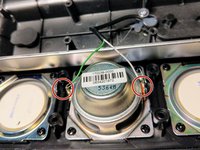
after opening the speaker fully you can see that the top and bottom membranes are not speakers, only decoration.
-
the middle one is connected with two wires matching the cinch connector on the cable.
-
the cable has a screw and some hot glue acting as a strain release for the cable.
-


To reassemble your device, follow these instructions in reverse order.
Отменить: Я не выполнил это руководство.
6 человек успешно провели ремонт по этому руководству.