Перейти к основному содержанию

Mac Pro Late 2013 CMOS Battery Replacement

Выберете то, что вам нужно

  1. Mac Pro Late 2013 CMOS Battery Replacement, Outer Case: шаг 1, изображение 1 из 2 Mac Pro Late 2013 CMOS Battery Replacement, Outer Case: шаг 1, изображение 2 из 2
    • Slide the lock switch to the right, to the unlocked position.

  2. Mac Pro Late 2013 CMOS Battery Replacement: шаг 2, изображение 1 из 3 Mac Pro Late 2013 CMOS Battery Replacement: шаг 2, изображение 2 из 3 Mac Pro Late 2013 CMOS Battery Replacement: шаг 2, изображение 3 из 3
    • Lift the outer case straight up off the Mac Pro.

    • It may help to push down on the center of the fan while lifting the case up.

  3. Mac Pro Late 2013 CMOS Battery Replacement, Fan Assembly: шаг 3, изображение 1 из 3 Mac Pro Late 2013 CMOS Battery Replacement, Fan Assembly: шаг 3, изображение 2 из 3 Mac Pro Late 2013 CMOS Battery Replacement, Fan Assembly: шаг 3, изображение 3 из 3
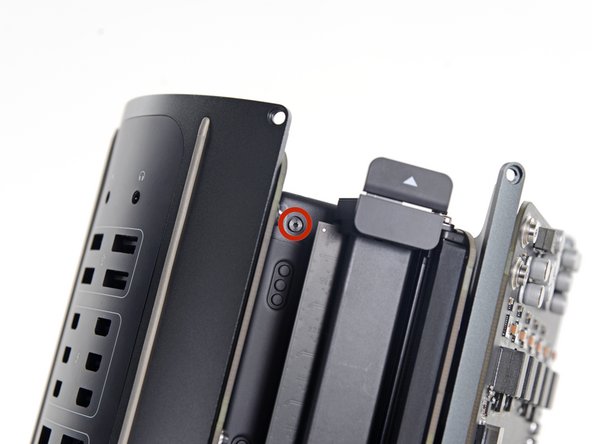
    • Remove five 5.1 mm T10 Torx screws from around the outer perimeter of the fan assembly.

  4. Mac Pro Late 2013 CMOS Battery Replacement: шаг 4, изображение 1 из 2 Mac Pro Late 2013 CMOS Battery Replacement: шаг 4, изображение 2 из 2
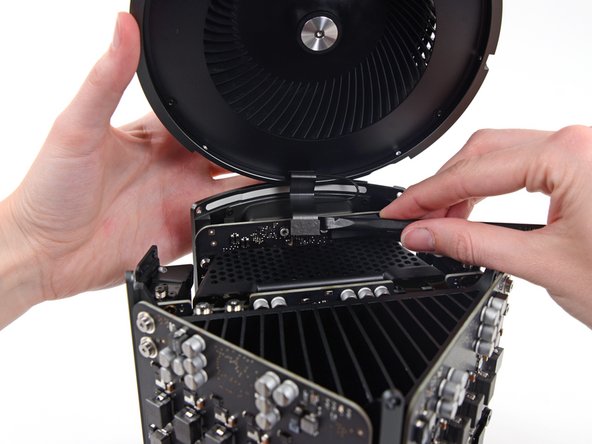
    • The fan assembly is attached to the rest of the computer by two cables on the IO board side.

    • Tilt the assembly up away from the IO board.

    • Do not try to remove the fan assembly yet, as it is still attached by two cables.

  5. Mac Pro Late 2013 CMOS Battery Replacement: шаг 5, изображение 1 из 1
    • While supporting the fan assembly with one hand, loosen the two T8 captive screws in the fan cable bracket.

    • These screws are captive in the Mac Pro. Do not try to remove these screws from your Mac Pro.

  6. Mac Pro Late 2013 CMOS Battery Replacement: шаг 6, изображение 1 из 1
    • Use a pair of tweezers to pull the fan cable bracket away from the fan assembly.

  7. Mac Pro Late 2013 CMOS Battery Replacement: шаг 7, изображение 1 из 2 Mac Pro Late 2013 CMOS Battery Replacement: шаг 7, изображение 2 из 2
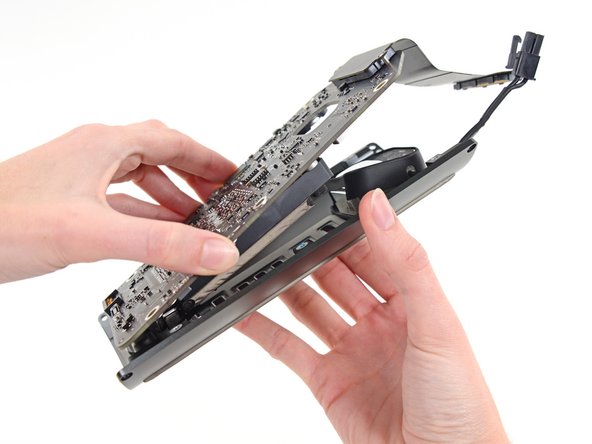
    • Use the flat end of a spudger to disconnect the fan assembly ribbon cable from the IO board.

  8. Mac Pro Late 2013 CMOS Battery Replacement: шаг 8, изображение 1 из 1
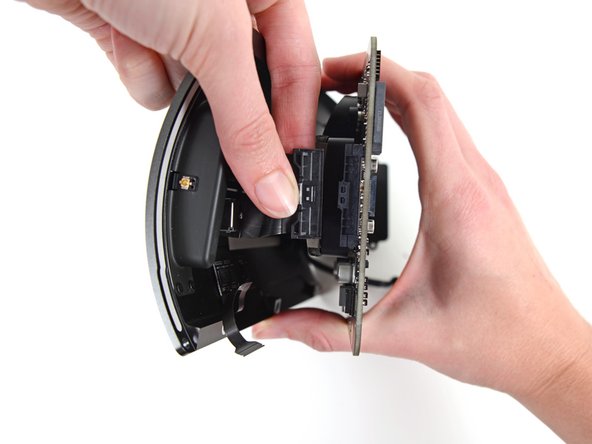
    • Disconnect the fan assembly antenna cable from the IO board.

    • Remove the fan assembly from the Mac Pro.

  9. Mac Pro Late 2013 CMOS Battery Replacement, Lower Case: шаг 9, изображение 1 из 3 Mac Pro Late 2013 CMOS Battery Replacement, Lower Case: шаг 9, изображение 2 из 3 Mac Pro Late 2013 CMOS Battery Replacement, Lower Case: шаг 9, изображение 3 из 3
    • Flip the Mac Pro upside down, 180 degrees.

    • Remove five 5.1 mm T10 Torx screws from the outer perimeter of the lower case.

  10. Mac Pro Late 2013 CMOS Battery Replacement: шаг 10, изображение 1 из 2 Mac Pro Late 2013 CMOS Battery Replacement: шаг 10, изображение 2 из 2
    • Carefully lift the lower case up and remove it from the Mac Pro.

  11. Mac Pro Late 2013 CMOS Battery Replacement, Interconnect Board: шаг 11, изображение 1 из 2 Mac Pro Late 2013 CMOS Battery Replacement, Interconnect Board: шаг 11, изображение 2 из 2
    • Use the flat end of a spudger and a twisting motion to gently separate one side of the graphics card data connection.

  12. Mac Pro Late 2013 CMOS Battery Replacement: шаг 12, изображение 1 из 3 Mac Pro Late 2013 CMOS Battery Replacement: шаг 12, изображение 2 из 3 Mac Pro Late 2013 CMOS Battery Replacement: шаг 12, изображение 3 из 3
    • Gently separate the other side as well.

    • Flip the connector up and out of the way of the graphics card.

    • Repeat this procedure on the other graphics card.

  13. Mac Pro Late 2013 CMOS Battery Replacement: шаг 13, изображение 1 из 1
    • Remove the two 6.0 mm T8 Torx screws securing the interconnect board to the heat sink.

  14. Mac Pro Late 2013 CMOS Battery Replacement: шаг 14, изображение 1 из 3 Mac Pro Late 2013 CMOS Battery Replacement: шаг 14, изображение 2 из 3 Mac Pro Late 2013 CMOS Battery Replacement: шаг 14, изображение 3 из 3
    • Gently walk the interconnect board straight up off the logic board's slot connection.

    • It is recommended to lift one side and then the other.

    • Do not try to remove the interconnect board from the Mac Pro yet, as it is still connected to the IO board.

  15. Mac Pro Late 2013 CMOS Battery Replacement: шаг 15, изображение 1 из 2 Mac Pro Late 2013 CMOS Battery Replacement: шаг 15, изображение 2 из 2
    • Flip the interconnect board up and over, exposing the IO board data cable.

    • Use the same sort of twisting and spreading motion with the flat end of a spudger to separate one side of the IO board data cable.

  16. Mac Pro Late 2013 CMOS Battery Replacement: шаг 16, изображение 1 из 2 Mac Pro Late 2013 CMOS Battery Replacement: шаг 16, изображение 2 из 2
    • Use the flat end of a spudger to separate the other side of the IO board data cable.

    • Bend the cable out of the way and remove the interconnect board from the Mac Pro.

  17. Mac Pro Late 2013 CMOS Battery Replacement, Power Supply Assembly: шаг 17, изображение 1 из 1
    • Flip the Mac Pro back over and set it gently on a flat surface.

    • We recommend laying the Mac Pro on the corner of the heat sink and the two standoff screw posts that attach to the interconnect board.

  18. Mac Pro Late 2013 CMOS Battery Replacement: шаг 18, изображение 1 из 2 Mac Pro Late 2013 CMOS Battery Replacement: шаг 18, изображение 2 из 2
    • Remove the two 3.6 mm T5 Torx screws from the sides of the power supply cage (one on each side).

  19. Mac Pro Late 2013 CMOS Battery Replacement: шаг 19, изображение 1 из 1
    • Remove the power supply cage from the top of the power supply.

    • By removing this cage, you are exposing internal components of the power supply. Be very careful not to touch any of the power supply components or circuitry.

    • Be careful not to drop any screws or tools into the power supply, as this may damage the power supply.

  20. Mac Pro Late 2013 CMOS Battery Replacement: шаг 20, изображение 1 из 1
    • Remove the four 5.5 mm T8 Torx screws securing the power supply assembly to the Mac Pro.

  21. Mac Pro Late 2013 CMOS Battery Replacement: шаг 21, изображение 1 из 1
    • Remove the power supply assembly from the Mac Pro.

  22. Mac Pro Late 2013 CMOS Battery Replacement, Power Supply: шаг 22, изображение 1 из 3 Mac Pro Late 2013 CMOS Battery Replacement, Power Supply: шаг 22, изображение 2 из 3 Mac Pro Late 2013 CMOS Battery Replacement, Power Supply: шаг 22, изображение 3 из 3
    • Use the flat end of a spudger to disconnect the power supply DC-Out connector from its socket on the IO board.

    • Use the tip of a spudger to disconnect the power supply data cable from its socket on the IO board.

    • For both cables, make sure to pry straight up on the connector, and not the socket.

  23. Mac Pro Late 2013 CMOS Battery Replacement: шаг 23, изображение 1 из 2 Mac Pro Late 2013 CMOS Battery Replacement: шаг 23, изображение 2 из 2
    • Remove the four 9.0 mm silver T10 Torx screws from the sides of the power supply.

    • The power supply overhangs these screws somewhat, so you'll need to use a fixed screwdriver at a bit of an angle.

  24. Mac Pro Late 2013 CMOS Battery Replacement: шаг 24, изображение 1 из 2 Mac Pro Late 2013 CMOS Battery Replacement: шаг 24, изображение 2 из 2
    • Gently shift the power supply to free the AC power inlet cable out of its plastic clip.

    • Be careful not to try to separate the power supply from the IO board assembly just yet, as it is still connected by the AC power inlet cable.

  25. Mac Pro Late 2013 CMOS Battery Replacement: шаг 25, изображение 1 из 2 Mac Pro Late 2013 CMOS Battery Replacement: шаг 25, изображение 2 из 2
    • Flip the power supply back to expose the AC power inlet cable.

  26. Mac Pro Late 2013 CMOS Battery Replacement: шаг 26, изображение 1 из 2 Mac Pro Late 2013 CMOS Battery Replacement: шаг 26, изображение 2 из 2
    • Squeeze the AC power inlet cable connector and pull it straight out of its socket in the power supply.

  27. Mac Pro Late 2013 CMOS Battery Replacement, IO Board: шаг 27, изображение 1 из 1
    • Remove the two 9 mm silver T10 Torx screws securing the IO Board to the IO shield.

  28. Mac Pro Late 2013 CMOS Battery Replacement: шаг 28, изображение 1 из 2 Mac Pro Late 2013 CMOS Battery Replacement: шаг 28, изображение 2 из 2
    • Lift the IO board up from the IO shield from the end with the AC plug.

    • Do not attempt to completely separate the IO board from the IO shield, as there are still two cables connecting the two components.

  29. Mac Pro Late 2013 CMOS Battery Replacement: шаг 29, изображение 1 из 3 Mac Pro Late 2013 CMOS Battery Replacement: шаг 29, изображение 2 из 3 Mac Pro Late 2013 CMOS Battery Replacement: шаг 29, изображение 3 из 3
    • Set the assembly down on a flat surface to access the connectors on the IO board.

    • Use the tip of a spudger to flip the retaining flap on the IO shield ribbon cable ZIF connector.

    • Disconnect the IO shield ribbon cable.

  30. Mac Pro Late 2013 CMOS Battery Replacement: шаг 30, изображение 1 из 2 Mac Pro Late 2013 CMOS Battery Replacement: шаг 30, изображение 2 из 2
    • Squeeze and pull the audio jack ribbon cable connector from the IO board.

  31. Mac Pro Late 2013 CMOS Battery Replacement, CMOS Battery: шаг 31, изображение 1 из 2 Mac Pro Late 2013 CMOS Battery Replacement, CMOS Battery: шаг 31, изображение 2 из 2
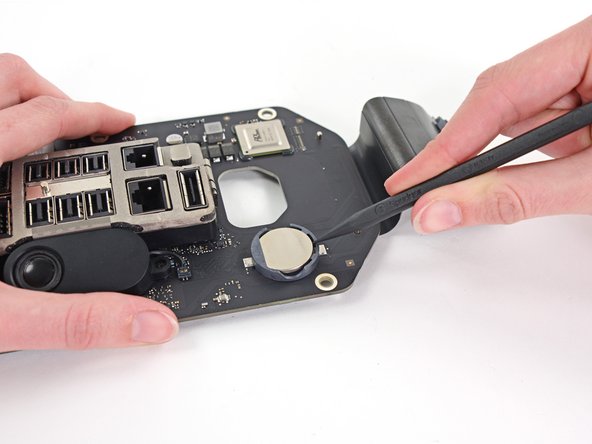
    • Use the tip of a spudger to pry the CMOS battery out of its socket.

Заключение

To reassemble your device, follow these instructions in reverse order.

26 участников успешно повторили данное руководство.

Andrew Optimus Goldheart

Участник с: 10/17/09

502 109 Репутация

Автор 407 руководств

Команда

iFixit Участник iFixit

Staff

135 членов

Автор 16 476 руководств

11 Комментариев

A very good guide. I have a few notes from my experience replacing my battery.

In step 13 the torx screws securing the interconnect board to the heat sink were T-8 on my Mac but T-7 worked.

In step 23 a short arm Torx key would be helpful. Getting them out tore up the heads of the screws and getting back in was difficult without cross threading some of them. Bondhus (model no. 31832) sells a set that might help.

In step 29 if you don't reconnect the power supply data cable completely your Mac fan will run full speed and the processors will max out.

Don Hayashi - Ответить

Seems like I need to replace the CMOS battery.

Which battery do I need to buy to replace the CMOS battery?

Jan - Ответить

Yeah, could somebody please post the specifications for the replacement battery and maybe a source for it?

Doctor Macintosh - Ответить

From the tear down, it's a Long-life BR-2032... I got mine at: https://www.amazon.com/PANASONIC-BATTERI.... Good luck! Great machine!

Wagon Fixin - Ответить

Yes, the BR2032.

The difference between it and the CR2032 medical battery is the wider heat tolerance range, both extreme heat and cold of the BR. As these are known to get quite hot, get the BR2032.

The batteries in most Macs are easy to replace so substituting the common CR2032 works fine. Electrically, they are identical. The Mac Pro and the late 2009-2010 iMac are a bit time consuming (2009–10 iMacs have the battery on the back of the motherboard) so use the same one that Apple uses.

MikeHalloran - Ответить

Добавить комментарий

Просмотр статистики:

За последние 24часов: 13

За последние 7 дней: 83

За последние 30 дней: 424

За всё время: 28,209