Перейти к основному содержанию
Присоединяйся к сообществу ремонтников - Создай аккаунт

Mac Pro Late 2013 IO Board Replacement

Выберете то, что вам нужно

  1. Mac Pro Late 2013 IO Board Replacement, Outer Case: шаг 1, изображение 1 из 2 Mac Pro Late 2013 IO Board Replacement, Outer Case: шаг 1, изображение 2 из 2
    • Slide the lock switch to the right, to the unlocked position.

    Спросите у FixBot

    Добавить комментарий

  2. Mac Pro Late 2013 IO Board Replacement: шаг 2, изображение 1 из 3 Mac Pro Late 2013 IO Board Replacement: шаг 2, изображение 2 из 3 Mac Pro Late 2013 IO Board Replacement: шаг 2, изображение 3 из 3
    • Lift the outer case straight up off the Mac Pro.

    • It may help to push down on the center of the fan while lifting the case up.

    Спросите у FixBot

    Добавить комментарий

  3. Mac Pro Late 2013 IO Board Replacement, Fan Assembly: шаг 3, изображение 1 из 3 Mac Pro Late 2013 IO Board Replacement, Fan Assembly: шаг 3, изображение 2 из 3 Mac Pro Late 2013 IO Board Replacement, Fan Assembly: шаг 3, изображение 3 из 3
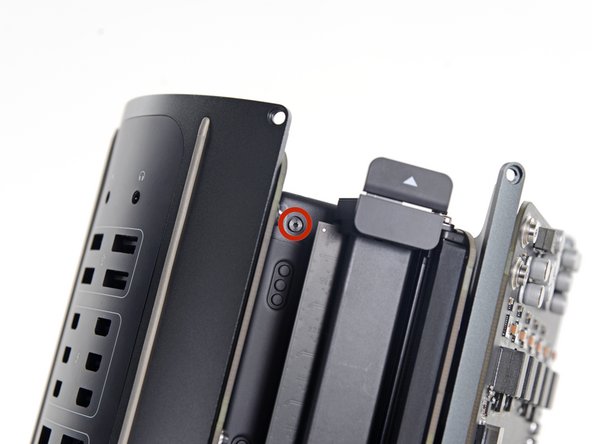
    • Remove five 5.1 mm T10 Torx screws from around the outer perimeter of the fan assembly.

    Спросите у FixBot

    Добавить комментарий

  4. Mac Pro Late 2013 IO Board Replacement: шаг 4, изображение 1 из 2 Mac Pro Late 2013 IO Board Replacement: шаг 4, изображение 2 из 2
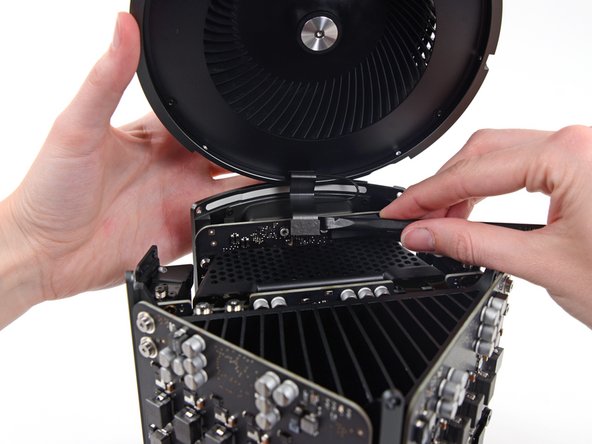
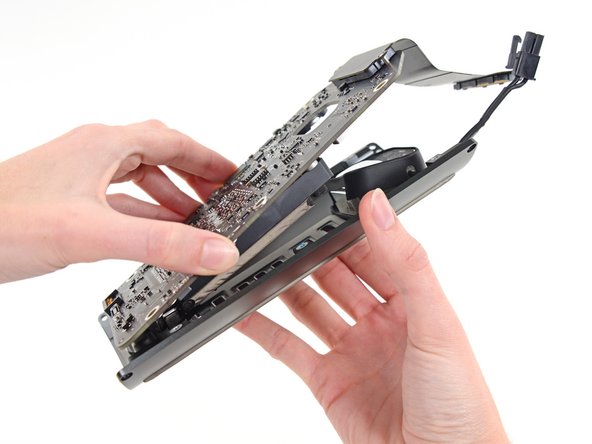
    • The fan assembly is attached to the rest of the computer by two cables on the IO board side.

    • Tilt the assembly up away from the IO board.

    • Do not try to remove the fan assembly yet, as it is still attached by two cables.

    Спросите у FixBot

    Добавить комментарий

  5. Mac Pro Late 2013 IO Board Replacement: шаг 5, изображение 1 из 1
    • While supporting the fan assembly with one hand, loosen the two T8 captive screws in the fan cable bracket.

    • These screws are captive in the Mac Pro. Do not try to remove these screws from your Mac Pro.

    Спросите у FixBot

    Добавить комментарий

  6. Mac Pro Late 2013 IO Board Replacement: шаг 6, изображение 1 из 1
    Инструмент, используемый на этом этапе:
    Tweezers
    $4.99
    • Use a pair of tweezers to pull the fan cable bracket away from the fan assembly.

    Спросите у FixBot

    Добавить комментарий

  7. Mac Pro Late 2013 IO Board Replacement: шаг 7, изображение 1 из 2 Mac Pro Late 2013 IO Board Replacement: шаг 7, изображение 2 из 2
    • Use the flat end of a spudger to disconnect the fan assembly ribbon cable from the IO board.

    Спросите у FixBot

    Добавить комментарий

  8. Mac Pro Late 2013 IO Board Replacement: шаг 8, изображение 1 из 1
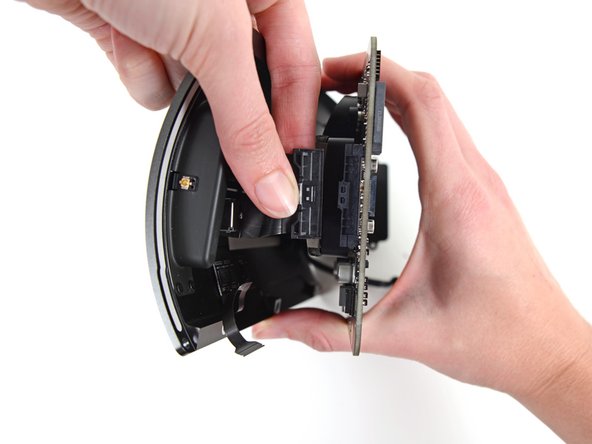
    • Disconnect the fan assembly antenna cable from the IO board.

    • Remove the fan assembly from the Mac Pro.

    Спросите у FixBot

    Добавить комментарий

  9. Mac Pro Late 2013 IO Board Replacement, Lower Case: шаг 9, изображение 1 из 3 Mac Pro Late 2013 IO Board Replacement, Lower Case: шаг 9, изображение 2 из 3 Mac Pro Late 2013 IO Board Replacement, Lower Case: шаг 9, изображение 3 из 3
    • Flip the Mac Pro upside down, 180 degrees.

    • Remove five 5.1 mm T10 Torx screws from the outer perimeter of the lower case.

    Спросите у FixBot

    Добавить комментарий

  10. Mac Pro Late 2013 IO Board Replacement: шаг 10, изображение 1 из 2 Mac Pro Late 2013 IO Board Replacement: шаг 10, изображение 2 из 2
    • Carefully lift the lower case up and remove it from the Mac Pro.

    Спросите у FixBot

    Добавить комментарий

  11. Mac Pro Late 2013 IO Board Replacement, Interconnect Board: шаг 11, изображение 1 из 2 Mac Pro Late 2013 IO Board Replacement, Interconnect Board: шаг 11, изображение 2 из 2
    • Use the flat end of a spudger and a twisting motion to gently separate one side of the graphics card data connection.

    Спросите у FixBot

    Добавить комментарий

  12. Mac Pro Late 2013 IO Board Replacement: шаг 12, изображение 1 из 3 Mac Pro Late 2013 IO Board Replacement: шаг 12, изображение 2 из 3 Mac Pro Late 2013 IO Board Replacement: шаг 12, изображение 3 из 3
    • Gently separate the other side as well.

    • Flip the connector up and out of the way of the graphics card.

    • Repeat this procedure on the other graphics card.

    Спросите у FixBot

    Добавить комментарий

  13. Mac Pro Late 2013 IO Board Replacement: шаг 13, изображение 1 из 1
    • Remove the two 6.0 mm T8 Torx screws securing the interconnect board to the heat sink.

    Спросите у FixBot

    Добавить комментарий

  14. Mac Pro Late 2013 IO Board Replacement: шаг 14, изображение 1 из 3 Mac Pro Late 2013 IO Board Replacement: шаг 14, изображение 2 из 3 Mac Pro Late 2013 IO Board Replacement: шаг 14, изображение 3 из 3
    • Gently walk the interconnect board straight up off the logic board's slot connection.

    • It is recommended to lift one side and then the other.

    • Do not try to remove the interconnect board from the Mac Pro yet, as it is still connected to the IO board.

    Спросите у FixBot

    Добавить комментарий

  15. Mac Pro Late 2013 IO Board Replacement: шаг 15, изображение 1 из 2 Mac Pro Late 2013 IO Board Replacement: шаг 15, изображение 2 из 2
    • Flip the interconnect board up and over, exposing the IO board data cable.

    • Use the same sort of twisting and spreading motion with the flat end of a spudger to separate one side of the IO board data cable.

    Спросите у FixBot

    Добавить комментарий

  16. Mac Pro Late 2013 IO Board Replacement: шаг 16, изображение 1 из 2 Mac Pro Late 2013 IO Board Replacement: шаг 16, изображение 2 из 2
    • Use the flat end of a spudger to separate the other side of the IO board data cable.

    • Bend the cable out of the way and remove the interconnect board from the Mac Pro.

    Спросите у FixBot

    Добавить комментарий

  17. Mac Pro Late 2013 IO Board Replacement, Power Supply Assembly: шаг 17, изображение 1 из 1
    • Flip the Mac Pro back over and set it gently on a flat surface.

    • We recommend laying the Mac Pro on the corner of the heat sink and the two standoff screw posts that attach to the interconnect board.

    Спросите у FixBot

    Добавить комментарий

  18. Mac Pro Late 2013 IO Board Replacement: шаг 18, изображение 1 из 2 Mac Pro Late 2013 IO Board Replacement: шаг 18, изображение 2 из 2
    • Remove the two 3.6 mm T5 Torx screws from the sides of the power supply cage (one on each side).

    Спросите у FixBot

    Добавить комментарий

  19. Mac Pro Late 2013 IO Board Replacement: шаг 19, изображение 1 из 1
    • Remove the power supply cage from the top of the power supply.

    • By removing this cage, you are exposing internal components of the power supply. Be very careful not to touch any of the power supply components or circuitry.

    • Be careful not to drop any screws or tools into the power supply, as this may damage the power supply.

    Спросите у FixBot

    Добавить комментарий

  20. Mac Pro Late 2013 IO Board Replacement: шаг 20, изображение 1 из 1
    • Remove the four 5.5 mm T8 Torx screws securing the power supply assembly to the Mac Pro.

    Спросите у FixBot

    Добавить комментарий

  21. Mac Pro Late 2013 IO Board Replacement: шаг 21, изображение 1 из 1
    • Remove the power supply assembly from the Mac Pro.

    Спросите у FixBot

    Добавить комментарий

  22. Mac Pro Late 2013 IO Board Replacement, Power Supply: шаг 22, изображение 1 из 3 Mac Pro Late 2013 IO Board Replacement, Power Supply: шаг 22, изображение 2 из 3 Mac Pro Late 2013 IO Board Replacement, Power Supply: шаг 22, изображение 3 из 3
    • Use the flat end of a spudger to disconnect the power supply DC-Out connector from its socket on the IO board.

    • Use the tip of a spudger to disconnect the power supply data cable from its socket on the IO board.

    • For both cables, make sure to pry straight up on the connector, and not the socket.

    Спросите у FixBot

    Добавить комментарий

  23. Mac Pro Late 2013 IO Board Replacement: шаг 23, изображение 1 из 2 Mac Pro Late 2013 IO Board Replacement: шаг 23, изображение 2 из 2
    • Remove the four 9.0 mm silver T10 Torx screws from the sides of the power supply.

    • The power supply overhangs these screws somewhat, so you'll need to use a fixed screwdriver at a bit of an angle.

    Спросите у FixBot

    Добавить комментарий

  24. Mac Pro Late 2013 IO Board Replacement: шаг 24, изображение 1 из 2 Mac Pro Late 2013 IO Board Replacement: шаг 24, изображение 2 из 2
    • Gently shift the power supply to free the AC power inlet cable out of its plastic clip.

    • Be careful not to try to separate the power supply from the IO board assembly just yet, as it is still connected by the AC power inlet cable.

    Спросите у FixBot

    Добавить комментарий

  25. Mac Pro Late 2013 IO Board Replacement: шаг 25, изображение 1 из 2 Mac Pro Late 2013 IO Board Replacement: шаг 25, изображение 2 из 2
    • Flip the power supply back to expose the AC power inlet cable.

    Спросите у FixBot

    Добавить комментарий

  26. Mac Pro Late 2013 IO Board Replacement: шаг 26, изображение 1 из 2 Mac Pro Late 2013 IO Board Replacement: шаг 26, изображение 2 из 2
    • Squeeze the AC power inlet cable connector and pull it straight out of its socket in the power supply.

    Спросите у FixBot

    Добавить комментарий

  27. Mac Pro Late 2013 IO Board Replacement, IO Board: шаг 27, изображение 1 из 1
    • Remove the two 9 mm silver T10 Torx screws securing the IO Board to the IO shield.

    Спросите у FixBot

    Добавить комментарий

  28. Mac Pro Late 2013 IO Board Replacement: шаг 28, изображение 1 из 2 Mac Pro Late 2013 IO Board Replacement: шаг 28, изображение 2 из 2
    • Lift the IO board up from the IO shield from the end with the AC plug.

    • Do not attempt to completely separate the IO board from the IO shield, as there are still two cables connecting the two components.

    Спросите у FixBot

    Добавить комментарий

  29. Mac Pro Late 2013 IO Board Replacement: шаг 29, изображение 1 из 3 Mac Pro Late 2013 IO Board Replacement: шаг 29, изображение 2 из 3 Mac Pro Late 2013 IO Board Replacement: шаг 29, изображение 3 из 3
    • Set the assembly down on a flat surface to access the connectors on the IO board.

    • Use the tip of a spudger to flip the retaining flap on the IO shield ribbon cable ZIF connector.

    • Disconnect the IO shield ribbon cable.

    Спросите у FixBot

    Добавить комментарий

  30. Mac Pro Late 2013 IO Board Replacement: шаг 30, изображение 1 из 2 Mac Pro Late 2013 IO Board Replacement: шаг 30, изображение 2 из 2
    • Squeeze and pull the audio jack ribbon cable connector from the IO board.

    Спросите у FixBot

    Добавить комментарий

Заключение

To reassemble your device, follow these instructions in reverse order.

Отменить: Я не выполнил это руководство.

6 человек успешно провели ремонт по этому руководству.

Andrew Optimus Goldheart

Участник с: 10/17/09

515 326 Репутация

Автор 407 руководств

Команда

iFixit Участник iFixit

Staff

123 членов

Автор 28 230 руководств

3 Комментарии к руководству

How do you even get the a t10 to fit a such an aggressive angle?

Clayton Voges - Ответить Поделиться

My USB ports don’t work.. I replaced this board and they still don’t work.. Suggestions as to what could be causing this?

Michael Warchut - Ответить Поделиться

I’m having a severe problem with the data cable the runs from the power supply to the IO board. First, I broke a couple of the pins, so I had to order a new IO board. Now the pins are slightly different. Before, they were just sitting out unprotected, but the new board I purchased has a type of barrier around it, but my data cable won’t fit onto the pins now with the new protective barriers. Please help!

brian - Ответить Поделиться

Добавить комментарий

Статистика просмотров:

За последние 24 часов: 2

За последние 7 дней: 15

За последние 30 дней: 75

За всё время: 10,535