Введение
Use this guide to replace the upper case of the 2018 MacBook Air, including the keyboard. This involves removing all the parts in the MacBook and transferring them to a new upper case. Make sure to keep track of screws and small parts so that they can be easily reinstalled in the new upper case.
Due to overlapping prerequisite guides, there are some repeated steps and inconsistencies in the photos. These are expected and do not effect the procedure. If you notice a repeated step, skip it and continue with the procedure.
To minimize risk of damage, turn on your MacBook and allow the battery to fully discharge before starting this procedure. A charged lithium-ion battery can be very dangerous if accidentally punctured. If your battery looks puffy or swollen, take extra precautions.
Do not reuse the battery if it is swollen or was deformed in any way during the procedure. The battery is likely damaged and can be very dangerous to reuse—it should be replaced.
This guide involves removing the speakers and battery. You will need new adhesive to reinstall the speakers and battery.
Выберете то, что вам нужно
-
-
If your MacBook is running Big Sur v11.1 or later, disabling Auto Boot may not work. You can proceed normally, but make sure to disconnect the battery as soon as you're inside.
-
Use a P5 driver to remove the following screws:
-
Two 7.9 mm screws
-
Two 7.1 mm screws
-
Six 2.6 mm screws
-
-
-
Wedge your fingers between the display and the lower case and pull upward to pop the lower case off the Air.
-
Remove the lower case.
Are there any suggestions to removing the pressure fasteners more easily?
-
-
-
Peel back the tape covering the battery connector enough to reveal the connector underneath.
-
-
-
Use a spudger to slide the battery connector parallel to the logic board and out of its socket on the logic board.
Before the battery can be fully disconnected, the battery disconnect button needs to be held down. There is a gold button just above the battery socket, along with a small LED much like the 12” machines. Once this has been held down and the LED has switched off it is safe to remove the battery.
This seems like an important step?
Also, seems like this should be done after the battery is disconnected, not before? Otherwise, wouldn’t the battery re-charge it?
What if the white LED dosent light up after pressing the yellow button again?
Iron05 -
I just performed this repair on my late 2018 mac air. I did click the gold button but saw no LED illuminated or otherwise. Question- after reassembly does the button get pressed again to connect the battery? Please clarify if this button is to be pressed and if it needs pressing again after the repair.
All said - I pressed again after the battery connector clicked, assembled the back and all worked perfectly. The original issue was one dead port (no charge, no communication). The battery charge lightening bold icon was acting funny too. Genuis bar guy in Naperville said it was likely a logic board too. But it was not. The port was apparently confusing the logic board with regards to the charge function. Thanks Adam for saving me $440 and sending my computer back to Apple. I am 71 yrs young - who says an old dog can’t learn new tricks with good training!!
I didn't see Aaron's comment before completing the battery replacement. Afterwards, the computer would not turn on despite multiple SMC reset procedures. Upon double-checking the comments I see the importance of pressing the gold button. I pressed the gold button before disconnecting the new battery, then pressed it again after reconnecting for good measure. Computer booted!
It would be good of iFixit to add this important step as most people probably don't open up every single comment on (seemingly) simple steps.
Seconding Corey's comment. If paid more attention to the comment section, I would have avoided 15-30 minutes of panic. (BTW I did not notice any LED, but the golden button was easy to find).
Where is the gold button? I replaced my battery and my laptop will not start
-
-
-
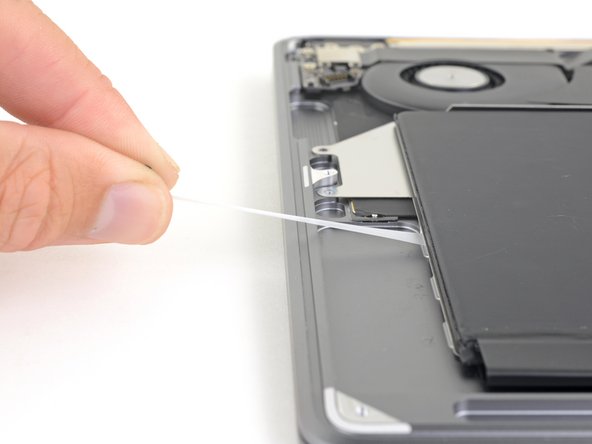
Use a pair of tweezers to lift up the black adhesive pull tab at the bottom of the right speaker, enough so you can grab it with your fingers.
-
Grab the adhesive strip pull tab and slowly and carefully pull the adhesive strip out from under the speaker.
-
If the adhesive strip breaks, leave it in and proceed to the next step.
What do you do to get the speaker to stick once you put things back together? Are these adhesive strips reusable? If not, where can we get new ones?
The strips will tend to remain edhesive in some cases but if not just use some thin double sided adhesive tape of a similar width. I will not link because I am in Australia but it isn’t hard to find. I used some heat (100°C) and a plastic spudger to aid removal or a hair dryer on lower heat. Slow and steady, it’s not hard. The strips will almost certainly break.
-
-
-
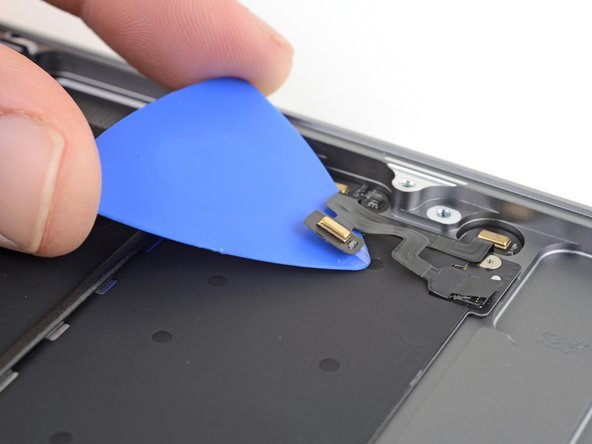
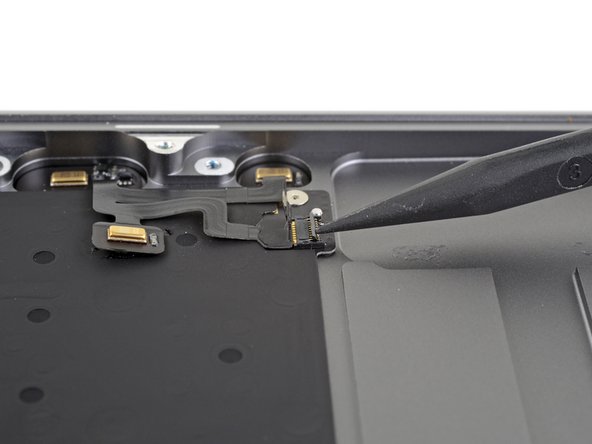
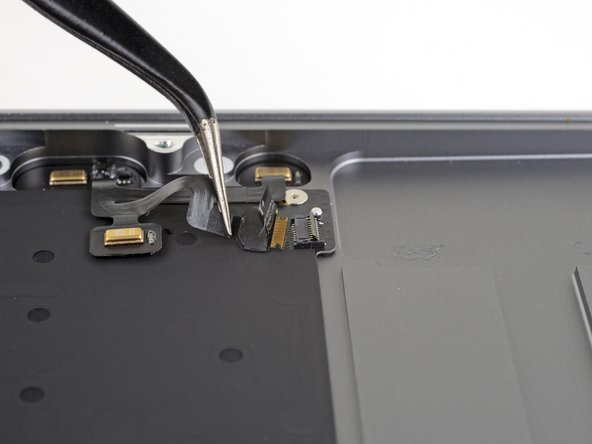
Slide the tip of a spudger underneath the right speaker cable and pry straight up to disconnect the speaker.
Broke both speaker connectors by spudging straight up. Looks like they should slide apart like a normal zif.
Pulled straight up and broke both connectors.
-
-
-
Use tweezers to lift the adhesive pull tab at the top of the right speaker enough that you can grab it with your fingers.
-
Grab the adhesive strip pull tab and slowly and carefully pull the adhesive strip out from under the speaker.
-
Apply heat to the speaker to soften the adhesive underneath.
-
Carefully slide a spudger or opening pick underneath the speaker to separate the adhesive.
This business of pulling the adhesive out (here and with the batteries) - at first it seems impossible, but persevere. Pull it really, really, slowly - it extends to around 30cm before it's all out. I applied a bit of heat with a heat gun (at least with the batteries) and after a few failed attempts got the hang of it. When it works, it's like magic and very satisfying, and much better than giving up and prising the part off with the adhesive in place.
-
-
-
Lift the right speaker straight up from the bottom and remove it.
Step 5 the right speaker adhesive broken while removing, other end adhesive slipped out ok. But it's extremely hard to now lift up the battery, feels like I break something if I try harder.
This is not as easy as it sounds. Neither adhesive strip broke, but that bugger resists removal, because it is attached with adhesive tape to the bottom. Use different angles of attack to pry it up with steady force.
-
-
-
Use a pair of tweezers to lift up the black adhesive pull tab at the bottom of the left speaker, enough so you can grab it with your fingers.
-
Grab the adhesive strip pull tab and slowly and carefully pull the adhesive strip out from under the speaker.
-
If the adhesive strip breaks, leave it in and proceed to the next step.
-
-
-
Slide the tip of a spudger underneath the left speaker cable and pry straight up to disconnect the speaker.
-
With the connector disconnected, slide the flat end of a spudger under the cable to separate the adhesive securing the cable to the logic board.
-
-
-
Use tweezers to lift the adhesive pull tab at the top of the left speaker enough that you can grab it with your fingers.
-
Grab the adhesive strip pull tab and slowly and carefully pull the adhesive strip out from under the speaker.
-
Apply heat to the speaker to soften the adhesive underneath.
-
Carefully slide a spudger or opening pick underneath the speaker to separate the adhesive.
-
-
-
Lift the left speaker straight up from the bottom and remove it.
-
-
-
Slide the tip of a spudger underneath the speaker cable and pry straight up to disconnect the speaker.
-
-
-
Use a T3 Torx driver to remove the three 1.4 mm screws securing the audio board cable bracket.
-
Remove the cable bracket.
-
-
-
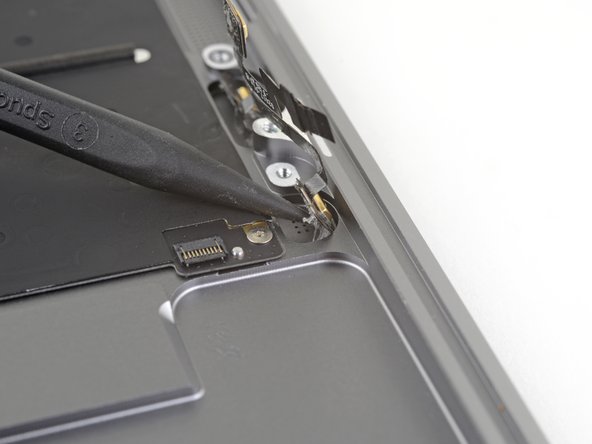
Use the flat end of a spudger to pry the audio board connector straight up and disconnect it.
-
-
-
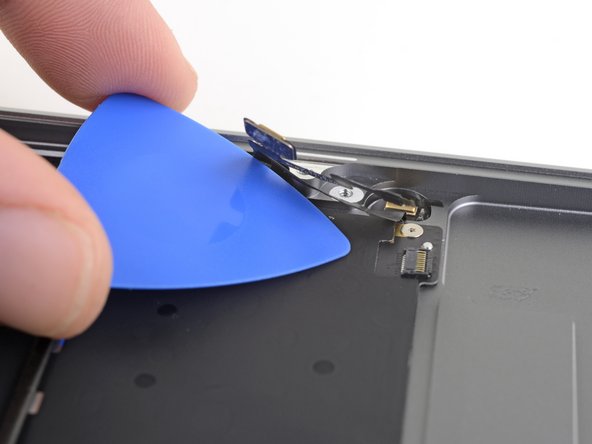
Use the flat end of a spudger to pry the Touch ID sensor connector straight up and disconnect it.
-
-
-
Remove the following screws:
-
Two 4.3 mm, T5 Torx screws
-
One 2.4 mm, T3 Torx screw
-
-
-
Slide the flat end of a spudger underneath the Touch ID sensor cable to slice through the adhesive securing it to the audio board.
-
-
-
Use the tip of a spudger to lift up the locking flap on the fan cable's ZIF connector.
-
Slide the fan cable out of the ZIF connector.
-
-
-
-
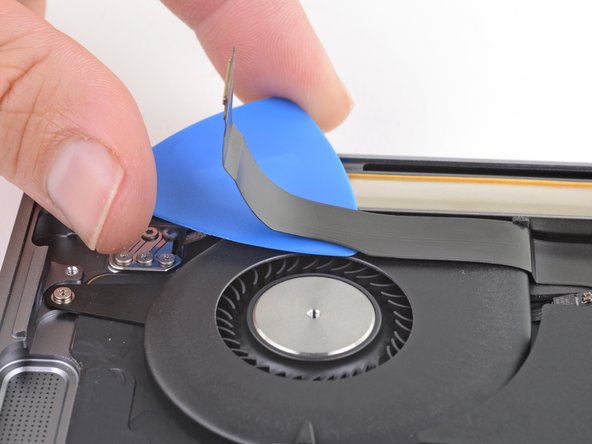
Slide an opening pick under the audio board cable to slice through the adhesive securing it to the fan.
-
-
-
Use a T5 Torx driver to remove the three 2.7 mm screws securing the fan.
-
-
-
Lift the fan out of the case and remove it.
Fan ribbon cable was fattened on to case with glue. Used a flat metal blade type tool to gently separate ribbon cable from case.
-
-
-
Use a T3 Torx driver to remove the two 1.4 mm screws securing the antenna cable bracket.
-
Remove the antenna cable bracket.
-
-
-
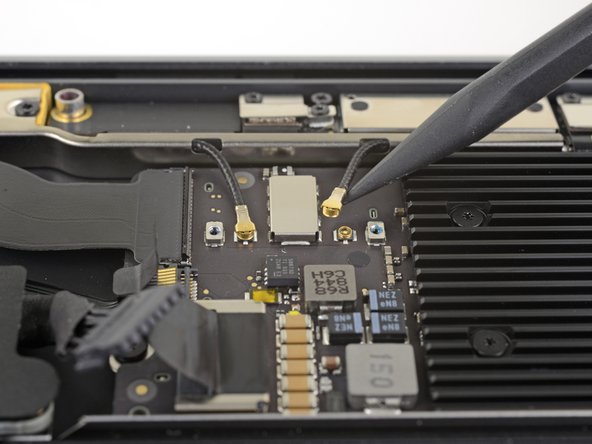
Insert the point of a spudger under one of the antenna cables close to the connector.
-
Pry straight up to disconnect the cable.
-
Repeat for the other antenna cable.
As you are putting everything back together, it is a bit wonky trying to reconnect these antenna. Patience is necessary and it helps if you reshape the cables so that the cables are like the picture.
-
-
-
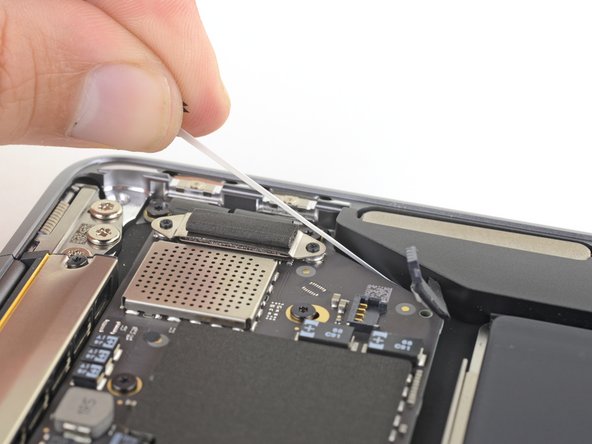
Use a T3 Torx driver to remove the two 1.5 mm screws securing the display cable connector bracket.
-
Remove the display cable connector bracket.
-
-
-
Use a T5 Torx driver to remove the following screws:
-
Four 7.4 mm screws
-
Two 4.5 mm screws
-
-
-
Lift the antenna bar straight up and out of the case. Take care not to snag the antenna bar on any cables or connectors.
-
Remove the antenna bar.
Tip: keep the six big lid anchor screws in place until after you remove the antenna bar. You may have to use your plastics spudger to wedge underneath the vents and get leverage off the underside of the lid along the hinge area. I also had to remove the Logicboard so I could get the plastic spudger underneath the antenna bar and lift it up. It felt like it was going to break. Did not want to have to remove the logic board, but seemed that was the only way I could get underneath and pry the antenna out.
Felt like I was going to break it! It will come out but it requires patience and light touch
Go to 12:02 on this Video:
Subscribe to this dude’s channel! I donated because he has taught me a lot with his videos!
Lamar's suggestion to view the video is excellent. Though I saw it only in arrears, it was quite valuable. I found a spudge, used to GENTLY pry both side first, then begin lifting on your right side (with back of laptop facing you) while gently twisting slightly inward to do the trick.
Probably the worst moment in this repair.
DLC
-
-
-
Use a T9 Torx driver to remove the six 4.9 mm screws securing the display hinges to the upper case.
This was a T8 Torx driver for me
It’s easier to leave 1 on each side in place open the MacBook fully and the remove them. This will help not damaging the bottom screen rim
Torx T8 for me too on a MacBook Air 2020
T8 for me as well on a 2019 MacBook Air
-
-
-
With the MacBook still screen-side down, carefully lift the upper case to open the MacBook as far as possible.
-
-
-
Lift the MacBook and carefully rotate the display to a 90 degree angle with the upper case.
-
Keeping the display at a 90 degree angle with the case, move the display straight down while holding the case still, so that the hinges slide out the bottom of the case.
Can i skip antenna screw and battery to reallign the screen lid ? My screen lid is misalligned with the body about half milimeters
Yes. You can loosen the screen lid screws to re-align the top lid.
(quote)
"Keeping the display at a 90 degree angle with the case, move the display straight down while holding the case still, so that the hinges slide out the bottom of the case."
(end quote)
If you're moving the display straight down, how does it "slide out"? I do ge the point, but this instruction could stand a tad amount of re-wording.
Also, on installing the new screen, the hinges on the new screen are very tight. It is easier to the install if you use some needle-nose or some tweezers to open the hinges to 90 degrees before trying to slot the new screen.
-
-
-
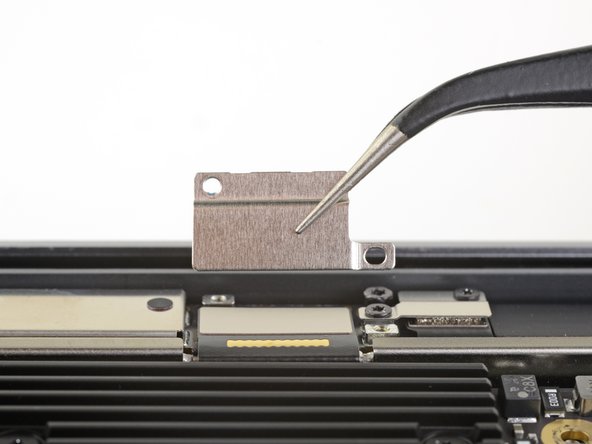
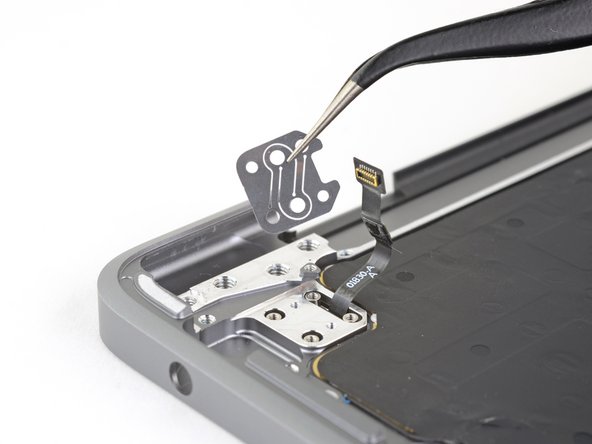
Use a T3 Torx driver to remove the six 1.6 mm screws securing the Touch ID sensor and its bracket.
-
Remove the Touch ID bracket.
-
-
-
Turn the MacBook right-side up and open the display.
-
Lift the Touch ID sensor sensor out of its recess and remove it.
-
-
-
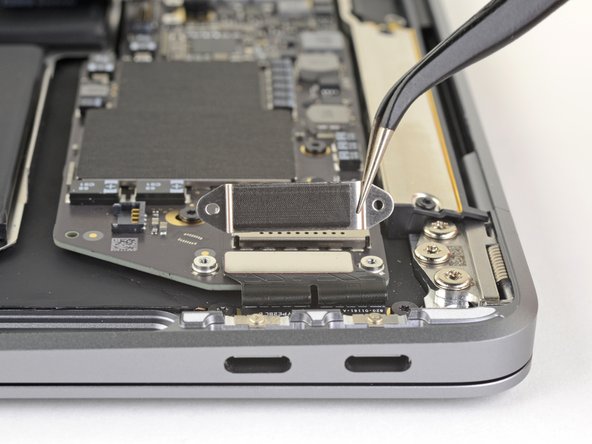
Use a T3 Torx driver to remove the two 1.4 mm screws securing the USB-C connector bracket.
-
Remove the USB-C connector bracket.
-
-
-
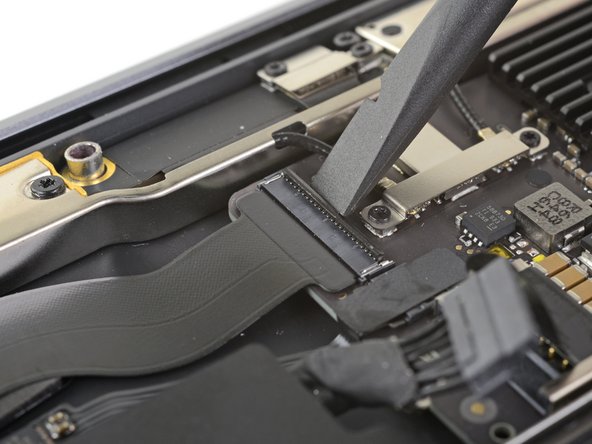
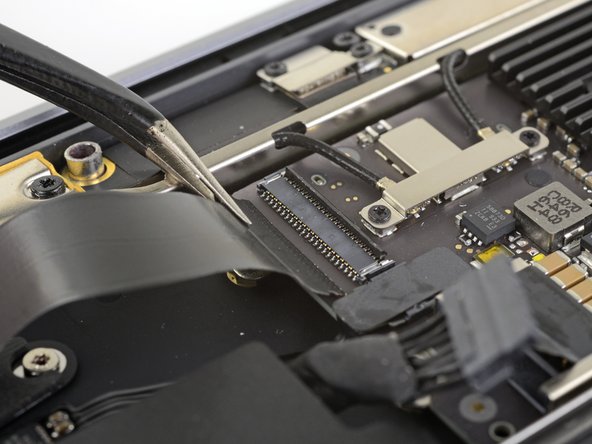
Use the flat end of a spudger to pry the USB-C cable connector up and out of its socket on the logic board.
-
-
-
Use a T4 Torx driver to remove the two 2.9 mm screws securing the USB-C board.
T5 driver worked better as the T4 was a smidge too small and started to strip the screw head.
-
-
-
Use a T3 Torx driver to remove the two 1.4 mm screws securing the trackpad connector bracket.
-
Remove the trackpad connector bracket.
-
-
-
Use the flat end of a spudger to pry the trackpad cable connector up and out of its socket.
-
-
-
Use a spudger to lift up the small locking flap on the sound board cable's ZIF connector.
-
Slide the sound board cable out of the ZIF connector.
-
-
-
Use a T5 Torx driver to remove the following screws:
-
One 5.5 mm screw
-
Three 2.6 mm screws
-
Two 1.9 mm screws
These are T5 Torx driver screws
Need torx 5 AND torx 4 driver here ;)
During re-assembly be soft when screwing in the logic board because those antenna plugs in Step 14 are quite awkward to pin back into their sockets and there is little leeway in the cables; to make this task a little easier in Step 14, secure the logic board loosely right up against the near outside edge; after re-connecting all the cables in Steps 16-9, return to Step 17 to firm up the logic board screws.
This tip was a huge help, hate these cables lol
The 5.5 mm screw goes into a hexagon standoff which may come off with the logic board being sanswiched beteen the 5.5 mm screw screw and the standoff like happened to me. Just something to be aware of. It also has a black rubber bumper over the screw which was not mentioned at all. It pulls straight off to give access to the screw.
On my board I needed to use T6 for all the screws except the rubber bumper for which I used a T7. I have a full set of small Torx drivers and tried for the best fit.
T5 fit best is all the screws on my machine
-
-
-
Carefully slide an opening pick under the trackpad cable to separate the adhesive securing it to the upper case.
-
-
-
Use the flat end of a spudger to lift the small locking flap on the trackpad ZIF connector.
-
Slide the trackpad cable straight out of its connector.
-
-
-
Carefully slide an opening pick under the trackpad cable to separate the adhesive securing it to the battery.
-
-
-
Use a T5 Torx driver to remove the following screws securing the trackpad:
-
One 3.2 mm screw
-
Eight 3.1 mm screws
-
-
-
With the laptop still lying screen-side down, carefully open the laptop. The trackpad will stay sitting on the display.
-
Remove the trackpad from the MacBook. Take care not to scratch the display.
-
-
-
Use the flat end of a spudger to lift the small locking flap on the trackpad's ZIF connector.
-
Slide the trackpad cable straight out of the ZIF connector.
-
-
-
Use a T3 Torx driver to remove four 2.5 mm screws securing the battery.
-
-
-
Use a pair of tweezers to lift up the black adhesive pull tab on the side of the battery, enough so you can grab it with your fingers.
-
Grab the adhesive strip pull tab and slowly and carefully pull the adhesive strip out from under the battery.
-
If the adhesive strip breaks, leave it in and proceed to the next step.
-
-
-
Repeat the previous step to remove the next two adhesive strips on the same side of the battery.
-
If any adhesive strips break, leave them in and proceed to the next step.
-
-
-
Repeat the previous two steps to remove the three adhesive strips on the other side of the battery.
-
Carefully drip isopropyl alcohol along either edge of the battery, in the recessed part of the upper case, where the adhesive pull tabs were.
-
Let the alcohol soak into the adhesive for a minute or two.
-
Use opening picks to gently pry the battery away from the upper case.
-
-
-
Remove the battery.
-
Calibrate your newly installed battery: charge it to 100%, and keep charging it for at least 2 more hours. Unplug and use it normally to drain the battery. When you see the low battery warning, save your work, and keep your laptop on until it goes to sleep due to low battery. Wait at least 5 hours, then charge your laptop uninterrupted to 100%.
-
-
-
Slide an opening pick under the microphone farthest away from the edge of the case to slice through the adhesive securing it to the upper case.
-
-
-
Use the point of a spudger to lift the small locking flap on the microphone's ZIF connector.
-
Slide the microphone cable straight out of the ZIF connector.
-
-
-
Slide an opening pick under the rest of the microphone assembly cable to separate it from the adhesive securing it to the upper case.
-
-
-
Use the point of a spudger to carefully pry one of the microphones out of its recess in the upper case.
-
-
-
Use the point of a spudger to carefully pry the other microphone out of its recess in the upper case.
-
-
-
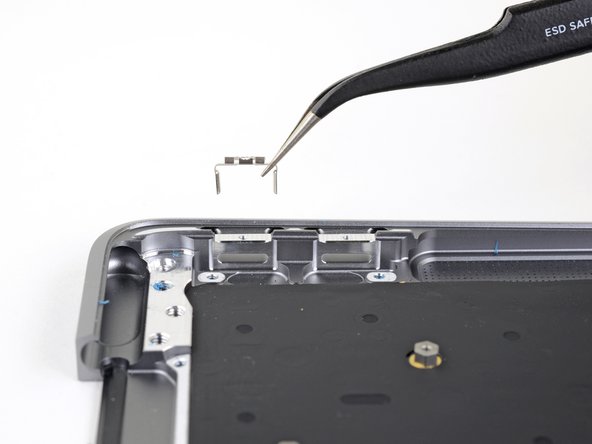
Lift the USB-C port brackets out of their recesses in the upper case and remove them.
-
Compare your new upper case to your old one and transfer over any remaining parts.
-


To reassemble your device, follow the above steps in reverse order.
Take your e-waste to an R2 or e-Stewards certified recycler.
Repair didn’t go as planned? Check out our Answers community for troubleshooting help.
To reassemble your device, follow the above steps in reverse order.
Take your e-waste to an R2 or e-Stewards certified recycler.
Repair didn’t go as planned? Check out our Answers community for troubleshooting help.
Отменить: Я не выполнил это руководство.
Еще один человек закончил это руководство.

2 Комментариев
I will be tackling this repair soon for my MacBook Air… I see I will need new adhesive to reattach the battery and speakers. What kind of adhesive should I use, and where can I get it?
I just repaired mine, if you buy the whole upper case part, it already comes with adhesive for the battery. The speakers were still tacky enough to hold mine down. Don't forget to take off those hex nuts off the old upper body because the new part won't have them. I believe it is about 6 of them
Gio U -
If the first thing you do is disconnect the battery, is it really an issue if you don’t (or can’t) disable auto-boot?
maccentric - Ответить
I agree, why disable Auto-Boot when the lid is closed and the battery is disconnected immediately? – I've never had an issue since 2016 when the feature was introduced.
stevebsiegel - Ответить
On my machine, the longest two screws were in the corners, while the other two long screws were in the middle. Perhaps previous service in the past had them replaced into the wrong place? In any case, the longest screws do seem to fit in either place. I guess 0.8mm is not very much of a difference. Seems like poor design if they could have used one size of screw.
johann beda - Ответить
Just did one, and it also had longest screws in the corners.
maccentric -
Just did another, and the long ones were in the middle. Definitely poor design and quality control.
maccentric -