Перейти к основному содержанию

Этот документ имеет более свежие изменения. Перейти к последней непроверенной версии.

MacBook Air 13" Mid 2012 Heat Sink Replacement

Выберете то, что вам нужно

  1. MacBook Air 13" Mid 2012 Heat Sink Replacement, Lower Case: шаг 1, изображение 1 из 1
    Инструмент, используемый на этом этапе:
    P5 Pentalobe Screwdriver Retina MacBook Pro and Air
    $5.99
    Купить
    • Before proceeding, power down your MacBook. Close the display and lay it on a soft surface, top-side down.

    • Use a P5 Pentalobe driver to remove ten screws securing the lower case, of the following lengths:

    • Two 9 mm screws

    • Eight 2.6 mm screws

  2. MacBook Air 13" Mid 2012 Heat Sink Replacement: шаг 2, изображение 1 из 1
    • Wedge your fingers between the display and the lower case and pull upward to pop the lower case off the Air.

    • Remove the lower case and set it aside.

  3. MacBook Air 13" Mid 2012 Heat Sink Replacement, Battery Connector: шаг 3, изображение 1 из 2 MacBook Air 13" Mid 2012 Heat Sink Replacement, Battery Connector: шаг 3, изображение 2 из 2
    • As a precaution against accidental discharge or shock, disconnect the battery connector from the logic board.

    • Grab the clear plastic pull tab attached to the battery connector and pull it toward the front edge of the Air to disconnect the battery from the logic board.

    • Be sure to pull the connector horizontally toward the battery, and not straight up from the Air, or you may damage the socket on the logic board.

  4. MacBook Air 13" Mid 2012 Heat Sink Replacement, I/O Board Cable: шаг 4, изображение 1 из 1
    • Use the flat end of a spudger to pry the I/O board cable connector upward out of its socket on the I/O board.

  5. MacBook Air 13" Mid 2012 Heat Sink Replacement: шаг 5, изображение 1 из 1
    • Carefully peel the I/O board cable from the top of the fan.

  6. MacBook Air 13" Mid 2012 Heat Sink Replacement: шаг 6, изображение 1 из 2 MacBook Air 13" Mid 2012 Heat Sink Replacement: шаг 6, изображение 2 из 2
    • The following connector has an especially deep socket. Use care when disconnecting it.

    • While gently pulling the I/O board cable upward near its connection to the logic board, use the tip of a spudger to pry upward on alternating sides of the connector to help "walk" it out of its socket.

    • Remove the I/O board cable.

  7. MacBook Air 13" Mid 2012 Heat Sink Replacement, Fan: шаг 7, изображение 1 из 1
    • Use the tip of a spudger to carefully flip up the retaining flap on the fan cable ZIF socket.

    • Be sure you are prying up on the hinged retaining flap, not the socket itself.

  8. MacBook Air 13" Mid 2012 Heat Sink Replacement: шаг 8, изображение 1 из 1
    • Peel the rubber gasket off the adhesive on the top of the fan.

  9. MacBook Air 13" Mid 2012 Heat Sink Replacement: шаг 9, изображение 1 из 1
    • Remove the following three screws securing the fan to the upper case:

    • One 3.6 mm T5 Torx screw

    • One 2.7 mm T5 Torx screw

    • One 3.6 mm T5 Torx screw with a short head

  10. MacBook Air 13" Mid 2012 Heat Sink Replacement: шаг 10, изображение 1 из 1
    • Lift the fan out of the upper case and carefully pull the fan ribbon cable out of its socket as you remove it from the Air.

  11. MacBook Air 13" Mid 2012 Heat Sink Replacement, I/O Board: шаг 11, изображение 1 из 1
    • Disconnect the I/O board by pulling the power cable away from its socket on the logic board.

    • Pull the cable parallel to the face of the logic board toward the right edge of the Air.

  12. MacBook Air 13" Mid 2012 Heat Sink Replacement: шаг 12, изображение 1 из 1
    • Pull the camera cable parallel to the face of the I/O board toward the hinge of the Air to disconnect it from its socket, using the tip of a spudger to help push the connector out of its socket.

    • Do not lift upward on this cable as you disconnect it, as its socket may break off the logic board.

  13. MacBook Air 13" Mid 2012 Heat Sink Replacement: шаг 13, изображение 1 из 1
    • Use the flat end of a spudger to pry the left speaker cable connector up and out of its socket on the I/O board.

    • Pry up from beneath the wires.

  14. MacBook Air 13" Mid 2012 Heat Sink Replacement: шаг 14, изображение 1 из 2 MacBook Air 13" Mid 2012 Heat Sink Replacement: шаг 14, изображение 2 из 2
    • Use the tip of a spudger to flip up the retaining flap securing the microphone ribbon cable to the I/O board.

    • Use the tip of a spudger to remove the volume button ribbon cable from its ZIF connector on the I/O board.

  15. MacBook Air 13" Mid 2012 Heat Sink Replacement: шаг 15, изображение 1 из 1
    • Remove the single 4.0 mm T5 Torx screw securing the I/O board to the upper case.

  16. MacBook Air 13" Mid 2012 Heat Sink Replacement: шаг 16, изображение 1 из 1
    • Carefully lift the I/O board from its edge nearest the logic board and remove it from the upper case.

  17. MacBook Air 13" Mid 2012 Heat Sink Replacement, Heat Sink: шаг 17, изображение 1 из 1
    • Remove the two 4.9 mm T8 Torx screws securing the antenna cable retainer on the left display hinge to the upper case.

  18. MacBook Air 13" Mid 2012 Heat Sink Replacement: шаг 18, изображение 1 из 1
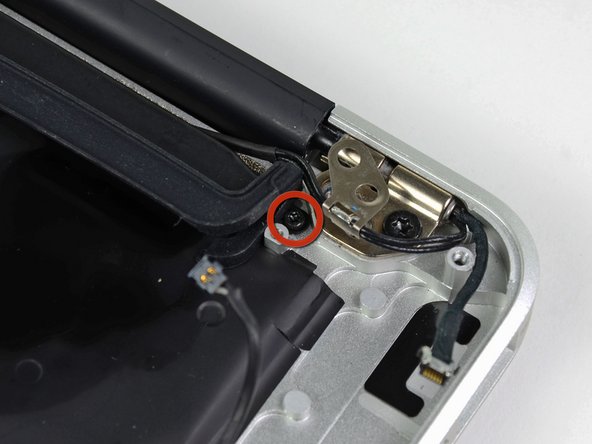
    • Push the antenna cable retainer out of the way and remove the 3 mm T5 Torx screw securing the end of the heat sink to the upper case.

  19. MacBook Air 13" Mid 2012 Heat Sink Replacement: шаг 19, изображение 1 из 1
    • Remove the four 2.5 mm T5 Torx screws securing the heat sink to the logic board.

  20. MacBook Air 13" Mid 2012 Heat Sink Replacement: шаг 20, изображение 1 из 1
    • If the heat sink seems to be stuck to the logic board after removing all five screws, use a spudger to carefully separate the heat sink from the faces of the CPU and GPU.

    • Remove the heat sink from the logic board.

    • When reinstalling the heat sink, be sure to apply a new layer of thermal paste. If you have never applied thermal paste before, we have a guide that makes it easy.

  21. MacBook Air 13" Mid 2012 Heat Sink Replacement: шаг 21, изображение 1 из 2 MacBook Air 13" Mid 2012 Heat Sink Replacement: шаг 21, изображение 2 из 2
    • These shots show how the rubber fan gasket should be installed during reassembly. Be sure not to install the gasket underneath the ear where the end of the heatsink is screwed down to the upper case.

    • Additionally, be sure the small post molded into the rubber gasket mates with the hole cut into the upper right corner of the logic board.

Заключение

To reassemble your device, follow these instructions in reverse order.

24 участников успешно повторили данное руководство.

Andrew Optimus Goldheart

Участник с: 10/17/09

502 807 Репутация

Автор 407 руководств

Команда

iFixit Участник iFixit

Staff

135 членов

Автор 16 767 руководств

5 Комментариев

I just swapped out a snapped heatsink & faulty fan, now the Macbook Air fan is on full within 20 seconds of boot & the mouse is lagging like crazy.

I’ve been assembling & repairing computers for years, so know how to apply thermal paste properly, so I’m wondering if I’ve missed something crucial here. Anybody else had issues after replacing the heatsink?

Matt Black - Ответить

Replaced the 6 year old dried up thermal paste with liquid metal, worked like a charm!

Gabriel - Ответить

Hello Gabriel, did you only replace the thermal paste? Or did you install a new heat sink too? My Macbook Air is overheating and shutting down. It has gotten worse over time. I am wondering if just cleaning and replacing the thermal paste will work? What do you think?

Thank you!

Chip -

On my Air the fans were running a lot, but no overheat shutdowns.

I replaced only the thermal paste and after that that the fans rarely ever turned on.

Adam Banko - Ответить

Can I do this without removing the fan and input board? It is possible to loosen the most right screw holding heatsink, I tried. So why do i need to remove so many other things?

Nazar Vovk - Ответить

Добавить комментарий

Просмотр статистики:

За последние 24часов: 5

За последние 7 дней: 26

За последние 30 дней: 110

За всё время: 19,552