Перейти к основному содержанию
Присоединяйся к сообществу ремонтников - Создай аккаунт

MacBook Pro 13" Retina Display Early 2013 Left Speaker Replacement

Выберете то, что вам нужно

    1. MacBook Pro 13" Retina Display Early 2013 Left Speaker Replacement, Lower Case: шаг 1, изображение 1 из 1
      Инструмент, используемый на этом этапе:
      Magnetic Project Mat
      $19.95
      • Remove the following ten screws securing the lower case to the upper case:

      • Two 2.3 mm P5 Pentalobe screws

      • Eight 3.0 mm P5 Pentalobe screws

      • Throughout this repair, keep track of each screw and make sure it goes back exactly where it came from to avoid damaging your device.

      Спросите у FixBot

      Добавить комментарий

    2. MacBook Pro 13" Retina Display Early 2013 Left Speaker Replacement: шаг 2, изображение 1 из 1
      • Wedge your fingers between the upper case and the lower case.

      • Gently pull the lower case away from the upper case.

      • Remove the lower case and set it aside.

      Спросите у FixBot

      Добавить комментарий

    3. MacBook Pro 13" Retina Display Early 2013 Left Speaker Replacement: шаг 3, изображение 1 из 3 MacBook Pro 13" Retina Display Early 2013 Left Speaker Replacement: шаг 3, изображение 2 из 3 MacBook Pro 13" Retina Display Early 2013 Left Speaker Replacement: шаг 3, изображение 3 из 3
      • During reassembly, gently push down the center of the lower case to reattach the two plastic clips.

      • The lower case is connected to the upper case at the center, with two plastic clips.

      Спросите у FixBot

      Добавить комментарий

    1. MacBook Pro 13" Retina Display Early 2013 Left Speaker Replacement, Battery Connector: шаг 4, изображение 1 из 1
      • Remove the plastic cover adhered to the battery contact board.

      Спросите у FixBot

      Добавить комментарий

    2. MacBook Pro 13" Retina Display Early 2013 Left Speaker Replacement: шаг 5, изображение 1 из 1
      • Remove the following screws securing the battery connector board to the logic board:

      • Two 2.8 mm T6 Torx screws

      • One 7.0 mm T6 Torx shouldered screw

      Спросите у FixBot

      Добавить комментарий

    3. MacBook Pro 13" Retina Display Early 2013 Left Speaker Replacement: шаг 6, изображение 1 из 2 MacBook Pro 13" Retina Display Early 2013 Left Speaker Replacement: шаг 6, изображение 2 из 2
      Инструмент, используемый на этом этапе:
      Tweezers
      $4.99
      • Use tweezers to remove the small plastic cover located near the bottom right of the battery connector board.

      Спросите у FixBot

      Добавить комментарий

    4. MacBook Pro 13" Retina Display Early 2013 Left Speaker Replacement: шаг 7, изображение 1 из 1
      • Remove the wide head 6.4 mm T6 Torx screw securing the battery connector to the logic board assembly.

      Спросите у FixBot

      Добавить комментарий

    5. MacBook Pro 13" Retina Display Early 2013 Left Speaker Replacement: шаг 8, изображение 1 из 2 MacBook Pro 13" Retina Display Early 2013 Left Speaker Replacement: шаг 8, изображение 2 из 2
      • Carefully lift the battery connector board up off the logic board.

      • It is recommended to bend the battery cables just slightly, to keep the board suspended up above the logic board and out of the way.

      • Do not fold the board completely over, or crease the cables, as this may damage the battery.

      Спросите у FixBot

      Добавить комментарий

    1. MacBook Pro 13" Retina Display Early 2013 Left Speaker Replacement, Battery Contact Board: шаг 9, изображение 1 из 2 MacBook Pro 13" Retina Display Early 2013 Left Speaker Replacement, Battery Contact Board: шаг 9, изображение 2 из 2
      Инструмент, используемый на этом этапе:
      Tweezers
      $4.99
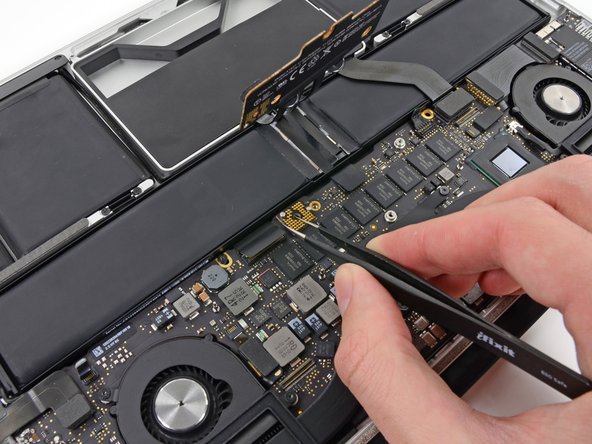
      • Grasp the Interposer with tweezers.

      • An interposer is the name for an interface that links one electrical connection to another. In this repair, it is the board connecting the battery to logic board.

      • Lift the Interposer off the logic board and remove it.

      • Removing this board will ensure that the battery remains disconnected throughout your repair, preventing your computer from accidentally powering on. It's also a good idea to take it out so it doesn't fall out unexpectedly.

      Спросите у FixBot

      Добавить комментарий

    1. MacBook Pro 13" Retina Display Early 2013 Left Speaker Replacement, Left Speaker: шаг 10, изображение 1 из 3 MacBook Pro 13" Retina Display Early 2013 Left Speaker Replacement, Left Speaker: шаг 10, изображение 2 из 3 MacBook Pro 13" Retina Display Early 2013 Left Speaker Replacement, Left Speaker: шаг 10, изображение 3 из 3
      • Use the flat end of a spudger to pry the headphone jack cable connector straight up off its socket on the logic board.

      • Gently bend the headphone jack cable to 90° up from the logic board.

      • Bending the headphone jack cable will allow you to disconnect the left speaker cable connector without having the headphone jack cable in the way.

      Спросите у FixBot

      Добавить комментарий

    2. MacBook Pro 13" Retina Display Early 2013 Left Speaker Replacement: шаг 11, изображение 1 из 2 MacBook Pro 13" Retina Display Early 2013 Left Speaker Replacement: шаг 11, изображение 2 из 2
      • Wedge the tip of a spudger beneath the left speaker cable connector.

      • Gently pry the left speaker cable connector up off from its socket on the logic board.

      • Be sure you are prying up on the connector, not the socket itself.

      Спросите у FixBot

      Добавить комментарий

    3. MacBook Pro 13" Retina Display Early 2013 Left Speaker Replacement: шаг 12, изображение 1 из 1
      Инструмент, используемый на этом этапе:
      Tweezers
      $4.99
      • Use a T5 Torx driver to remove the following screws securing the left speaker to the upper case:

      • One black 6.8 mm screw

      • One silver 6.3 mm screw

      • One black 4.9 mm screw

      • The silver screw (in the corner) may be covered with a foam pad. If so, use your tweezers to peel it up and remove it.

      Спросите у FixBot

      Добавить комментарий

    4. MacBook Pro 13" Retina Display Early 2013 Left Speaker Replacement: шаг 13, изображение 1 из 2 MacBook Pro 13" Retina Display Early 2013 Left Speaker Replacement: шаг 13, изображение 2 из 2
      • Lift and remove the left speaker out of the upper case.

      Спросите у FixBot

      Добавить комментарий

Заключение

To reassemble your device, follow these instructions in reverse order.

Отменить: Я не выполнил это руководство.

8 человек успешно провели ремонт по этому руководству.

Sam Goldheart

Участник с: 10/18/12

477 943 Репутация

Автор 538 руководств

Команда

iFixit Участник iFixit

Staff

123 членов

Автор 80 380 руководств

1 Комментарий к руководству

Super simple and comprehensive. Great instructions !

Sascha Simon - Ответить Поделиться

Добавить комментарий

Статистика просмотров:

За последние 24 часов: 3

За последние 7 дней: 17

За последние 30 дней: 65

За всё время: 9,728