Перейти к основному содержанию

MacBook Pro 13" Retina Display Early 2013 Trackpad Replacement

Выберете то, что вам нужно

  1. MacBook Pro 13" Retina Display Early 2013 Trackpad Replacement, Lower Case: шаг 1, изображение 1 из 1
    Инструмент, используемый на этом этапе:
    Magnetic Project Mat
    $19.95
    Купить
    • Remove the following ten screws securing the lower case to the upper case:

    • Two 2.3 mm P5 Pentalobe screws

    • Eight 3.0 mm P5 Pentalobe screws

    • Throughout this repair, keep track of each screw and make sure it goes back exactly where it came from to avoid damaging your device.

  2. MacBook Pro 13" Retina Display Early 2013 Trackpad Replacement: шаг 2, изображение 1 из 1
    • Wedge your fingers between the upper case and the lower case.

    • Gently pull the lower case away from the upper case.

    • Remove the lower case and set it aside.

  3. MacBook Pro 13" Retina Display Early 2013 Trackpad Replacement: шаг 3, изображение 1 из 3 MacBook Pro 13" Retina Display Early 2013 Trackpad Replacement: шаг 3, изображение 2 из 3 MacBook Pro 13" Retina Display Early 2013 Trackpad Replacement: шаг 3, изображение 3 из 3
    • During reassembly, gently push down the center of the lower case to reattach the two plastic clips.

    • The lower case is connected to the upper case at the center, with two plastic clips.

  4. MacBook Pro 13" Retina Display Early 2013 Trackpad Replacement, Battery Connector: шаг 4, изображение 1 из 1
    • Remove the plastic cover adhered to the battery contact board.

  5. MacBook Pro 13" Retina Display Early 2013 Trackpad Replacement: шаг 5, изображение 1 из 1
    • Remove the following screws securing the battery connector board to the logic board:

    • Two 2.8 mm T6 Torx screws

    • One 7.0 mm T6 Torx shouldered screw

  6. MacBook Pro 13" Retina Display Early 2013 Trackpad Replacement: шаг 6, изображение 1 из 2 MacBook Pro 13" Retina Display Early 2013 Trackpad Replacement: шаг 6, изображение 2 из 2
    • Use tweezers to remove the small plastic cover located near the bottom right of the battery connector board.

  7. MacBook Pro 13" Retina Display Early 2013 Trackpad Replacement: шаг 7, изображение 1 из 1
    • Remove the wide head 6.4 mm T6 Torx screw securing the battery connector to the logic board assembly.

  8. MacBook Pro 13" Retina Display Early 2013 Trackpad Replacement: шаг 8, изображение 1 из 2 MacBook Pro 13" Retina Display Early 2013 Trackpad Replacement: шаг 8, изображение 2 из 2
    • Carefully lift the battery connector board up off the logic board.

    • It is recommended to bend the battery cables just slightly, to keep the board suspended up above the logic board and out of the way.

    • Do not fold the board completely over, or crease the cables, as this may damage the battery.

  9. MacBook Pro 13" Retina Display Early 2013 Trackpad Replacement, Battery Contact Board: шаг 9, изображение 1 из 2 MacBook Pro 13" Retina Display Early 2013 Trackpad Replacement, Battery Contact Board: шаг 9, изображение 2 из 2
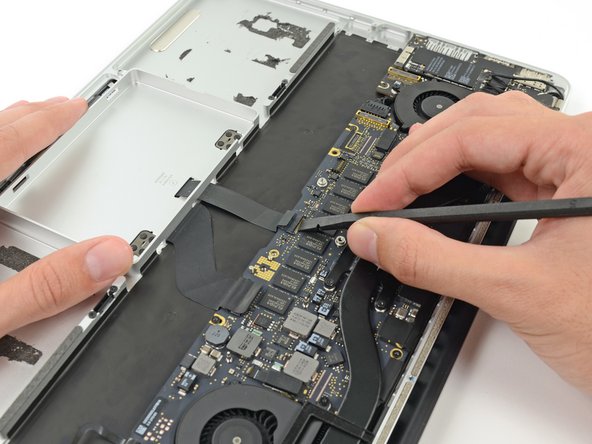
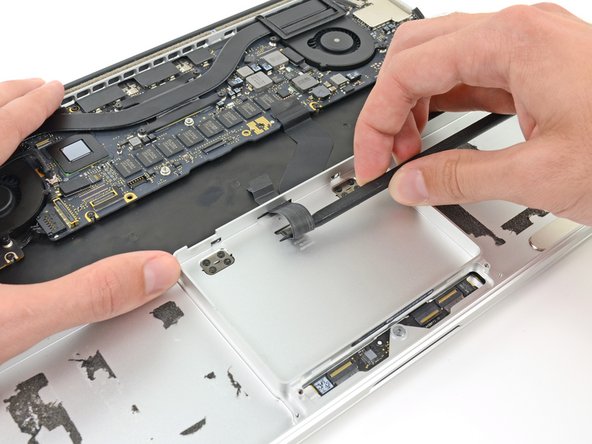
    • Grasp the Interposer with tweezers.

    • An interposer is the name for an interface that links one electrical connection to another. In this repair, it is the board connecting the battery to logic board.

    • Lift the Interposer off the logic board and remove it.

    • Removing this board will ensure that the battery remains disconnected throughout your repair, preventing your computer from accidentally powering on. It's also a good idea to take it out so it doesn't fall out unexpectedly.

  10. MacBook Pro 13" Retina Display Early 2013 Trackpad Replacement, I/O Board Data Cable: шаг 10, изображение 1 из 2 MacBook Pro 13" Retina Display Early 2013 Trackpad Replacement, I/O Board Data Cable: шаг 10, изображение 2 из 2
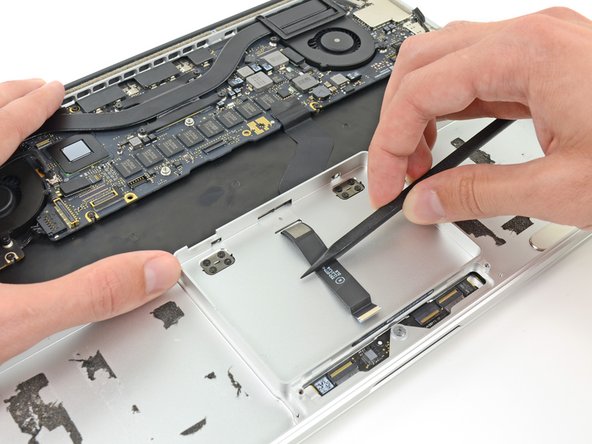
    • Use the flat end of a spudger to pry the right side of the I/O board data cable connector up off its socket on the I/O board.

    • When prying the I/O board data cable connector from its socket, make sure to pry the connector itself and not the socket. Prying the socket may cause irreversible damage to the I/O board.

  11. MacBook Pro 13" Retina Display Early 2013 Trackpad Replacement: шаг 11, изображение 1 из 2 MacBook Pro 13" Retina Display Early 2013 Trackpad Replacement: шаг 11, изображение 2 из 2
    • Wedge the flat end of a spudger beneath the left side of the I/O board data cable connector.

    • Gently twist the spudger to disconnect the I/O board data cable connector from its socket on the logic board.

  12. MacBook Pro 13" Retina Display Early 2013 Trackpad Replacement: шаг 12, изображение 1 из 1
    • Lift and remove the I/O board data cable from the MacBook Pro.

  13. MacBook Pro 13" Retina Display Early 2013 Trackpad Replacement, Right Speaker: шаг 13, изображение 1 из 3 MacBook Pro 13" Retina Display Early 2013 Trackpad Replacement, Right Speaker: шаг 13, изображение 2 из 3 MacBook Pro 13" Retina Display Early 2013 Trackpad Replacement, Right Speaker: шаг 13, изображение 3 из 3
    • Use the flat end of a spudger to pry the SSD cable connector up from its socket on the logic board.

    • Move the SSD cable connector out of the way.

  14. MacBook Pro 13" Retina Display Early 2013 Trackpad Replacement: шаг 14, изображение 1 из 2 MacBook Pro 13" Retina Display Early 2013 Trackpad Replacement: шаг 14, изображение 2 из 2
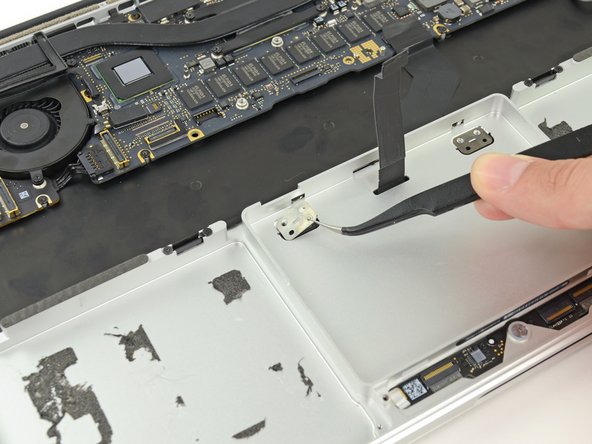
    • Wedge the pointed end of a spudger beneath the right speaker cable connector.

    • Gently pry the right speaker cable connector up off from its socket on the logic board.

    • Be sure you are prying up on the connector, not the socket itself.

  15. MacBook Pro 13" Retina Display Early 2013 Trackpad Replacement: шаг 15, изображение 1 из 2 MacBook Pro 13" Retina Display Early 2013 Trackpad Replacement: шаг 15, изображение 2 из 2
    • Use a T5 Torx driver to remove the following screws securing the right speaker to the upper case:

    • One black 6.8 mm screw

    • One silver 6.3 mm screw

    • One black 4.9 mm screw

    • The silver screw (in the corner) may be covered with a foam pad. If so, use your tweezers to peel it up and remove it.

  16. MacBook Pro 13" Retina Display Early 2013 Trackpad Replacement: шаг 16, изображение 1 из 2 MacBook Pro 13" Retina Display Early 2013 Trackpad Replacement: шаг 16, изображение 2 из 2
    • Lift and remove the right speaker out of the upper case.

    • If necessary, de-route the right speaker cable from its channel in the upper case.

  17. MacBook Pro 13" Retina Display Early 2013 Trackpad Replacement, Left Speaker: шаг 17, изображение 1 из 3 MacBook Pro 13" Retina Display Early 2013 Trackpad Replacement, Left Speaker: шаг 17, изображение 2 из 3 MacBook Pro 13" Retina Display Early 2013 Trackpad Replacement, Left Speaker: шаг 17, изображение 3 из 3
    • Use the flat end of a spudger to pry the headphone jack cable connector straight up off its socket on the logic board.

    • Gently bend the headphone jack cable to 90° up from the logic board.

    • Bending the headphone jack cable will allow you to disconnect the left speaker cable connector without having the headphone jack cable in the way.

  18. MacBook Pro 13" Retina Display Early 2013 Trackpad Replacement: шаг 18, изображение 1 из 2 MacBook Pro 13" Retina Display Early 2013 Trackpad Replacement: шаг 18, изображение 2 из 2
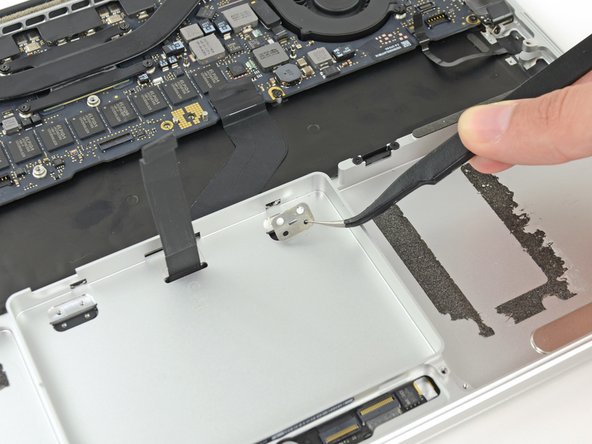
    • Wedge the tip of a spudger beneath the left speaker cable connector.

    • Gently pry the left speaker cable connector up off from its socket on the logic board.

    • Be sure you are prying up on the connector, not the socket itself.

  19. MacBook Pro 13" Retina Display Early 2013 Trackpad Replacement: шаг 19, изображение 1 из 1
    • Use a T5 Torx driver to remove the following screws securing the left speaker to the upper case:

    • One black 6.8 mm screw

    • One silver 6.3 mm screw

    • One black 4.9 mm screw

    • The silver screw (in the corner) may be covered with a foam pad. If so, use your tweezers to peel it up and remove it.

  20. MacBook Pro 13" Retina Display Early 2013 Trackpad Replacement: шаг 20, изображение 1 из 2 MacBook Pro 13" Retina Display Early 2013 Trackpad Replacement: шаг 20, изображение 2 из 2
    • Lift and remove the left speaker out of the upper case.

  21. MacBook Pro 13" Retina Display Early 2013 Trackpad Replacement, SSD Assembly: шаг 21, изображение 1 из 3 MacBook Pro 13" Retina Display Early 2013 Trackpad Replacement, SSD Assembly: шаг 21, изображение 2 из 3 MacBook Pro 13" Retina Display Early 2013 Trackpad Replacement, SSD Assembly: шаг 21, изображение 3 из 3
    • Use your thumb or finger to bend the plastic spring bar on the SSD tray, freeing the two clips at the front side of the device.

    • While holding the spring bar depressed, tilt the SSD assembly up out of its cavity.

  22. MacBook Pro 13" Retina Display Early 2013 Trackpad Replacement: шаг 22, изображение 1 из 1
    • Remove the SSD assembly from the upper case.

  23. MacBook Pro 13" Retina Display Early 2013 Trackpad Replacement, Battery: шаг 23, изображение 1 из 2 MacBook Pro 13" Retina Display Early 2013 Trackpad Replacement, Battery: шаг 23, изображение 2 из 2
    • Remove three 2.2 mm T5 Torx screws from each side of the battery (six screws total).

  24. MacBook Pro 13" Retina Display Early 2013 Trackpad Replacement: шаг 24, изображение 1 из 1
    • The liquid adhesive remover provided in your kit can affect the antireflective coating on your MacBook Pro's display.

    • To protect your display, place a sheet of aluminum foil between the display and keyboard and leave it there while you work.

  25. MacBook Pro 13" Retina Display Early 2013 Trackpad Replacement: шаг 25, изображение 1 из 2 MacBook Pro 13" Retina Display Early 2013 Trackpad Replacement: шаг 25, изображение 2 из 2
    • Now that your MacBook Pro is fully prepped, it's time to prep yourself.

    • iFixit adhesive remover contains acetone, a mild skin and eye irritant.

    • Wear eye protection when handling and applying the adhesive remover. (Eye protection is included in your kit.)

    • Do not wear contact lenses without eye protection.

    • Protective gloves are also included in your kit. If you are concerned about skin irritation, put your gloves on now.

  26. MacBook Pro 13" Retina Display Early 2013 Trackpad Replacement: шаг 26, изображение 1 из 3 MacBook Pro 13" Retina Display Early 2013 Trackpad Replacement: шаг 26, изображение 2 из 3 MacBook Pro 13" Retina Display Early 2013 Trackpad Replacement: шаг 26, изображение 3 из 3
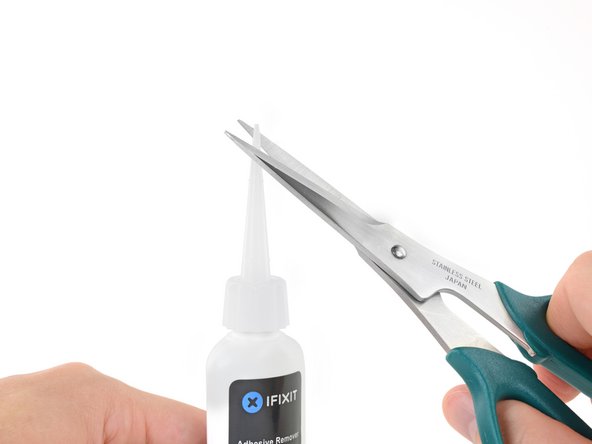
    • Pull off the black rubber stopper from your bottle of adhesive remover.

    • Twist to loosen or remove the bottle cap before you cut the applicator tip.

    • This unseals the bottle and allows the pressure to equalize before you cut the applicator tip. If you skip this step, the adhesive remover may spray out unexpectedly when the tip is cut.

    • Use scissors to cut off the sealed tip of the applicator.

    • Cutting close to the narrow tip will give you better control so you can apply the adhesive remover in small amounts.

    • Twist and close the bottle cap securely before you proceed further.

  27. MacBook Pro 13" Retina Display Early 2013 Trackpad Replacement: шаг 27, изображение 1 из 1
    • Apply a few drops of adhesive remover evenly under the edge of the leftmost battery cell.

    • You don't need to use very much. The small bottle contains more than twice the amount of solvent needed to remove all the battery cells.

    • Wait 2-3 minutes for the liquid adhesive remover to penetrate underneath the battery cell before you proceed to the next step.

  28. MacBook Pro 13" Retina Display Early 2013 Trackpad Replacement: шаг 28, изображение 1 из 3 MacBook Pro 13" Retina Display Early 2013 Trackpad Replacement: шаг 28, изображение 2 из 3 MacBook Pro 13" Retina Display Early 2013 Trackpad Replacement: шаг 28, изображение 3 из 3
    Инструмент, используемый на этом этапе:
    Plastic Cards
    $2.99
    Купить
    • Insert the flat edge of a spudger or plastic card underneath the leftmost battery cell.

    • Run your tool along the bottom perimeter of the battery cell and lift to begin separating the adhesive.

  29. MacBook Pro 13" Retina Display Early 2013 Trackpad Replacement: шаг 29, изображение 1 из 3 MacBook Pro 13" Retina Display Early 2013 Trackpad Replacement: шаг 29, изображение 2 из 3 MacBook Pro 13" Retina Display Early 2013 Trackpad Replacement: шаг 29, изображение 3 из 3
    • Insert the spudger along the left-hand side of the leftmost battery cell.

    • Run the spudger up along the left side of the leftmost battery cell.

    • Slightly pry the leftmost battery cell to release it from the adhesive.

  30. MacBook Pro 13" Retina Display Early 2013 Trackpad Replacement: шаг 30, изображение 1 из 3 MacBook Pro 13" Retina Display Early 2013 Trackpad Replacement: шаг 30, изображение 2 из 3 MacBook Pro 13" Retina Display Early 2013 Trackpad Replacement: шаг 30, изображение 3 из 3
    • Repeat the above steps to separate the adjacent battery cell from its adhesive:

    • Apply a few drops of liquid adhesive remover under the battery cell.

    • Wait 2-3 minutes for the adhesive remover to penetrate and soften the adhesive.

    • Carefully wedge a spudger or plastic card inwards, being careful to not damage the battery, and separate the battery cell from the adhesive securing it to your MacBook Pro.

  31. MacBook Pro 13" Retina Display Early 2013 Trackpad Replacement: шаг 31, изображение 1 из 3 MacBook Pro 13" Retina Display Early 2013 Trackpad Replacement: шаг 31, изображение 2 из 3 MacBook Pro 13" Retina Display Early 2013 Trackpad Replacement: шаг 31, изображение 3 из 3
    • Insert the flat end of a spudger underneath the larger leftmost battery cell.

    • Carefully wedge the spudger inwards, being careful to not damage the battery cells.

    • Pry the larger leftmost battery cell up off the upper case.

  32. MacBook Pro 13" Retina Display Early 2013 Trackpad Replacement: шаг 32, изображение 1 из 3 MacBook Pro 13" Retina Display Early 2013 Trackpad Replacement: шаг 32, изображение 2 из 3 MacBook Pro 13" Retina Display Early 2013 Trackpad Replacement: шаг 32, изображение 3 из 3
    • Grasp the battery cells and gently move (but do not remove) them from their recess in the upper case.

    • Leave the battery cells resting on top of the upper case as shown in the third picture.

  33. MacBook Pro 13" Retina Display Early 2013 Trackpad Replacement: шаг 33, изображение 1 из 3 MacBook Pro 13" Retina Display Early 2013 Trackpad Replacement: шаг 33, изображение 2 из 3 MacBook Pro 13" Retina Display Early 2013 Trackpad Replacement: шаг 33, изображение 3 из 3
    • Switch sides and repeat the above procedure for the two battery cells on the right-hand side of the MacBook Pro.

    • Remember to add a small amount of liquid adhesive remover under each battery cell, and wait 2-3 minutes for it to penetrate before prying up the cell.

    • Be careful not to puncture or otherwise damage the battery cells.

  34. MacBook Pro 13" Retina Display Early 2013 Trackpad Replacement: шаг 34, изображение 1 из 3 MacBook Pro 13" Retina Display Early 2013 Trackpad Replacement: шаг 34, изображение 2 из 3 MacBook Pro 13" Retina Display Early 2013 Trackpad Replacement: шаг 34, изображение 3 из 3
    • Lift the battery as a whole up out of the upper case, and remove the battery.

    • Before installing a new battery, remove all the old adhesive from the MacBook Pro's case.

    • With a little luck, you can slowly pull out each strip of adhesive with your fingers.

    • Otherwise, soak each section of adhesive with a bit of adhesive remover for 2-3 minutes, and then scrape it out with an opening pick or one of the other tools in your kit. This can take quite a bit of work, so be patient.

    • Mop up any remaining adhesive remover and give your MacBook Pro a few minutes to air dry.

    • The replacement battery included in your iFixit kit comes with adhesive pre-installed. Test the battery's fit and alignment carefully before peeling off the film covering the adhesive, and then press each cell firmly into place. If any additional films/liners are present that weren't on your original battery, remove them now.

    • Calibrate your newly installed battery: charge it to 100%, and keep charging it for at least 2 more hours. Unplug and use it normally to drain the battery. When you see the low battery warning, save your work, and keep your laptop on until it goes to sleep due to low battery. Wait at least 5 hours, then charge your laptop uninterrupted to 100%.

    • If you notice any unusual behavior or problems after installing your new battery, you may need to reset your MacBook Pro's SMC.

  35. MacBook Pro 13" Retina Display Early 2013 Trackpad Replacement, Trackpad: шаг 35, изображение 1 из 2 MacBook Pro 13" Retina Display Early 2013 Trackpad Replacement, Trackpad: шаг 35, изображение 2 из 2
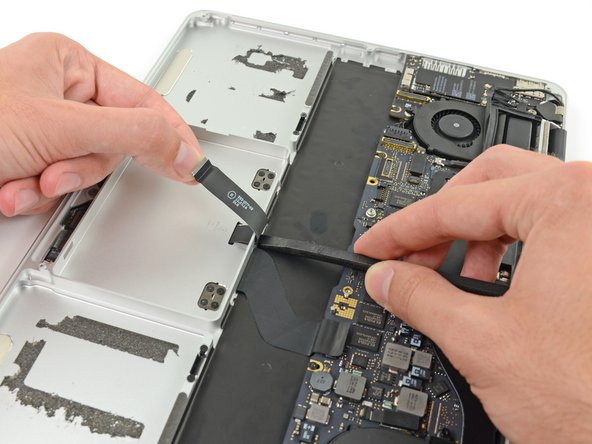
    • Use the flat end of a spudger to flip up the retaining flap on the trackpad ribbon cable ZIF socket.

    • Be sure you are prying up on the hinged retaining flap, not the socket itself.

  36. MacBook Pro 13" Retina Display Early 2013 Trackpad Replacement: шаг 36, изображение 1 из 2 MacBook Pro 13" Retina Display Early 2013 Trackpad Replacement: шаг 36, изображение 2 из 2
    • Grasp the plastic pull tab and pull the trackpad ribbon cable out of its socket.

  37. MacBook Pro 13" Retina Display Early 2013 Trackpad Replacement: шаг 37, изображение 1 из 2 MacBook Pro 13" Retina Display Early 2013 Trackpad Replacement: шаг 37, изображение 2 из 2
    • Wedge the spudger between the trackpad ribbon cable and the upper case.

    • Run the spudger along the bottom to release the trackpad ribbon cable from the adhesive securing it to the upper case.

  38. MacBook Pro 13" Retina Display Early 2013 Trackpad Replacement: шаг 38, изображение 1 из 2 MacBook Pro 13" Retina Display Early 2013 Trackpad Replacement: шаг 38, изображение 2 из 2
    • Insert the tip of a spudger in between the trackpad ribbon cable and the upper case inside the SSD assembly cavity to remove the last of the adhesive.

  39. MacBook Pro 13" Retina Display Early 2013 Trackpad Replacement: шаг 39, изображение 1 из 3 MacBook Pro 13" Retina Display Early 2013 Trackpad Replacement: шаг 39, изображение 2 из 3 MacBook Pro 13" Retina Display Early 2013 Trackpad Replacement: шаг 39, изображение 3 из 3
    • Using the tip of the spudger carefully thread the trackpad ribbon cable out of the notch near the top of the SSD assembly cavity.

  40. MacBook Pro 13" Retina Display Early 2013 Trackpad Replacement: шаг 40, изображение 1 из 1
    • Remove the following screws securing the trackpad brackets to the trackpad and upper case:

    • Four 1.9 mm Phillips #000 screws

    • Four 1.4 mm Phillips #000 screws

  41. MacBook Pro 13" Retina Display Early 2013 Trackpad Replacement: шаг 41, изображение 1 из 3 MacBook Pro 13" Retina Display Early 2013 Trackpad Replacement: шаг 41, изображение 2 из 3 MacBook Pro 13" Retina Display Early 2013 Trackpad Replacement: шаг 41, изображение 3 из 3
    • Use tweezers to remove the two trackpad mounting brackets from the upper case.

  42. MacBook Pro 13" Retina Display Early 2013 Trackpad Replacement: шаг 42, изображение 1 из 2 MacBook Pro 13" Retina Display Early 2013 Trackpad Replacement: шаг 42, изображение 2 из 2
    • To avoid scratching the display, open the computer about 90º and set it on end.

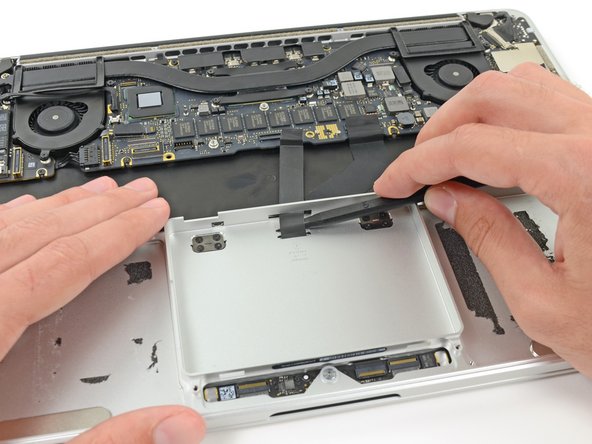
    • Guide the trackpad ribbon cable through the slot cut in the upper case. This will push the trackpad up out of its recess in the top of the upper case. Guide the trackpad out with your other hand, so it doesn't fall.

  43. MacBook Pro 13" Retina Display Early 2013 Trackpad Replacement: шаг 43, изображение 1 из 3 MacBook Pro 13" Retina Display Early 2013 Trackpad Replacement: шаг 43, изображение 2 из 3 MacBook Pro 13" Retina Display Early 2013 Trackpad Replacement: шаг 43, изображение 3 из 3
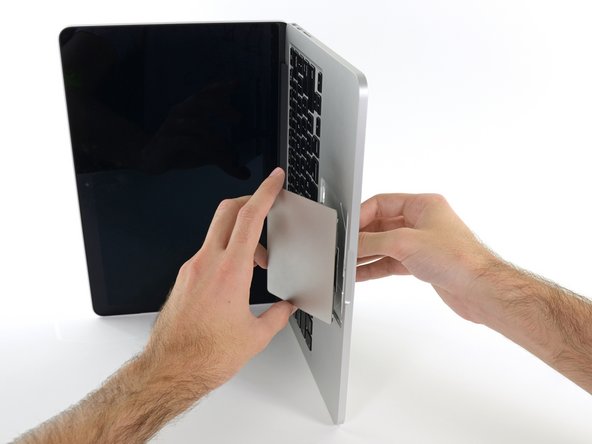
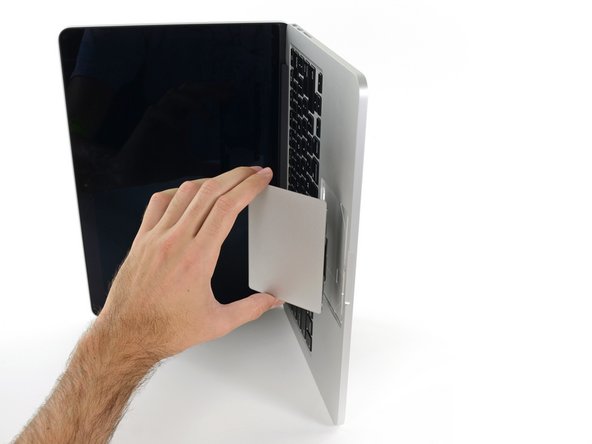
    • Gently pull the trackpad from the upper case, being careful not to snag the ribbon cable.

Заключение

To reassemble your device, follow these instructions in reverse order.

13 участников успешно повторили данное руководство.

Sam Goldheart

Участник с: 10/18/12

465 122 Репутация

Автор 538 руководств

Команда

iFixit Участник iFixit

Staff

135 членов

Автор 16 476 руководств

12 Комментариев

Hi!

I have a Macbook Pro Retina 15-Inch Early 2013. Is it a similar procedure for this laptop with a larger screen (15" versus yours 13")?

kisakuski87 - Ответить

We've got guides for the 15" Early 2013, unfortunately, removing the battery in the 15" is significantly harder, you can follow the upper case guide to get most of the way and either replace the whole upper case (and get a new battery included), or use this guide to try to get the rest of the way. Best of luck!

Sam Goldheart -

I just wanted to say this worked for me, thank you for the walkthrough! My trackpad just suddenly died one day out of the blue. I thought it might be a lose cable, but ordered a replacement just in case. No loose cables, simple swap out did the trick. This walkthrough is very good. Only thing I'd warn the feint of heart is the removal of the batteries can be intense because they are glued in. You really need the right tool to work it free. I think the battery removal took at least 20 minutes alone!

Anyone, thanks again for your help!

andrewjripley - Ответить

Excellent write up. Three suggestions which i uncovered when i followed this procedure:

Step 5 - The silver shouldered screw was a T6 Torx, not a T7. On this basis, I didn't need a T7 Torx screwdriver for this procedure.

Step 15 & 19 - To remove the corner screws (the heads of which aren't immediately visible), you need to carefully remove the covering mesh with tweezers

Step 44 - Reposition of trackpad. I found that when putting the trackpad back in place during reassembly, it was tricky to get it in exactly the right position (perfectly centralised). I found that taking four small pieces of paper and folding them in half helped. I wedged a piece of folded paper in between the four sides of the trackpad and then tightened the screws. Once the screws are tightened, you can simply remove the paper.

Sunil Dhiman - Ответить

This guide wasted a bit of my time! Removing the speakers and the battery are unnecessary. The top piece of the battery can be lifted to reveal the trackpad cable once the screws at the sides are removed.

just1ed - Ответить

Добавить комментарий

Просмотр статистики:

За последние 24часов: 1

За последние 7 дней: 17

За последние 30 дней: 110

За всё время: 37,373