Перейти к основному содержанию

MacBook Pro 13" Retina Display Early 2015 Heat Sink Replacement

Выберете то, что вам нужно

  1. MacBook Pro 13" Retina Display Early 2015 Heat Sink Replacement, Lower Case: шаг 1, изображение 1 из 1
    Инструмент, используемый на этом этапе:
    Magnetic Project Mat
    $19.95
    Купить
    • Remove the following ten screws securing the lower case to the upper case:

    • Two 2.3 mm P5 Pentalobe screws

    • Eight 3.0 mm P5 Pentalobe screws

    • Throughout this repair, keep track of each screw and make sure it goes back exactly where it came from to avoid damaging your device.

  2. MacBook Pro 13" Retina Display Early 2015 Heat Sink Replacement: шаг 2, изображение 1 из 1
    • Wedge your fingers between the upper case and the lower case.

    • Gently pull the lower case away from the upper case to remove it.

  3. MacBook Pro 13" Retina Display Early 2015 Heat Sink Replacement: шаг 3, изображение 1 из 2 MacBook Pro 13" Retina Display Early 2015 Heat Sink Replacement: шаг 3, изображение 2 из 2
    • The lower case is connected to the upper case with two plastic clips near its center.

    • During reassembly, gently push down the center of the lower case to reattach the two plastic clips.

  4. MacBook Pro 13" Retina Display Early 2015 Heat Sink Replacement, Battery Connector: шаг 4, изображение 1 из 1
    • If necessary, remove the plastic cover adhered to the battery contact board.

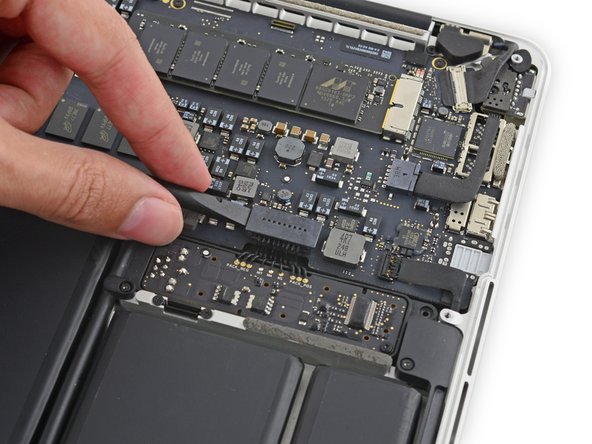
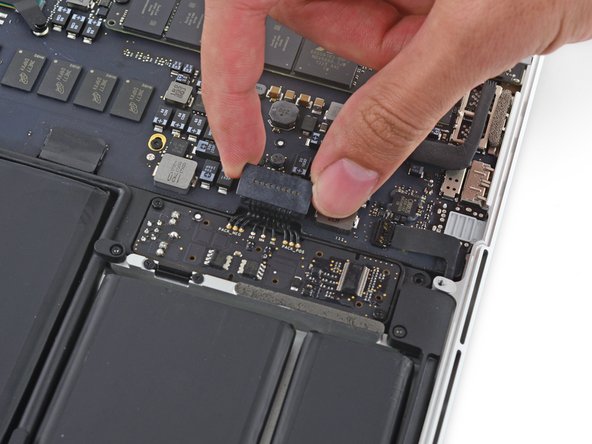
  5. MacBook Pro 13" Retina Display Early 2015 Heat Sink Replacement: шаг 5, изображение 1 из 2 MacBook Pro 13" Retina Display Early 2015 Heat Sink Replacement: шаг 5, изображение 2 из 2
    • Use the flat end of a spudger to lift the battery connector straight up out of its socket on the logic board.

    • Be sure you lift up only on the connector itself, not the socket, or you risk permanent damage to the logic board.

  6. MacBook Pro 13" Retina Display Early 2015 Heat Sink Replacement: шаг 6, изображение 1 из 1
    • Bend the battery connector up out of the way to prevent accidental contact with its socket during your repair.

  7. MacBook Pro 13" Retina Display Early 2015 Heat Sink Replacement, Heat Sink: шаг 7, изображение 1 из 3 MacBook Pro 13" Retina Display Early 2015 Heat Sink Replacement, Heat Sink: шаг 7, изображение 2 из 3 MacBook Pro 13" Retina Display Early 2015 Heat Sink Replacement, Heat Sink: шаг 7, изображение 3 из 3
    • Carefully remove the rubber fan bumper from the edge of the heat sink.

    • The fan bumper wraps around the heat sink and fits into slots in the fan duct. During reassembly, be sure to fit the tabs into the notches in the fan duct.

  8. MacBook Pro 13" Retina Display Early 2015 Heat Sink Replacement: шаг 8, изображение 1 из 2 MacBook Pro 13" Retina Display Early 2015 Heat Sink Replacement: шаг 8, изображение 2 из 2
    • Use the flat end of a spudger to peel the four foam stickers off of the heat sink screws.

  9. MacBook Pro 13" Retina Display Early 2015 Heat Sink Replacement: шаг 9, изображение 1 из 1
    • Remove the following screws securing the heat sink to the logic board:

    • One 2.7 mm T5 screw (silver)

    • Four T5 screws (black)

  10. MacBook Pro 13" Retina Display Early 2015 Heat Sink Replacement: шаг 10, изображение 1 из 2 MacBook Pro 13" Retina Display Early 2015 Heat Sink Replacement: шаг 10, изображение 2 из 2
Заключение

To reassemble your device, follow these instructions in reverse order.

56 участников успешно повторили данное руководство.

Andrew Optimus Goldheart

Участник с: 10/17/09

502 710 Репутация

Автор 407 руководств

Команда

iFixit Участник iFixit

Staff

135 членов

Автор 16 731 руководств

5 Комментариев

what part should i purchae to get the rubber fan bumper?

Walid Shraim - Ответить

Bonjour !

Merci pour ce tutoriel de qualité ! Pour la pâte thermique, j’ai opté pour la Grizzly Kryonaut… Un peu overkill pour un MBP 13” de 2015, mais cela devrait contribuer à sa longévité !

Une remarque cependant : sur mon modèle, la vis en ROUGE de l’ETAPE 9 n’était pas une Torx T5, mais une Y00 ! Cela ne m’a pas posé de problème car j’avais le kit complet de tournevis, mais cela l’aurait été si je n’avais acheté qu’un P5 et un T5 ! Faites attention !

Bonne continuation !

PS: si certains doutent de leurs capacités à réaliser cette opération, sachez que je suis grand débutant en informatique et que je n’ai eu AUCUN problème. La partie la plus ardue étant le retrait du connecteur de la batterie !

Merlin Calvez-Martinez - Ответить

Used this guide to pop the heat sink and scrape off the old thermal paste. Cleaned and re-applied with new paste, hopefully leading to better thermal performance. One thing I noticed is that the heatsink doesn’t cover the second module (presumed to be the integrated GPU) next to the CPU? Perhaps this is why thermal performance is so abysmal on these little guys.

Ming Lee - Ответить

In my MacBook Pro, the screw in step 9 that is farthest away from the CPU is a Philips screw, rather than T5 Torx.

I bought my MacBook Pro in 2016, over a year after it came out, so this might be different depending on when yours was manufactured.

Daniel Korzhenevich - Ответить

What is the 4 screw size of heatsink? mine are stripped, need to buy new 4

rick - Ответить

Добавить комментарий

Просмотр статистики:

За последние 24часов: 15

За последние 7 дней: 84

За последние 30 дней: 398

За всё время: 42,928