Перейти к основному содержанию

MacBook Pro 13" Retina Display Early 2015 Trackpad Cable Replacement

Абсолютно необходимое руководство
Это руководство предназначено только для использования в качестве обязательного условия для других руководств. Оно не полностью само по себе.

Выберете то, что вам нужно

  1. MacBook Pro 13" Retina Display Early 2015 Trackpad Cable Replacement, Trackpad Cable: шаг 1, изображение 1 из 2 MacBook Pro 13" Retina Display Early 2015 Trackpad Cable Replacement, Trackpad Cable: шаг 1, изображение 2 из 2
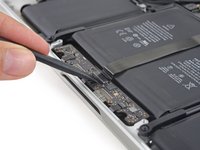
    • Use the flat end of a spudger to pop the trackpad connector straight up off its socket on the logic board.

  2. MacBook Pro 13" Retina Display Early 2015 Trackpad Cable Replacement: шаг 2, изображение 1 из 2 MacBook Pro 13" Retina Display Early 2015 Trackpad Cable Replacement: шаг 2, изображение 2 из 2
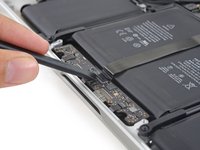
    • Lift the trackpad cable up off the battery to separate it from the adhesive securing it.

    • Be careful not to damage the cable. If it doesn't peel up easily, apply a little heat from an iOpener, heat gun, or hair dryer to soften the adhesive, and try again.

    • If you are installing a new trackpad cable, be sure to fold the new cable to match the shape of the old cable. The new cable will appear to be too long if it is not folded.

  3. MacBook Pro 13" Retina Display Early 2015 Trackpad Cable Replacement: шаг 3, изображение 1 из 3 MacBook Pro 13" Retina Display Early 2015 Trackpad Cable Replacement: шаг 3, изображение 2 из 3 MacBook Pro 13" Retina Display Early 2015 Trackpad Cable Replacement: шаг 3, изображение 3 из 3
    • If necessary, peel back any tape covering the trackpad cable connector.

    • Use the end of a spudger to flip the retaining tab on the ZIF connector.

  4. MacBook Pro 13" Retina Display Early 2015 Trackpad Cable Replacement: шаг 4, изображение 1 из 2 MacBook Pro 13" Retina Display Early 2015 Trackpad Cable Replacement: шаг 4, изображение 2 из 2
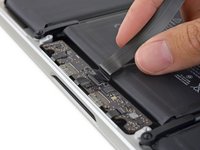
    • Pull the trackpad cable straight out of its ZIF socket on the trackpad control board.

    • During reassembly, make sure that the retaining tab is in the up, "unlocked" position before you insert the cable into the socket.

  5. MacBook Pro 13" Retina Display Early 2015 Trackpad Cable Replacement: шаг 5, изображение 1 из 1
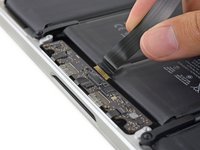
    • Remove the single 3.7 mm T5 Torx screw securing the battery board to the upper case.

Заключение

To reassemble your device, follow these instructions in reverse order.

3 участников успешно повторили данное руководство.

Sam Goldheart

Участник с: 10/18/12

465 759 Репутация

Автор 538 руководств

Команда

iFixit Участник iFixit

Staff

135 членов

Автор 16 816 руководств

3 Комментариев

Why remove the screw in step 5?

Ari Cooper - Davis - Ответить

Yes @sam , why should you remove the screw in step 5? Is this a mistake?

lmdehaas - Ответить

Step 5: Remove the single 3.7 mm T5 Torx screw.

Step 6: Re-screw single 3.7 mm T5 Torx screw.

David Grabowski - Ответить

Добавить комментарий

Просмотр статистики:

За последние 24часов: 0

За последние 7 дней: 0

За последние 30 дней: 0

За всё время: 1,782