Эта версия возможно содержит некорректные исправления. Переключить на последнюю проверенную версию.
Выберете то, что вам нужно
-
Этот шаг не переведен. Помогите перевести
-
Remove the following ten screws securing the lower case to the upper case:
-
Two 2.3 mm P5 Pentalobe screws
-
Eight 3.0 mm P5 Pentalobe screws
-
-
Этот шаг не переведен. Помогите перевести
-
Wedge your fingers between the upper case and the lower case.
-
Gently pull the lower case away from the upper case to remove it.
-
-
Этот шаг не переведен. Помогите перевести
-
Use the flat end of a spudger to lift the battery connector straight up out of its socket on the logic board.
-
-
Этот шаг не переведен. Помогите перевести
-
Remove the two 2.1 mm T5 Torx screws securing the logic board end of the I/O board cable bracket.
-
-
Этот шаг не переведен. Помогите перевести
-
Grasp the I/O board cable bracket with a pair of tweezers and remove it from the MacBook.
-
-
Этот шаг не переведен. Помогите перевести
-
Use the flat end of a spudger to pop the I/O board connector straight up off its socket on the logic board.
-
-
Этот шаг не переведен. Помогите перевести
-
Lift the logic board end of the I/O board cable straight up to bend it out of the way.
-
-
Этот шаг не переведен. Помогите перевести
-
Carefully tuck the tip of a spudger under the right speaker cable near the connector and lift it up out of its socket on the logic board.
-
-
Этот шаг не переведен. Помогите перевести
-
Carefully peel the right speaker cable off the upper case.
-
-
Этот шаг не переведен. Помогите перевести
-
Remove the following screws securing the right speaker to the upper case:
-
One 5.7 mm T5 Torx screw
-
One 6.5 mm T5 Torx screw
-
One 3.8 mm T5 Torx screw
-
-
Этот шаг не переведен. Помогите перевести
-
Lift the right speaker from the cable end and pull it free from the case.
-
-
Этот шаг не переведен. Помогите перевести
-
Insert the tip of a spudger under the left speaker cable near the connector and lift it up out of its socket on the logic board.
-
-
Этот шаг не переведен. Помогите перевести
-
Remove the following screws securing the left speaker to the upper case:
-
One 5.7 mm T5 Torx screw
-
One 6.5 mm T5 Torx screw
-
One 3.8 mm T5 Torx screw
-
-
Этот шаг не переведен. Помогите перевести
-
Lift the corner of the left speaker up and slide it out around the battery to remove it from the upper case.
-
-
-
Этот шаг не переведен. Помогите перевести
-
Heat the iOpener for thirty seconds.
-
Throughout the repair procedure, as the iOpener cools, reheat it in the microwave for an additional thirty seconds at a time.
-
-
Этот шаг не переведен. Помогите перевести
-
Remove the iOpener from the microwave, holding it by one of the two flat ends to avoid the hot center.
-
-
Этот шаг не переведен. Помогите перевести
-
Fill a pot or pan with enough water to fully submerge an iOpener.
-
Heat the water to a boil. Turn off the heat.
-
Place an iOpener into the hot water for 2-3 minutes. Make sure the iOpener is fully submerged in the water.
-
Use tongs to extract the heated iOpener from the hot water.
-
Thoroughly dry the iOpener with a towel.
-
Your iOpener is ready for use! If you need to reheat the iOpener, heat the water to a boil, turn off the heat, and place the iOpener in the water for 2-3 minutes.
-
-
Этот шаг не переведен. Помогите перевести
-
Remove the five 3.7 mm T5 Torx screws securing the battery to the upper case.
-
-
Этот шаг не переведен. Помогите перевести
-
To protect your display, place a sheet of aluminum foil between the display and keyboard and leave it there while you work.
-
-
Этот шаг не переведен. Помогите перевести
-
Alternatively, if you are using the hot iOpener method, skip the following three steps.
-
Wear eye protection when handling and applying the adhesive remover. (Eye protection is included in your kit.)
-
Do not wear contact lenses without eye protection.
-
Protective gloves are also included in your kit. If you are concerned about skin irritation, put your gloves on now.
-
-
Этот шаг не переведен. Помогите перевести
-
Pull off the black rubber stopper from your bottle of adhesive remover.
-
Use scissors to cut off the sealed tip of the applicator.
-
-
Этот шаг не переведен. Помогите перевести
-
Apply a few drops of adhesive remover evenly under the edge of the rightmost battery cell.
-
Wait 2-3 minutes for the liquid adhesive remover to penetrate underneath the battery cell before you proceed to the next step.
-
-
Этот шаг не переведен. Помогите перевести
-
Use the hot iOpener to cover half of the two right-most battery cells.
-
After about a minute, reheat the iOpener and move it to cover the other half of the right-most battery cells.
-
-
Этот шаг не переведен. Помогите перевести
-
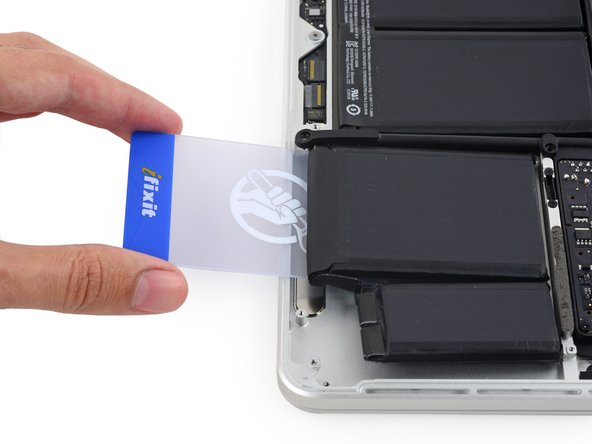
Push a plastic card between the right-most battery cell and the upper case, cutting the adhesive between the two.
-
When using the hot iOpener method, if you encounter significant resistance to prying, stop and use the iOpener to reheat the section you're working on.
-
-
Этот шаг не переведен. Помогите перевести
-
Use the plastic card to pry the right-most battery cell up from the rear case.
-
-
Этот шаг не переведен. Помогите перевести
-
Repeat this procedure with the adjacent battery cell:
-
Apply a small amount of liquid adhesive remover under the battery cell, and wait 2-3 minutes for it to penetrate and soften the adhesive.
-
Alternatively, re-heat this section with your iOpener if needed.
-
Push a plastic card about an inch between the battery cell and the upper case, and slowly pry the cell up to separate all of the adhesive.
-
-
Этот шаг не переведен. Помогите перевести
-
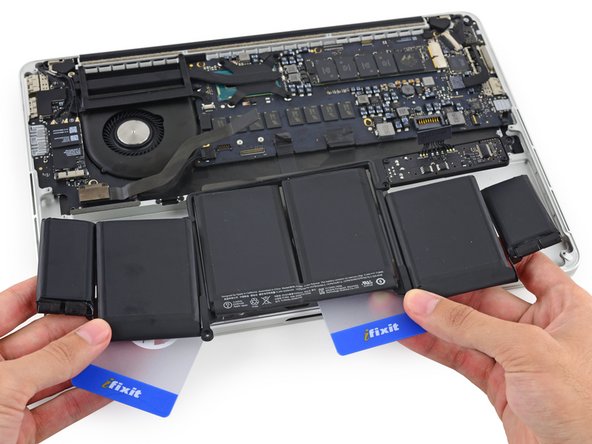
Temporarily leave your plastic card underneath the two rightmost battery cells to prevent them from re-adhering to the upper case.
-
If using an iOpener, reheat it and reapply it, this time to the left-most battery cells.
-
-
Этот шаг не переведен. Помогите перевести
-
Repeat the above procedure to separate the two leftmost battery cells from the upper case.
-
Remember to apply a small amount of adhesive remover to each battery cell, and wait 2-3 minutes for it to penetrate and soften the adhesive.
-
Use a second plastic card to separate the two leftmost battery cells from the upper case.
-
-
Этот шаг не переведен. Помогите перевести
-
Leave the second card in the corner between the two left cells.
-
-
Этот шаг не переведен. Помогите перевести
-
To separate the adhesive securing the final two, middle battery cells, apply a few more drops of liquid adhesive remover (or your iOpener) to each cell.
-
It may help to elevate one side of your MacBook Pro a few inches so that the adhesive remover flows in the correct direction, underneath the battery cells. You can use a sturdy book or foam block to prop up one side of your MacBook Pro while you work.
-
Insert the card about an inch between the left-center battery cell and the upper case, separating the adhesive between the cell and the case.
-
-
Этот шаг не переведен. Помогите перевести
-
Pull the card back out and insert it about an inch between the right-center battery cell and the upper case, separating the adhesive between the cell and case.
-
-
Этот шаг не переведен. Помогите перевести
-
Pry up on the two center cells to separate the last of the adhesive and lift the battery from the device.
-
-
Этот шаг не переведен. Помогите перевести
-
Remove the battery.
-
With a little luck, you can slowly pull out each strip of adhesive with your fingers.
-
Otherwise, soak each section of adhesive with a bit of adhesive remover for 2-3 minutes, and then scrape it out with an opening pick or one of the other tools in your kit. This can take quite a bit of work, so be patient.
-
Mop up any remaining adhesive remover and give your MacBook Pro a few minutes to air dry.
-
Calibrate your newly installed battery: charge it to 100%, and keep charging it for at least 2 more hours. Unplug and use it normally to drain the battery. When you see the low battery warning, save your work, and keep your laptop on until it goes to sleep due to low battery. Wait at least 5 hours, then charge your laptop uninterrupted to 100%.
-
-
Этот шаг не переведен. Помогите перевести
-
Place a reheated iOpener over the trackpad cover plate to soften the adhesive securing it to the upper case.
-
-
Этот шаг не переведен. Помогите перевести
-
Use a plastic opening tool to carefully pry the trackpad cover plate up from the upper case.
-
-
Этот шаг не переведен. Помогите перевести
-
Use a plastic opening tool to slowly and carefully peel the trackpad cover plate up off the upper case.
-
-
Этот шаг не переведен. Помогите перевести
-
Use the tip of a spudger to flip the retaining tab on the ZIF connector.
-
-
Этот шаг не переведен. Помогите перевести
-
Pull the trackpad ribbon cable straight out of its socket on the logic board.
-
-
Этот шаг не переведен. Помогите перевести
-
Wedge the flat end of a spudger underneath the upper case opening where the trackpad ribbon cable passes is routed through.
-
Gently pry the trackpad ribbon cable from the adhesive securing it to the upper case.
-
-
Этот шаг не переведен. Помогите перевести
-
Remove the following screws securing the trackpad brackets to the trackpad and upper case.
-
Four 2.2 mm T5 Torx screws
-
Four 1.7 mm T5 Torx screws
-
-
Этот шаг не переведен. Помогите перевести
-
Use tweezers to remove the two trackpad mounting brackets from the upper case.
-
-
Этот шаг не переведен. Помогите перевести
-
Carefully guide the trackpad ribbon cable through the slot cut in the upper case.
-
Guide the trackpad out of the upper casewith your other hand, so it doesn't fall.
-
-
Этот шаг не переведен. Помогите перевести
-
Gently pull the trackpad away from the upper case, being careful not to snag the ribbon cable.
-


Отменить: Я не выполнил это руководство.
46 участников успешно повторили данное руководство.


9 Комментариев
It's also worth mentioning that if your new trackpad doesn't click - there is a T6 torx adjustment screw located dead center of the bottom frame, below the battery (but not underneath it, so battery removal isn't required).
Turning this screw counterclockwise or clockwise will increase or decrease the travel of the trackpad clicking action. When i installed my replacement pad, it was not clicking at all - but turning this screw a bit counterclockwise fixed that problem!
This is fantastic. Thanks, I was able to replace the trackpad for about $50; the authorized Apple shop in my area wanted $500.