Введение
Use this guide to replace a broken hard drive cable. The hard drive cable also contains the sleep LED and the IR sensor.
Выберете то, что вам нужно
-
-
Remove the following ten screws:
-
Three 14.4 mm Phillips #00 screws
-
Three 3.5 mm Phillips #00 screws
-
Four 3.5 mm shouldered Phillips #00 screws
-
-
-
Use your fingers to pry the lower case away from the body of the MacBook near the vent.
-
Remove the lower case.
-
-
-
Use the edge of a spudger to pry the battery connector upwards from its socket on the logic board.
-
-
-
Bend the battery cable slightly away from its socket on the logic board so it does not accidentally connect itself while you work.
-
-
-
Remove the two Phillips screws securing the hard drive bracket to the upper case.
-
-
-
-
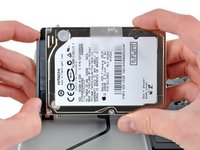
Pull the hard drive cable away from the body of the hard drive.
-
Remove the hard drive.
-
-
-
Use the flat end of a spudger to pry the hard drive cable connector up from its socket on the logic board.
-
-
-
Remove the following four screws:
-
Two 3 mm Phillips screws
-
Two 9.7 mm Phillips screws
-
-
-
Carefully peel up the thin IR sensor/sleep LED ribbon cable from the adhesive securing it to the upper case.
-
-
-
Pull the front hard drive bracket containing the IR sensor/sleep LED away from the front edge of the upper case.
-
-
-
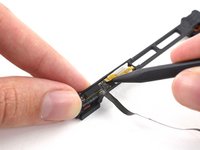
Use the tip of a spudger to flip the "lever" of the ZIF connector (left side in first photo) on the hard drive cable. The connector does not come off, see next instruction.
-
Gently pull the yellow sensor bracket cable out of the ZIF connector (to the right, in the second photo).
-
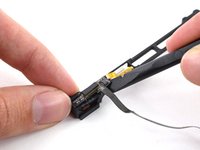
Use the flat end of a spudger to pry the hard drive cable up off the sensor bracket to which it is adhered.
-


To reassemble your device, follow these instructions in reverse order.
To reassemble your device, follow these instructions in reverse order.
Отменить: Я не выполнил это руководство.
219 человек успешно провели ремонт по этому руководству.

15 Комментариев
Quick and easy fix a repair shop would have charged a small fortune for. The only thing I'd add is if your replacement has built in glue like mine did be careful installing it as it will stick anywhere and everywhere!
We upgraded our hdd to an ssd and in the process must have damaged the sata cable. Macbook worked for a month before we got the flashing ? folder of death. Investigating we noticed the cable was partly ripped. This guide was perfect for replacing the cable, and now the macbook is working fine again! Brilliant! Just be careful to anyone replacing the hdd, the sata cable can tear easily.
I've replaced my hard drive cable twice now. The problem seems to be that the underside of the aluminum unibody has small ridges on it (you can see them, but they are small. The cable rubbed back and forth on these ridges, and you could see where the cable had shorted where it had worn away. It doesn't take much.
I found a youtube fix which involved only laying a piece of electrical tape along the underside of the cable (underneath the drive), and another piece along the body itself. A couple minutes and few cents worth of electrical tape later and all was working fine.
I think i might have damaged the yellow ribbon that needs to be reinserted into the new sata cable because i recently installed one and had it fail 2 weeks later and just got a new one that isn't loading up the sign-in menu but at least begins to read the hard drive instead of going straight to the ' ? ' folder. However, it will just continue to read the hard drive and stay at the loading screen with the apple icon and a spinning gray loading wheel below it without any progress. Any thoughts? I was thinking the yellow cable could have somehow been damaged. Does anyone know the name of the part with the yellow ribbon? It is connected to the bracket that sits below the hard drive.