Перейти к основному содержанию

MacBook Pro 13" Unibody Early 2011 Hard Drive Replacement

Абсолютно необходимое руководство
Это руководство предназначено только для использования в качестве обязательного условия для других руководств. Оно не полностью само по себе.

Выберете то, что вам нужно

  1. MacBook Pro 13" Unibody Early 2011 Hard Drive Replacement, Hard Drive: шаг 1, изображение 1 из 1
    • Remove the two Phillips screws securing the hard drive bracket to the upper case.

    • These screws will remain attached to the hard drive bracket.

  2. MacBook Pro 13" Unibody Early 2011 Hard Drive Replacement: шаг 2, изображение 1 из 1
    • Remove the hard drive bracket.

    • The hard drive bracket may be firmly seated against the upper case.

  3. MacBook Pro 13" Unibody Early 2011 Hard Drive Replacement: шаг 3, изображение 1 из 1
    • Use the attached pull tab to lift the hard drive out of the upper case.

    • Don't try to completely remove the hard drive just yet. It is still attached to the hard drive cable.

  4. MacBook Pro 13" Unibody Early 2011 Hard Drive Replacement: шаг 4, изображение 1 из 2 MacBook Pro 13" Unibody Early 2011 Hard Drive Replacement: шаг 4, изображение 2 из 2
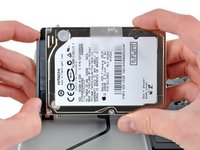
    • Pull the hard drive cable away from the body of the hard drive.

    • Remove the hard drive.

Заключение

To reassemble your device, follow these instructions in reverse order.

2 участников успешно повторили данное руководство.

0 Комментариев

Добавить комментарий

Просмотр статистики:

За последние 24часов: 0

За последние 7 дней: 0

За последние 30 дней: 0

За всё время: 1,323