Введение
This guide will show you how to replace your hard drive cable or tighten it if it is loose.
Выберете то, что вам нужно
-
-
Remove the following 10 screws securing the lower case to the MacBook Pro 13" Unibody:
-
Seven 3 mm Phillips screws.
-
Three 13.5 mm Phillips screws.
-
-
-
Slightly lift the lower case and push it toward the rear of the computer to free the mounting tabs.
-
-
-
Use the flat end of a spudger to lift the battery connector up out of its socket on the logic board.
-
-
-
Remove two Phillips screws securing the hard drive bracket to the upper case.
-
-
-
-
Lift the hard drive by its pull tab and pull it out of the chassis, minding the cable attaching it to the computer.
-
-
-
Remove the hard drive cable by pulling its connector straight away from the hard drive.
-
-
-
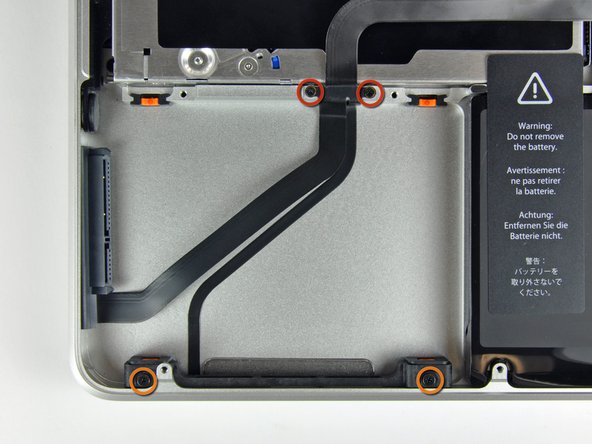
Remove the following four screws securing the hard drive and IR sensor cable to the upper case:
-
Two 1.5 mm Phillips screws.
-
Two 9.5 mm Phillips screws.
-
-
-
Slide the hard drive and IR sensor bracket away from the edge of the upper case.
-
Carefully peel the hard drive and IR sensor cable from the upper case.
-
-
-
Use the flat end of a spudger to pry the hard drive cable connector up off the logic board.
-


To reassemble your device, follow these instructions in reverse order.
To reassemble your device, follow these instructions in reverse order.
Отменить: Я не выполнил это руководство.
292 участников успешно повторили данное руководство.

7 Комментариев
Used a Phillips #00 and a creditcard. It's an easy job, takes about 10 minutes. :)
In step #8 the two small screws were very tight in my computer. The Phillips #00 was too large and damaging the screws. I changed to a Phillips #000 applied substantial pressure and voila, the screws came off.
Reassembly: placing the IR sensor cable (the one you"peeled off" in step #9) is a bit tricky. Start from the side opposite the IR sensor (the side with the two small screws of step 8) and press first along the short vertical side and then across towards the IR section. There should be a little left for a vertical section at the IR sensor end.
if i change the HDD cable and get the same results what could be the the real problem , because the original problem as we all know was the we were getting the question mark on the white screen .