Перейти к основному содержанию

MacBook Pro 15" Retina Display Mid 2014 Right Fan Replacement

Выберете то, что вам нужно

  1. MacBook Pro 15" Retina Display Mid 2014 Right Fan Replacement, Lower Case: шаг 1, изображение 1 из 1
    • Remove the following P5 pentalobe screws securing the lower case to the MacBook Pro:

    • Eight 3.0 mm

    • Two 2.3 mm

  2. MacBook Pro 15" Retina Display Mid 2014 Right Fan Replacement: шаг 2, изображение 1 из 1
    • Lifting from the edge nearest the clutch cover, lift the lower case off the MacBook Pro.

    • Set the lower case aside.

  3. MacBook Pro 15" Retina Display Mid 2014 Right Fan Replacement, Battery Connector: шаг 3, изображение 1 из 1
    • Peel back the warning label covering the battery connector.

  4. MacBook Pro 15" Retina Display Mid 2014 Right Fan Replacement: шаг 4, изображение 1 из 2 MacBook Pro 15" Retina Display Mid 2014 Right Fan Replacement: шаг 4, изображение 2 из 2
    • Using the flat end of a spudger, gently pry the battery connector straight up out of its socket on the logic board.

    • Bend the battery cables back and out of the way, ensuring that the battery connector doesn't accidentally make contact with the logic board.

  5. MacBook Pro 15" Retina Display Mid 2014 Right Fan Replacement, AirPort/Camera Cable: шаг 5, изображение 1 из 1
    • Use a spudger or tweezers to pry the three AirPort antenna cables straight up off of their sockets on the AirPort board.

    • The cable connection points are fragile. Be careful to lift only on the connector, and not on the socket or cable.

    • To reconnect, align the connector carefully into position over the socket, and press it down firmly with the flat of your spudger.

  6. MacBook Pro 15" Retina Display Mid 2014 Right Fan Replacement: шаг 6, изображение 1 из 1
    • Use the tip of a spudger to push the camera cable's plug toward the fan and out of its socket on the logic board.

    • The plug in the photo has six connections, but some models have twelve connections. The process of removing the plug from its socket is the same for both.

    • If the camera cable's plug won't come easily out of its socket on the logic board, fold back the rubber cover over the fan to gain access to the cable, then gently pull on the cable while using the spudger to gently push the plug out of its socket.

    • Be sure to push parallel to the board, first on one side, then the other, to slowly "walk" the plug out of its socket. Do not pry up, or you will damage the socket.

  7. MacBook Pro 15" Retina Display Mid 2014 Right Fan Replacement: шаг 7, изображение 1 из 3 MacBook Pro 15" Retina Display Mid 2014 Right Fan Replacement: шаг 7, изображение 2 из 3 MacBook Pro 15" Retina Display Mid 2014 Right Fan Replacement: шаг 7, изображение 3 из 3
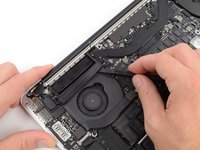
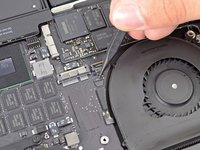
    • Insert the flat end of a spudger underneath the rubber heat sink cover on the right fan.

    • Slide the spudger underneath the length of the cover, releasing the adhesive.

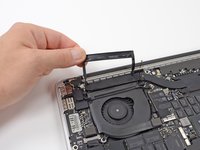
    • Lift the cover and flip it back so that you can access the cables underneath.

  8. MacBook Pro 15" Retina Display Mid 2014 Right Fan Replacement: шаг 8, изображение 1 из 3 MacBook Pro 15" Retina Display Mid 2014 Right Fan Replacement: шаг 8, изображение 2 из 3 MacBook Pro 15" Retina Display Mid 2014 Right Fan Replacement: шаг 8, изображение 3 из 3
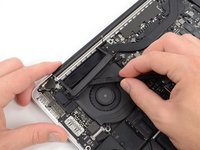
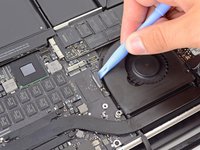
    • Use your fingers to pull the AirPort/Camera cables up off the fan.

    • The cables are adhered to the fan, so peel them up carefully to avoid damaging them.

    • Carefully de-route the cables from the plastic cable guide.

  9. MacBook Pro 15" Retina Display Mid 2014 Right Fan Replacement, I/O Board Cable: шаг 9, изображение 1 из 3 MacBook Pro 15" Retina Display Mid 2014 Right Fan Replacement, I/O Board Cable: шаг 9, изображение 2 из 3 MacBook Pro 15" Retina Display Mid 2014 Right Fan Replacement, I/O Board Cable: шаг 9, изображение 3 из 3
    • If your I/O Board cable's connectors have notches in the padding, you will need to release a locking lever underneath the notch in order to remove the cable. If this is the case, don't pry up on the connector until the levers are unlatched.

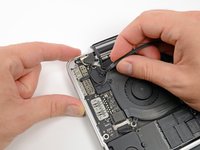
    • Using the flat end of a spudger, pry the I/O Board connector straight up out of its socket on the logic board.

    • During reassembly, connect this end first, as it does not flex.

    • In a similar fashion, remove the I/O Board cable connector from its socket on the I/O Board.

    • Remove the I/O Board cable from the MacBook Pro.

  10. MacBook Pro 15" Retina Display Mid 2014 Right Fan Replacement, Airport Card: шаг 10, изображение 1 из 1
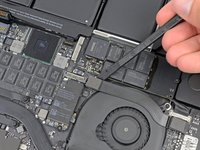
    • Remove the single 2.9 mm T5 Torx screw securing the AirPort card to the logic board.

  11. MacBook Pro 15" Retina Display Mid 2014 Right Fan Replacement: шаг 11, изображение 1 из 2 MacBook Pro 15" Retina Display Mid 2014 Right Fan Replacement: шаг 11, изображение 2 из 2
    • Grasp the sides of the AirPort card and lift it up to a shallow angle (5-10˚) to separate the light adhesive adhering it to the logic board.

    • Pull the AirPort card parallel out of its connector on the logic board to remove it.

  12. MacBook Pro 15" Retina Display Mid 2014 Right Fan Replacement: шаг 12, изображение 1 из 2 MacBook Pro 15" Retina Display Mid 2014 Right Fan Replacement: шаг 12, изображение 2 из 2
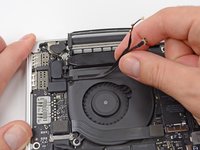
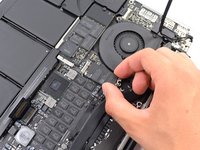
    • Use the tip of a spudger to flip up the retaining flap on the right fan ribbon cable ZIF socket.

    • Be sure you are prying up on the hinged retaining flap, not the socket itself.

    • Starting at the top of the cable, slide a plastic opening tool under the right fan cable to free it from the logic board.

    • Use caution when freeing the cable, as it is strongly adhered to the logic board.

  13. MacBook Pro 15" Retina Display Mid 2014 Right Fan Replacement: шаг 13, изображение 1 из 1
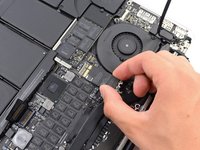
    • Remove the following three screws securing the right fan to the logic board:

    • One 4.4 mm T5 Torx screw

    • One 3.9 mm T5 Wide Head Torx screw

    • One 5.0 mm T5 Torx screw with 2 mm collar

  14. MacBook Pro 15" Retina Display Mid 2014 Right Fan Replacement: шаг 14, изображение 1 из 1
    • Lift and remove the right fan out from the MacBook Pro.

    • When reinstalling the fan, it's easiest connect the fan ribbon cable as you drop the fan in place, rather than after you've installed the three fan screws.

Заключение

To reassemble your device, follow these instructions in reverse order.

12 участников успешно повторили данное руководство.

4 Комментариев

The killer info in this is which way the connectors come out. It's not that apparent when you are looking at them. Using this guide I cleaned the dust out of both fans which should make my mac run cooler. I'm also trying to figure out why my base is all bowed out.

Bill Pennock - Ответить

My base did the exact same thing >:( did you find any solution?

Adam Baxter -

sorry I didn’t see this sooner. Yes the batteries had bulged. I wound up taking it in on the last day (very lucky) of apple care and they took care of it. Had to replace the entire top of the computer

Bill Pennock - Ответить

What is the serial number for the fan? Is it the same fan as in earlier models?

heltenraymond - Ответить

Добавить комментарий

Просмотр статистики:

За последние 24часов: 2

За последние 7 дней: 22

За последние 30 дней: 85

За всё время: 17,910