Перейти к основному содержанию

MacBook Pro 15" Retina Display Mid 2015 Heat Sink Replacement

Выберете то, что вам нужно

  1. MacBook Pro 15" Retina Display Mid 2015 Heat Sink Replacement, Lower Case: шаг 1, изображение 1 из 1
    • Remove the following P5 pentalobe screws securing the lower case to the MacBook Pro:

    • Eight 3.1 mm

    • Two 2.3 mm

  2. MacBook Pro 15" Retina Display Mid 2015 Heat Sink Replacement: шаг 2, изображение 1 из 2 MacBook Pro 15" Retina Display Mid 2015 Heat Sink Replacement: шаг 2, изображение 2 из 2
    • Lifting from the edge nearest the clutch cover, lift the lower case off the MacBook Pro.

  3. MacBook Pro 15" Retina Display Mid 2015 Heat Sink Replacement: шаг 3, изображение 1 из 3 MacBook Pro 15" Retina Display Mid 2015 Heat Sink Replacement: шаг 3, изображение 2 из 3 MacBook Pro 15" Retina Display Mid 2015 Heat Sink Replacement: шаг 3, изображение 3 из 3
    • The lower case has two plastic pegs (red) that fit into plastic clips in the upper case (orange).

    • During reassembly, gently push down the center of the lower case to reattach the case to its two plastic clips.

  4. MacBook Pro 15" Retina Display Mid 2015 Heat Sink Replacement, Battery Connector: шаг 4, изображение 1 из 1
    • Peel back the sticker covering the battery connector.

  5. MacBook Pro 15" Retina Display Mid 2015 Heat Sink Replacement: шаг 5, изображение 1 из 3 MacBook Pro 15" Retina Display Mid 2015 Heat Sink Replacement: шаг 5, изображение 2 из 3 MacBook Pro 15" Retina Display Mid 2015 Heat Sink Replacement: шаг 5, изображение 3 из 3
    • Gently lift each side of the battery connector to pry the connector out of its socket on the logic board.

    • Bend the connector back toward the battery, ensuring that the battery connector doesn't accidentally make contact with the logic board.

  6. MacBook Pro 15" Retina Display Mid 2015 Heat Sink Replacement, Heat Sink: шаг 6, изображение 1 из 2 MacBook Pro 15" Retina Display Mid 2015 Heat Sink Replacement, Heat Sink: шаг 6, изображение 2 из 2
    • Peel the rubber cover up off the right fan and fold it out of the way.

  7. MacBook Pro 15" Retina Display Mid 2015 Heat Sink Replacement: шаг 7, изображение 1 из 2 MacBook Pro 15" Retina Display Mid 2015 Heat Sink Replacement: шаг 7, изображение 2 из 2
    • Peel the rubber cover up off the left fan and fold it out of the way.

  8. MacBook Pro 15" Retina Display Mid 2015 Heat Sink Replacement: шаг 8, изображение 1 из 2 MacBook Pro 15" Retina Display Mid 2015 Heat Sink Replacement: шаг 8, изображение 2 из 2
    • Remove the small rubber cap from the screw at the end of the heat sink.

  9. MacBook Pro 15" Retina Display Mid 2015 Heat Sink Replacement: шаг 9, изображение 1 из 1
    • Remove the following screws securing the heat sink to the logic board:

    • One 3.8 mm T5 Torx screw

    • Two 3.4 mm T5 Torx screws

    • When you remove these screws, springy metal brackets securing the heat sink will be released. Take care not to lose these screws when the brackets spring free.

    • One 5.6 mm T5 Torx screw

  10. MacBook Pro 15" Retina Display Mid 2015 Heat Sink Replacement: шаг 10, изображение 1 из 2 MacBook Pro 15" Retina Display Mid 2015 Heat Sink Replacement: шаг 10, изображение 2 из 2
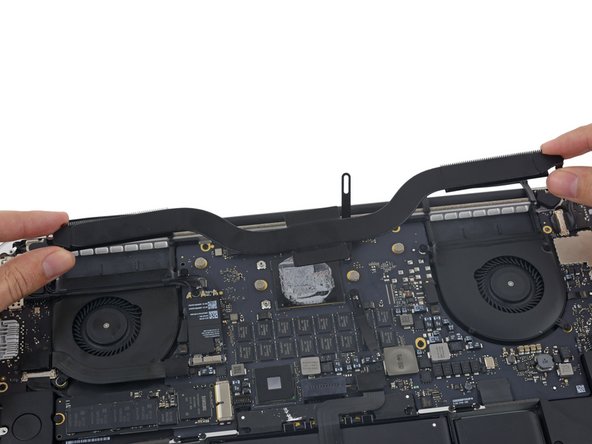
    • Flip the two spring clamps out of the way of the heat sink.

    • Remove the heat sink from the MacBook Pro.

    • On reassembly, be sure to clean the CPU and heat sink and reapply thermal compound to the CPU. Follow this guide to learn how.

    • If you are using a model with dual graphics, be sure to remove the four screws where the GPU die is before attempting to remove the heatsink.

Заключение

To reassemble your device, follow these instructions in reverse order.

87 участников успешно повторили данное руководство.

Andrew Optimus Goldheart

Участник с: 10/17/09

502 755 Репутация

Автор 407 руководств

Команда

iFixit Участник iFixit

Staff

135 членов

Автор 16 732 руководств

12 Комментариев

On my macbook Pro 2015 it has an extra Square on the heatsink to cover the graphics card. So the Pictures does not look right on this guide. I would share my pictures but it’s not possible in the comments.

Mark Barner - Ответить

I don’t have much to add other than that these squares on the GPU and CPU were hindering my ability to completely clean off the previous thermal paste. I actually would like to remove the squares, but would like to hear from folks who might have a sense of how essential it is for thermal transfer (or any other purpose it serves).

Rahul S -

Hey guys when I refreshed the thermal paste on my 2015 15” (top spec) mbp, I noticed four little metallic sponges in that area, one of those came off… I still have it, how critical is it? Should I replace it? If so are there any guides?

Many thanks

AlexMorse - Ответить

I have the same issue as well— 2 of mine came off, and I just stuck them back where they were before and let the pressure of the heat sink hold it in place for now. But any expertise on this issue is appreciated!

Rahul S -

I too am missing some of those "little metallic sponges". Has anyone found a good replacement for them. I cannot find them online. I'm sure it's because I don't know their "official" name. Maybe I can make my own from thermal pads?

rfmorrow -

Добавить комментарий

Просмотр статистики:

За последние 24часов: 20

За последние 7 дней: 133

За последние 30 дней: 701

За всё время: 74,152