Перейти к основному содержанию

MacBook Pro 15" Unibody Late 2011 Right Fan Replacement

Выберете то, что вам нужно

  1. MacBook Pro 15" Unibody Late 2011 Right Fan Replacement, Lower Case: шаг 1, изображение 1 из 1
    • Remove the following ten screws securing the lower case to the upper case:

    • Three 13.5 mm (14.1 mm) Phillips screws.

    • Seven 3 mm Phillips screws.

    • When removing these screws, note how they come out at a slight angle. They must be reinstalled the same way.

  2. MacBook Pro 15" Unibody Late 2011 Right Fan Replacement: шаг 2, изображение 1 из 1
    • Using both hands, lift the lower case near the vent to pop it off two clips securing it to the upper case.

    • Remove the lower case and set it aside.

  3. MacBook Pro 15" Unibody Late 2011 Right Fan Replacement, Battery Connector: шаг 3, изображение 1 из 2 MacBook Pro 15" Unibody Late 2011 Right Fan Replacement, Battery Connector: шаг 3, изображение 2 из 2
    • For certain repairs (e.g. hard drive), disconnecting the battery connector is not necessary but is recommended as it prevents any accidental shorting of electronics on the motherboard. If you do not disconnect the battery connector, please be careful as parts of the motherboard might be electrified.

    • Use the edge of a spudger to pry the battery connector upwards from its socket on the logic board.

    • It is useful to pry upward on both short sides of the connector to "walk" it out of its socket.

  4. MacBook Pro 15" Unibody Late 2011 Right Fan Replacement: шаг 4, изображение 1 из 1
    • Bend the battery cable slightly away from its socket on the logic board so it does not accidentally connect itself while you work.

  5. MacBook Pro 15" Unibody Late 2011 Right Fan Replacement, Right Fan: шаг 5, изображение 1 из 3 MacBook Pro 15" Unibody Late 2011 Right Fan Replacement, Right Fan: шаг 5, изображение 2 из 3 MacBook Pro 15" Unibody Late 2011 Right Fan Replacement, Right Fan: шаг 5, изображение 3 из 3
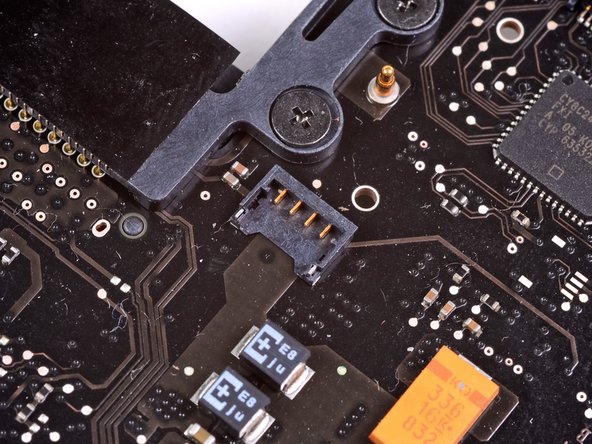
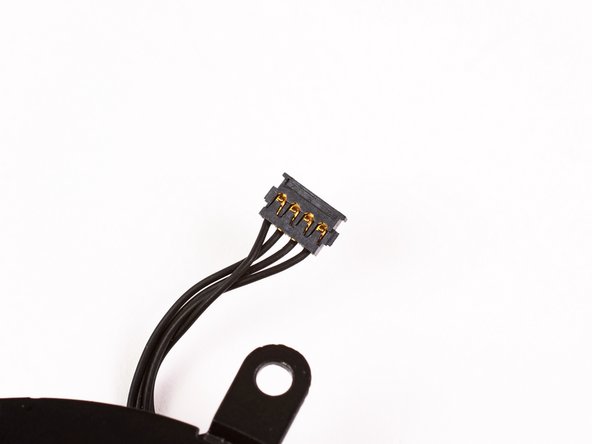
    • Use a spudger to pry the fan connector straight up off the logic board.

    • It is useful to twist the spudger axially from beneath the fan cable wires to release the connector.

    • The fan socket and the fan connector can be seen in the second and third pictures. Be careful not to break the plastic fan socket off the logic board as you use your spudger to lift the fan connector straight up and out of its socket. The layout of the logic board shown in the second picture may look slightly different than your machine but the fan socket is the same.

  6. MacBook Pro 15" Unibody Late 2011 Right Fan Replacement: шаг 6, изображение 1 из 1
    • Remove three T6 Torx screws securing the right fan to the logic board and upper case.

  7. MacBook Pro 15" Unibody Late 2011 Right Fan Replacement: шаг 7, изображение 1 из 1
    • Lift the right fan out of the upper case.

Заключение

To reassemble your device, follow these instructions in reverse order.

27 участников успешно повторили данное руководство.

2 Комментариев

I continue to repair my 10 year MBP and hope to keep it running as long as possible. Thanks Miroslav, all iFixit contributors, and iFixit!

Barb - Ответить

Struggled with replacement fan electrical connection back to board; until I (stupidly) realized they needed a twist (upside down). Thanks!

Greg - Ответить

Добавить комментарий

Просмотр статистики:

За последние 24часов: 0

За последние 7 дней: 4

За последние 30 дней: 29

За всё время: 8,393