Введение
The hard drive cable includes the IR sensor/sleep indicator.
Выберете то, что вам нужно
-
-
Remove the following ten screws securing the lower case to the upper case:
-
Seven 3 mm Phillips screws.
-
Three 13.5 mm Phillips screws.
-
-
-
Using both hands, lift the lower case near the vent to pop it off two clips securing it to the upper case.
-
Remove the lower case and set it aside.
-
-
КупитьИнструмент, используемый на этом этапе:P6 Pentalobe Screwdriver 2009 15" MacBook Pro Battery$5.49
-
Remove the two 5-Point Pentalobe screws along the top edge of the battery.
Question: why do you remove the battery? According to Apple's official manual, this is not required (not for the mid-2009 and not for the mid-2010 15-inch MacBook Pro) - see pages 37 ff:
Цитата от(из) alexkli:
Question: why do you remove the battery? According to Apple's official manual, this is not required (not for the mid-2009 and not for the mid-2010 15-inch MacBook Pro) - see pages 37 ff:
I'm interested by your experience.
Did you have removed the optical drive without removing the battery ?
I'm just in this step now and if it is possible I would proceed like you because removing the battery void the warranty (and there is a sticker).
Thanks in advance.
Looks like my note to step 3 appears on all repair guides that have the same step. I meant that in the context of the hard drive replacement only.
Did you have removed the optical drive without removing the battery ?
I haven't yet done anything, waiting for my MacBook Pro 15 inch mid-2010 to arrive.
I missed the notes and went ahead and purchased the 5 point driver for the battery before I realized it was not necessary.
I've edited the repair guide to remove the section on the battery, but I don't have the points to approve the changes.
Please note - the step about removing the battery is part of a pre-requisite guide, that is used for many of the guides, most that do require removal of the battery. Also, working inside a disassembled laptop with the battery still connected risks damaging/shorting out very expensive parts.
Absolutely. To be clear -- ALL of the above discussion is ONLY in reference to replacing the hard drive.
I replaced a hard drive in a MacBook Pro of an earlier model than this without removing the battery. The hard drive wasn't right. It only worked at about half speed, and I had to replace it once more. The second time I removed the battery and all went well. The recommendation by the iFixit staff to remove the battery before working on electronic equipment is a good one.
What is the size of those screws... I have rounded off the socket on mine and would like to replace them.
I measured the screw size, using a micrometer, its about 1.523mm in diameter and 3.186mm in length. Not sure what screw size that is. They are not easily available I guess, unless someone is selling used ones on ebay
-
-
-
Use the tip of a spudger to bend back the finger of the "Warning: Do not remove the battery" sticker while you remove third five-point Pentalobe screw hidden underneath.
-
-
-
Lift the battery by its plastic pull tab and slide it away from the long edge of the upper case.
My T6 (appears to be same screw driver you have - $6 on amazon for 20piece set) did NOT fit int he battery screws...not sure if I had the wrong screws or what, but I went ahead w/o battery steps and it was pretty easy.
I also noticed that the new SDD (from crucial) didn't have the 4 screws, so I had to move those off the old HD and onto the new one.
Just had the same issue: T6 does not fit the battery screws ;-( ... but with a little bit more preassure it was possible to remove the screws.
-
-
-
-
Tilt the battery back enough to access the battery cable connector.
-
Pull the battery cable connector away from its socket on the logic board and remove the battery from the upper case.
-
-
-
Remove the two Phillips screws securing the hard drive bracket to the upper case.
-
Lift the the retaining bracket out of the upper case.
-
-
-
Lift the hard drive by its pull tab and pull it out of the chassis, minding the cable attaching it to the computer.
-
-
-
Remove the hard drive cable by pulling the hard drive straight away from the connector. Keep the connector steady. If pulled by the connector, it can be pulled too far and accidentally tear the hard drive cable.
-
-
-
Remove the following four screws securing the hard drive and IR sensor cable to the upper case:
-
Two 1.5 mm Phillips screws.
-
Two 4 mm Phillips screws.
-
-
-
Slide the hard drive and IR sensor bracket away from the edge of the upper case.
-
-
-
Use the flat end of a spudger to pry the hard drive cable connector up off the logic board.
-
-
-
Carefully peel the hard drive and IR sensor cable off the right speaker body/upper case and remove them from your computer.
-
-
-
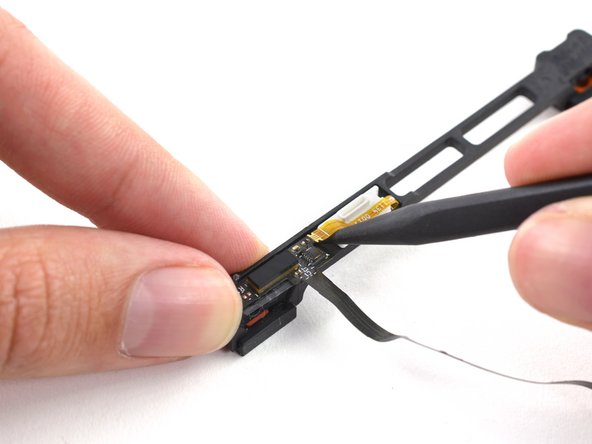
Use the tip of a spudger to flip the ZIF connector on the hard drive cable.
-
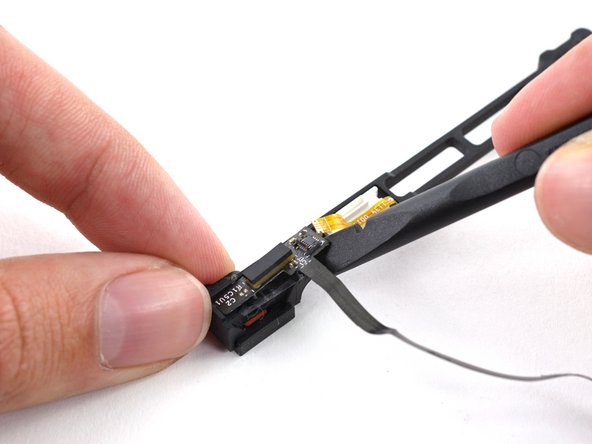
Gently pull the sensor bracket cable out of the ZIF connector.
-
Use the flat end of a spudger to pry the hard drive cable up off the sensor bracket.
-


To reassemble your device, follow these instructions in reverse order.
To reassemble your device, follow these instructions in reverse order.
Отменить: Я не выполнил это руководство.
48 участников успешно повторили данное руководство.

3 Комментариев
I found that the smaller cable branch to the IR sensor was glued down to the case. The new part (purchased from ifixit.com) didn't have a sticky backing so I carefully removed some of the sticky material from the original cable and stuck it to the new cable. This kept the cable in place when I replaced the hard drive. I could see how one might accidentally bend or fold the cable in a way that could damage it when placing the hard drive.
This guide made it really easy. It fixed my problem. Thanks!
I want to buy a hard drive cable but I live in Mozambique, how can I get it, because my country is not included?
May be helpful to have more distinct colors to identify the different screws.
Victor Caamano - Ответить