Эта версия возможно содержит некорректные исправления. Переключить на последнюю проверенную версию.
Выберете то, что вам нужно
-
Этот шаг не переведен. Помогите перевести
-
Remove the following ten screws securing the lower case to the upper case:
-
Seven 3 mm Phillips screws.
-
Three 13.5 mm Phillips screws.
-
-
Этот шаг не переведен. Помогите перевести
-
Using both hands, lift the lower case near the vent to pop it off two clips securing it to the upper case.
-
Remove the lower case and set it aside.
-
-
Этот шаг не переведен. Помогите перевести
КупитьИнструмент, используемый на этом этапе:P6 Pentalobe Screwdriver 2009 15" MacBook Pro Battery$5.49-
Remove the two 5-Point Pentalobe screws along the top edge of the battery.
-
-
Этот шаг не переведен. Помогите перевести
-
Use the tip of a spudger to bend back the finger of the "Warning: Do not remove the battery" sticker while you remove third five-point Pentalobe screw hidden underneath.
-
-
Этот шаг не переведен. Помогите перевести
-
Lift the battery by its plastic pull tab and slide it away from the long edge of the upper case.
-
-
-
Этот шаг не переведен. Помогите перевести
-
Tilt the battery back enough to access the battery cable connector.
-
Pull the battery cable connector away from its socket on the logic board and remove the battery from the upper case.
-
-
Этот шаг не переведен. Помогите перевести
-
Remove the two Phillips screws securing the hard drive bracket to the upper case.
-
Lift the the retaining bracket out of the upper case.
-
-
Этот шаг не переведен. Помогите перевести
-
Lift the hard drive by its pull tab and pull it out of the chassis, minding the cable attaching it to the computer.
-
-
Этот шаг не переведен. Помогите перевести
-
Remove the hard drive cable by pulling the hard drive straight away from the connector. Keep the connector steady. If pulled by the connector, it can be pulled too far and accidentally tear the hard drive cable.
-
-
Этот шаг не переведен. Помогите перевести
-
Remove the following four screws securing the hard drive and IR sensor cable to the upper case:
-
Two 1.5 mm Phillips screws.
-
Two 4 mm Phillips screws.
-
-
Этот шаг не переведен. Помогите перевести
-
Slide the hard drive and IR sensor bracket away from the edge of the upper case.
-
-
Этот шаг не переведен. Помогите перевести
-
Use the flat end of a spudger to pry the hard drive cable connector up off the logic board.
-
-
Этот шаг не переведен. Помогите перевести
-
Carefully peel the hard drive and IR sensor cable off the right speaker body/upper case and remove them from your computer.
-
-
Этот шаг не переведен. Помогите перевести
-
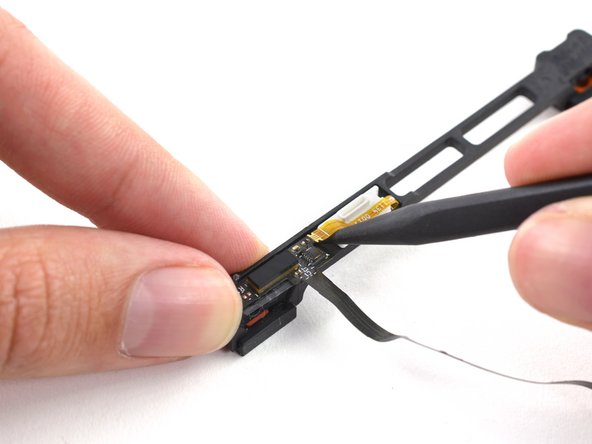
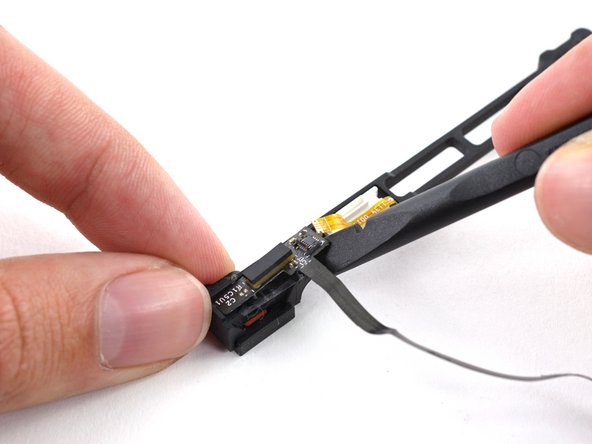
Use the tip of a spudger to flip the ZIF connector on the hard drive cable.
-
Gently pull the sensor bracket cable out of the ZIF connector.
-
Use the flat end of a spudger to pry the hard drive cable up off the sensor bracket.
-


Отменить: Я не выполнил это руководство.
48 участников успешно повторили данное руководство.

3 Комментариев
I found that the smaller cable branch to the IR sensor was glued down to the case. The new part (purchased from ifixit.com) didn't have a sticky backing so I carefully removed some of the sticky material from the original cable and stuck it to the new cable. This kept the cable in place when I replaced the hard drive. I could see how one might accidentally bend or fold the cable in a way that could damage it when placing the hard drive.
This guide made it really easy. It fixed my problem. Thanks!
I want to buy a hard drive cable but I live in Mozambique, how can I get it, because my country is not included?