Перейти к основному содержанию

MacBook Pro 15" Unibody Mid 2009 Optical Drive Replacement

Выберете то, что вам нужно

  1. MacBook Pro 15" Unibody Mid 2009 Optical Drive Replacement, Lower Case: шаг 1, изображение 1 из 1
    • Remove the following ten screws securing the lower case to the upper case:

    • Seven 3 mm Phillips screws.

    • Three 13.5 mm Phillips screws.

  2. MacBook Pro 15" Unibody Mid 2009 Optical Drive Replacement: шаг 2, изображение 1 из 2 MacBook Pro 15" Unibody Mid 2009 Optical Drive Replacement: шаг 2, изображение 2 из 2
    • Using both hands, lift the lower case near the vent to pop it off two clips securing it to the upper case.

    • Remove the lower case and set it aside.

  3. MacBook Pro 15" Unibody Mid 2009 Optical Drive Replacement, Battery: шаг 3, изображение 1 из 1
    Инструмент, используемый на этом этапе:
    P6 Pentalobe Screwdriver 2009 15" MacBook Pro Battery
    $5.49
    Купить
    • Remove the two 5-Point Pentalobe screws along the top edge of the battery.

    • You do not necessarily have to follow steps 3-6 to remove the battery in order to replace the hard drive. However it is recommended to remove all power sources from electronics before working on them.

  4. MacBook Pro 15" Unibody Mid 2009 Optical Drive Replacement: шаг 4, изображение 1 из 1
    • Use the tip of a spudger to bend back the finger of the "Warning: Do not remove the battery" sticker while you remove third five-point Pentalobe screw hidden underneath.

  5. MacBook Pro 15" Unibody Mid 2009 Optical Drive Replacement: шаг 5, изображение 1 из 2 MacBook Pro 15" Unibody Mid 2009 Optical Drive Replacement: шаг 5, изображение 2 из 2
    • Lift the battery by its plastic pull tab and slide it away from the long edge of the upper case.

    • Do not try to completely remove the battery just yet.

  6. MacBook Pro 15" Unibody Mid 2009 Optical Drive Replacement: шаг 6, изображение 1 из 1
    • Tilt the battery back enough to access the battery cable connector.

    • Pull the battery cable connector away from its socket on the logic board and remove the battery from the upper case.

    • If you're installing a new battery, you should calibrate it after installation.

  7. MacBook Pro 15" Unibody Mid 2009 Optical Drive Replacement, Optical Drive: шаг 7, изображение 1 из 1
    • Apple sticks a small strip of clear plastic with adhesive applied to one side to the logic board behind the camera cable connector to keep it in its socket. When moving it out of the way, be sure not to break any surface-mount components off the logic board.

    • Hold the end of the cable retainer down with one finger while you use the tip of a spudger to slightly lift the other end and rotate it away from the camera cable connector.

  8. MacBook Pro 15" Unibody Mid 2009 Optical Drive Replacement: шаг 8, изображение 1 из 2 MacBook Pro 15" Unibody Mid 2009 Optical Drive Replacement: шаг 8, изображение 2 из 2
    • Disconnect the camera cable by pulling the male end straight away from its socket.

    • Pull the connector parallel to the face of the logic board, not straight up.

  9. MacBook Pro 15" Unibody Mid 2009 Optical Drive Replacement: шаг 9, изображение 1 из 1
    • Peel the camera cable off the adhesive securing it to the optical drive.

  10. MacBook Pro 15" Unibody Mid 2009 Optical Drive Replacement: шаг 10, изображение 1 из 2 MacBook Pro 15" Unibody Mid 2009 Optical Drive Replacement: шаг 10, изображение 2 из 2
    • This step is only required if you have an anti-glare display. If you have a glossy display, skip this step.

    • Disconnect the Bluetooth cable by pulling the male end straight away from its socket.

    • Pull the connector parallel to the face of the logic board, not straight up.

    • Use the flat end of a spudger to pry the Bluetooth antenna cable from its socket on the board.

  11. MacBook Pro 15" Unibody Mid 2009 Optical Drive Replacement: шаг 11, изображение 1 из 2 MacBook Pro 15" Unibody Mid 2009 Optical Drive Replacement: шаг 11, изображение 2 из 2
    • This step is only required if you have an anti-glare display.

    • Remove the two 8 mm Phillips screws securing the Bluetooth/camera cable retainer to the upper case.

    • One of the screws may remain captive in the Bluetooth/camera cable ground loop. If replacing the display, be sure to transfer this screw to the new unit.

    • Lift the Bluetooth board/cable retainer assembly out of the upper case.

  12. MacBook Pro 15" Unibody Mid 2009 Optical Drive Replacement: шаг 12, изображение 1 из 1
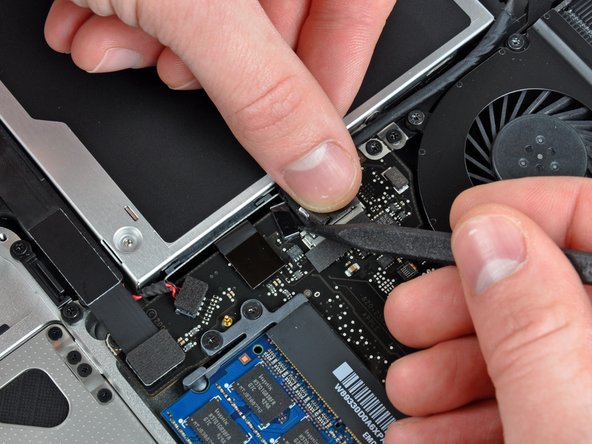
    • Use a spudger to pry the optical drive connector straight up off the logic board.

  13. MacBook Pro 15" Unibody Mid 2009 Optical Drive Replacement: шаг 13, изображение 1 из 1
    • Remove the single 3.5 mm Phillips screw securing the inner side of the optical drive to the upper case.

  14. MacBook Pro 15" Unibody Mid 2009 Optical Drive Replacement: шаг 14, изображение 1 из 1
    • Remove the two 3.5 mm Phillips screws securing the outer side of the optical drive to the upper case.

  15. MacBook Pro 15" Unibody Mid 2009 Optical Drive Replacement: шаг 15, изображение 1 из 1
    • Lift the optical drive from its left edge and pull it out of the upper case.

  16. MacBook Pro 15" Unibody Mid 2009 Optical Drive Replacement, Optical Drive: шаг 16, изображение 1 из 1
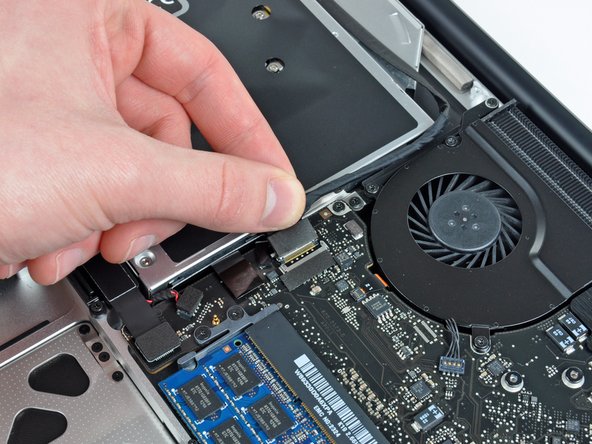
    • Remove the optical drive cable by pulling it straight away from the optical drive.

    • If you have a CD or any other object jammed in your optical drive, we have an optical drive repair guide.

  17. MacBook Pro 15" Unibody Mid 2009 Optical Drive Replacement: шаг 17, изображение 1 из 1
    • Remove the two black Phillips #0 screws securing the small metal mounting bracket. Transfer this bracket to your new optical drive or hard drive enclosure.

Заключение

To reassemble your device, follow these instructions in reverse order.

49 участников успешно повторили данное руководство.

4 Комментариев

My replacement drive had screwholes in slightly different places and a different connector ribbon, but I was able to successfully swap the drive top plate, inner side screw bracket and connector ribbon with the ones from the existing drive.

Steve Seear - Ответить

Replaced the drive. DVD inserts. Drive works. But the DVD won't eject. Seems like the slot in the case and the drive don't align. Any Ideas?

Gabriel Lieb - Ответить

Do you think, It’s a good solution to remove the drive without replacing it?

Oliver - Ответить

I just replaced drive…tried to insert disk and no go. Do I need to reset something software wise??

Doe - Ответить

Добавить комментарий

Просмотр статистики:

За последние 24часов: 3

За последние 7 дней: 7

За последние 30 дней: 39

За всё время: 79,282