Эта версия возможно содержит некорректные исправления. Переключить на последнюю проверенную версию.
Выберете то, что вам нужно
-
Этот шаг не переведен. Помогите перевести
-
Remove the following ten screws securing the lower case to the upper case:
-
Three 13.5 mm (14.1 mm) Phillips screws.
-
Seven 3 mm Phillips screws.
-
-
Этот шаг не переведен. Помогите перевести
-
Using both hands, lift the lower case near the vent to pop it off two clips securing it to the upper case.
-
Remove the lower case and set it aside.
-
-
Этот шаг не переведен. Помогите перевести
-
Use the edge of a spudger to pry the battery connector upwards from its socket on the logic board.
-
-
Этот шаг не переведен. Помогите перевести
-
Bend the battery cable slightly away from its socket on the logic board so it does not accidentally connect itself while you work.
-
-
Этот шаг не переведен. Помогите перевести
-
Pull the camera cable connector straight out of its socket on the logic board.
-
-
-
Этот шаг не переведен. Помогите перевести
-
Use the flat end of a spudger to carefully pry the AirPort/Bluetooth ribbon cable up off its socket on the logic board.
-
-
Этот шаг не переведен. Помогите перевести
-
Use the tip of a spudger to pry the four antenna connectors up from their sockets on the AirPort/Bluetooth board.
-
-
Этот шаг не переведен. Помогите перевести
-
De-route all four antenna cables from their channels in the AirPort/Bluetooth housing.
-
De-route the camera cable from its channel in the AirPort/Bluetooth housing.
-
-
Этот шаг не переведен. Помогите перевести
-
Remove the following two screws securing the AirPort/Bluetooth assembly to the upper case:
-
One 8.6 mm Phillips screw
-
One 3.9 mm Phillips screw
-
-
Этот шаг не переведен. Помогите перевести
-
Remove the AirPort/Bluetooth assembly from the upper case, minding any cables that may get caught.
-
-
Этот шаг не переведен. Помогите перевести
-
Peel and remove the piece of EMI tape wrapped around the AirPort/Bluetooth assembly.
-
-
Этот шаг не переведен. Помогите перевести
-
Use the flat end of a spudger to pry the AirPort/Bluetooth cable away from its socket on the AirPort/Bluetooth board.
-
Remove the AirPort/Bluetooth cable from the AirPort/Bluetooth assembly.
-
-
Этот шаг не переведен. Помогите перевести
-
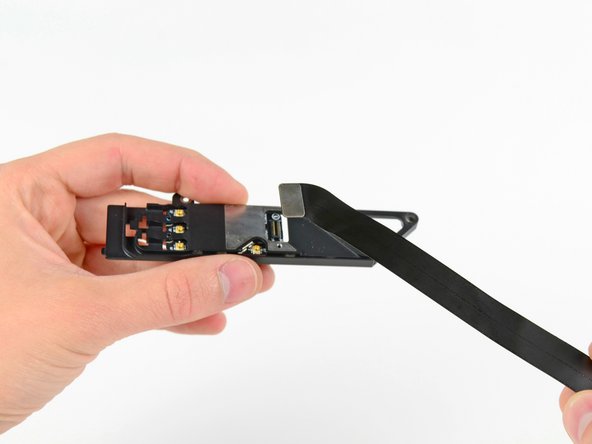
Remove the three Phillips screws securing the AirPort/Bluetooth board to the AirPort/Bluetooth board housing.
-
Use the flat end of a spudger to dislodge the AirPort/Bluetooth board from its recess in the AirPort/Bluetooth board housing.
-
-
Этот шаг не переведен. Помогите перевести
-
Remove the AirPort/Bluetooth board from its aluminum housing.
-


Отменить: Я не выполнил это руководство.
43 участников успешно повторили данное руководство.

21 Комментариев
Pessoal; Será que temos com trocar essa peça Bluetooth 2.1 por um 4.0?
-----
Folks; Do we have to change this piece Bluetooth 2.1 for a 4.0?
-----
My computer was having trouble with the internet and after much research I came to the conclusion it was my airport/bluetooth board. A bunch of stores I went to said it would cost me around $200-$300 to replace ($100 for board and $100-$200 for installation). Then I found this cite and all of its manuals. I was able to order the part online from this site for only ~$50 and following the steps in the instructions was super easy. Would definitely give 10/10 for this website and manual.
I'd also like to point out I ordered the ifixit tool kit as well (just cause it looked awesome and I have no will power), but only the 2 tools mentioned in the instructions were needed. So no need to go overboard such as myself
Good chance it is the ribbon. I replaced the board with the one I ordered from this site. Worked great for about 2 months then had the same issue. Figured out it couldn't be the board that was causing the problem. So I played with it and I think it's my ribbon connections. All I do is every few months when I start to get the problem I open it up and reconnect the connections on the ribbon and it's good for another 2 months. I assume a permanent solution would be to buy a new ribbon but I haven't done that yet
I second this. My old computer started having bluetooth issues and I needed more power, so I bought a new one and gave the old to my wife. WiFi went out shortly thereafter. PRAM resets worked for a few minutes, but never very long. Replaced the ribbon (very easy, a bit cheaper), and bluetooth works great now, and wifi too. I would try the ribbon first (cheaper and much easier to do).