Эта версия возможно содержит некорректные исправления. Переключить на последнюю проверенную версию.
Выберете то, что вам нужно
-
Этот шаг не переведен. Помогите перевести
-
Remove the following ten screws securing the lower case to the upper case:
-
Three 13.5 mm (14.1 mm) Phillips screws.
-
Seven 3 mm Phillips screws.
-
-
Этот шаг не переведен. Помогите перевести
-
Using both hands, lift the lower case near the vent to pop it off two clips securing it to the upper case.
-
Remove the lower case and set it aside.
-
-
Этот шаг не переведен. Помогите перевести
-
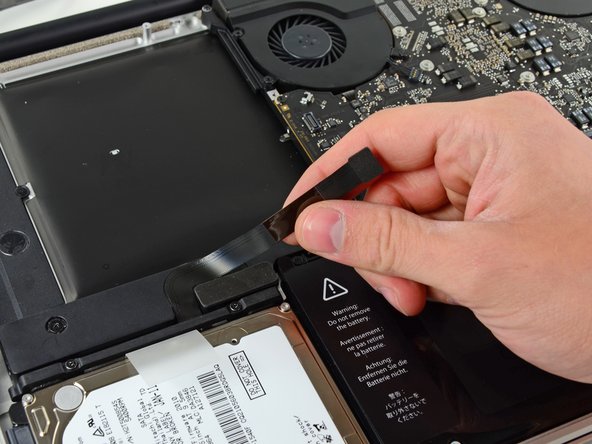
Use the edge of a spudger to pry the battery connector upwards from its socket on the logic board.
-
-
Этот шаг не переведен. Помогите перевести
-
Bend the battery cable slightly away from its socket on the logic board so it does not accidentally connect itself while you work.
-
-
Этот шаг не переведен. Помогите перевести
-
Disconnect the camera cable connector from its socket on the logic board.
-
-
-
Этот шаг не переведен. Помогите перевести
-
Use the flat end of a spudger to pry the AirPort/Bluetooth connector up from its socket on the logic board.
-
-
Этот шаг не переведен. Помогите перевести
-
Use the flat end of a spudger to pry the optical drive connector up from its socket on the logic board.
-
-
Этот шаг не переведен. Помогите перевести
-
Remove following two screws:
-
One 8.6 mm Phillips screw
-
One 3.9 mm Phillips screw
-
Carefully rotate the AirPort/Bluetooth board housing (with AirPort/Antenna cables still attached) out of the lower case.
-
-
Этот шаг не переведен. Помогите перевести
-
Remove the three 3.5 mm T6 Torx screws securing the optical drive to the upper case.
-
-
Этот шаг не переведен. Помогите перевести
-
Lift the optical drive near its connector and pull it away from the upper case to remove it from the computer.
-
-
Этот шаг не переведен. Помогите перевести
-
Use the flat end of a spudger to pry the hard drive/IR sensor cable connector up off the logic board.
-
Peel the hard drive cable up from the channel within the subwoofer and right speaker.
-
-
Этот шаг не переведен. Помогите перевести
-
Using the flat end of a spudger, pry the subwoofer connector straight up off the logic board.
-
-
Этот шаг не переведен. Помогите перевести
-
Remove the following six screws securing the subwoofer and right speaker to the upper case:
-
Two 3.2 mm Phillips screws.
-
Two 12.3 mm Phillips screws.
-
One 2.5 mm Phillips screw.
-
One 8.3 mm Phillips screw.
-
-
Этот шаг не переведен. Помогите перевести
-
Use the flat end of a spudger to dislodge the right speaker from its recess in the upper case.
-
Lift the subwoofer and right speaker assembly out of the upper case.
-


Отменить: Я не выполнил это руководство.
13 участников успешно повторили данное руководство.

Один комментарий
Hi, since a few day my right speaker crackles (in the bass), do you think it should be changed ? what could be the cause of the damage ? If so, is this type of piece ok ? (macbook pro Unibody 15" Mid-2102) THX