Перейти к основному содержанию

Magellan RoadMate 2120T-LM Display Assembly Replacement

Выберете то, что вам нужно

  1. Magellan RoadMate 2120T-LM Display Assembly Replacement, Battery: шаг 1, изображение 1 из 3 Magellan RoadMate 2120T-LM Display Assembly Replacement, Battery: шаг 1, изображение 2 из 3 Magellan RoadMate 2120T-LM Display Assembly Replacement, Battery: шаг 1, изображение 3 из 3
    • Turn the GPS over on its backside and remove the six 3 mm Phillips #1 screws.

  2. Magellan RoadMate 2120T-LM Display Assembly Replacement: шаг 2, изображение 1 из 2 Magellan RoadMate 2120T-LM Display Assembly Replacement: шаг 2, изображение 2 из 2
    • Pry up on back panel with black spudger

  3. Magellan RoadMate 2120T-LM Display Assembly Replacement: шаг 3, изображение 1 из 1
    • Disconnect battery and speaker cables from the motherboard at indicated places.

  4. Magellan RoadMate 2120T-LM Display Assembly Replacement: шаг 4, изображение 1 из 1
    • Use a spudger to remove the battery from the back panel.

    • If at all possible, please try to use a regular nylon spudger before resorting to a metal spudger. Metal spudgers are much sharper, and have the potential to accidentally pierce the battery.

    • There is a strong adhesive holding the battery to the back panel.

    • This step is not a prerequisite for replacement of other components.

  5. Magellan RoadMate 2120T-LM Display Assembly Replacement, Motherboard: шаг 5, изображение 1 из 1
    • Remove the four 3 mm Phillips #1 screws from the motherboard.

    • In the picture three out of four screws have already been removed.

  6. Magellan RoadMate 2120T-LM Display Assembly Replacement: шаг 6, изображение 1 из 2 Magellan RoadMate 2120T-LM Display Assembly Replacement: шаг 6, изображение 2 из 2
    • Remove black tape covering connection ribbon for touch-screen

  7. Magellan RoadMate 2120T-LM Display Assembly Replacement: шаг 7, изображение 1 из 3 Magellan RoadMate 2120T-LM Display Assembly Replacement: шаг 7, изображение 2 из 3 Magellan RoadMate 2120T-LM Display Assembly Replacement: шаг 7, изображение 3 из 3
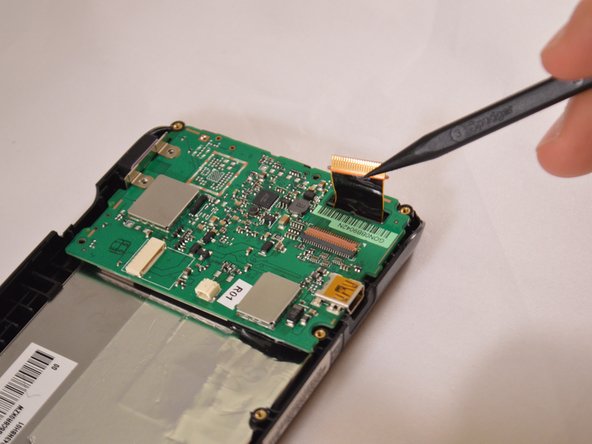
    • Pull up on the brown tab holding down the ribbon.

    • In this picture the brown tab has already been lifted.

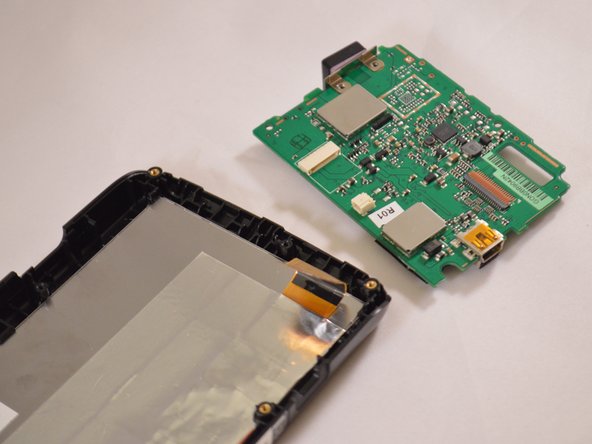
    • Lift up on the motherboard and remove it from device.

  8. Magellan RoadMate 2120T-LM Display Assembly Replacement, Display Assembly: шаг 8, изображение 1 из 2 Magellan RoadMate 2120T-LM Display Assembly Replacement, Display Assembly: шаг 8, изображение 2 из 2
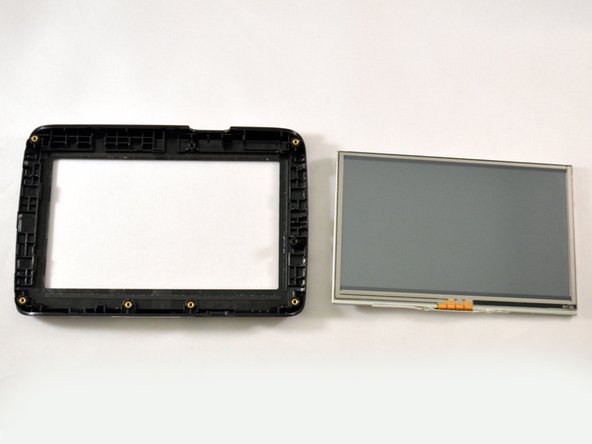
    • Pry back on the plastic shell surrounding the touchscreen and remove the screen.

Заключение

To reassemble your device, follow these instructions in reverse order.

John Doe

Участник с: 01/12/16

503 Репутация

Автор 4 руководств

Команда

Eastern Washington University, Team 1-5, Rowley Winter 2016 Участник Eastern Washington University, Team 1-5, Rowley Winter 2016

EWU-ROWLEY-W16S1G5

2 членов

Автор 4 руководств

0 Комментариев

Добавить комментарий

Просмотр статистики:

За последние 24часов: 0

За последние 7 дней: 0

За последние 30 дней: 6

За всё время: 262