Перейти к основному содержанию

Magic Bullet MB1001B Casing Replacement

Выберете то, что вам нужно

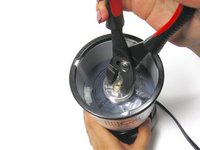
  1. Magic Bullet MB1001B Casing Replacement, Base Gear: шаг 1, изображение 1 из 3 Magic Bullet MB1001B Casing Replacement, Base Gear: шаг 1, изображение 2 из 3 Magic Bullet MB1001B Casing Replacement, Base Gear: шаг 1, изображение 3 из 3
    • Use pliers to grip the gear inside of the top of the device.

    • You may have to remove a sticker that is covering the slit at the center of the bottom before completing the next step.

    • Insert a flathead screwdriver into the slit at the bottom of the device while still holding the pliers in place gripped on the gear.

    • Lay the device on its side. Holding the screwdriver stationary to hold the bottom side in place, use the pliers to unscrew the gear by turning the pliers CLOCKWISE.

  2. Magic Bullet MB1001B Casing Replacement, Casing: шаг 2, изображение 1 из 1
    • Remove the four rubber pegs from the feet on the base of the Magic Bullet using the spudger.

  3. Magic Bullet MB1001B Casing Replacement: шаг 3, изображение 1 из 1
    • Remove the four 14.0 mm Phillips head screws in the feet of the base of the Magic Bullet using the Phillips #1 screwdriver.

  4. Magic Bullet MB1001B Casing Replacement: шаг 4, изображение 1 из 1
    • Remove the black base plate.

  5. Magic Bullet MB1001B Casing Replacement: шаг 5, изображение 1 из 1
    • Remove the two 13.0 mm Phillips head screws from the white plastic cable guide using a Phillips #1 screwdriver.

  6. Magic Bullet MB1001B Casing Replacement: шаг 6, изображение 1 из 1
    • Remove the white plastic cable guide.

  7. Magic Bullet MB1001B Casing Replacement: шаг 7, изображение 1 из 1
    • Remove the three 11.0 mm Phillips head screws surrounding the white fan blade on the base using the Phillips #1 screwdriver.

  8. Magic Bullet MB1001B Casing Replacement: шаг 8, изображение 1 из 1
    • Remove the black base.

  9. Magic Bullet MB1001B Casing Replacement: шаг 9, изображение 1 из 1
    • Remove the three white rubber spacers with the spudger.

  10. Magic Bullet MB1001B Casing Replacement: шаг 10, изображение 1 из 1
    • Remove the three 11.0 mm Phillips head screws using the Phillips #1 screwdriver.

  11. Magic Bullet MB1001B Casing Replacement: шаг 11, изображение 1 из 1
    • Remove the motor.

Заключение

To reassemble your device, follow these instructions in reverse order.

2 участников успешно повторили данное руководство.

Kelly McGartland

Участник с: 10/06/15

555 Репутация

Автор 2 руководств

Команда

Cal Poly, Team 12-13, Maness Fall 2015 Участник Cal Poly, Team 12-13, Maness Fall 2015

CPSU-MANESS-F15S12G13

4 членов

Автор 8 руководств

0 Комментариев

Добавить комментарий

Просмотр статистики:

За последние 24часов: 0

За последние 7 дней: 12

За последние 30 дней: 23

За всё время: 1,574