Перейти к основному содержанию

Magic Bullet NutriBullet Activator Replacement

Выберете то, что вам нужно

  1. Magic Bullet NutriBullet Activator Replacement, Curve Base: шаг 1, изображение 1 из 1
    • Unplug the device from the wall and turn the powerbase upside down.

  2. Magic Bullet NutriBullet Activator Replacement: шаг 2, изображение 1 из 2 Magic Bullet NutriBullet Activator Replacement: шаг 2, изображение 2 из 2
    • Use a #2 Phillips Head Screwdriver to unscrew the four 10 mm screws located on the bottom of the power base.

  3. Magic Bullet NutriBullet Activator Replacement: шаг 3, изображение 1 из 1
    • Use slight tension to remove the plastic base from the NutriBullet once all of the screws are removed.

    • When reassembling, note the fan located in the center of the powerbase. Make sure the cord does not get caught or frayed by the fan.

  4. Magic Bullet NutriBullet Activator Replacement: шаг 4, изображение 1 из 1
    • Lift the power cord to remove it from the side slot on the curved base.

  5. Magic Bullet NutriBullet Activator Replacement: шаг 5, изображение 1 из 2 Magic Bullet NutriBullet Activator Replacement: шаг 5, изображение 2 из 2
    • Use a #2 Phillips Head Screwdriver to remove the two 10 mm screws that secure the white bracket down.

    • The white safety bracket holds the cord down. After removing it, the cord will be loosened.

  6. Magic Bullet NutriBullet Activator Replacement: шаг 6, изображение 1 из 1
    • Use a #2 Phillips Head Screwdriver to remove the three 10mm screws that keep the base in place.

  7. Magic Bullet NutriBullet Activator Replacement: шаг 7, изображение 1 из 1
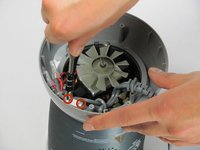
    • Use slight tension to remove the curved base by lifting it upward off of the outside casing.

  8. Magic Bullet NutriBullet Activator Replacement, Outside Casing: шаг 8, изображение 1 из 1
    • Wiggle the outside casing upward until it separates from the powerbase.
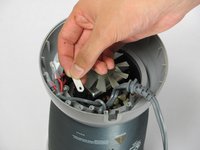
    • Hold the ring at the bottom of the powerbase to receive a better grip.

  9. Magic Bullet NutriBullet Activator Replacement, Rubber Covers: шаг 9, изображение 1 из 1
    • Place the NutriBullet powerbase on the table so that the three rubber screw covers are visible along the bottom of the well. Remove the covers using either tweezers or your fingers.

  10. Magic Bullet NutriBullet Activator Replacement, Top Screws: шаг 10, изображение 1 из 1
    • Remove the three 15mm screws with the Philips Head 2 Screwdriver.

  11. Magic Bullet NutriBullet Activator Replacement: шаг 11, изображение 1 из 1
    • Turn the NutriBullet powerbase upside down and remove the plastic casing by lifting it up. You may have to wiggle the casing in order to break away any hardened material.

  12. Magic Bullet NutriBullet Activator Replacement: шаг 12, изображение 1 из 1
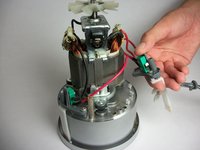
    • Determine which activator(s) fail to work by applying pressure to them. Then, remove the two 15mm screws that hold the activators in place by using the Philips Head 2 screwdriver.

    • Only two of the three activator tabs have green micro switches that actually turn on the motor. Use a circuit tester on the power chord and press the two micro switches simultaneously to see if they complete the circuit. If not, one or both need to be replaced.

  13. Magic Bullet NutriBullet Activator Replacement: шаг 13, изображение 1 из 3 Magic Bullet NutriBullet Activator Replacement: шаг 13, изображение 2 из 3 Magic Bullet NutriBullet Activator Replacement: шаг 13, изображение 3 из 3
    • Using slight tension, pull the loose activator from the slot.

    • The white plastic activator should fall out and they can now be replaced.

  14. Magic Bullet NutriBullet Activator Replacement, Repairing internal switches: шаг 14, изображение 1 из 1
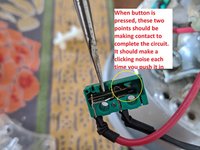
    • Open up the green switch. The metal tab and black button will fall out. Fiddle around with the metal switch on the inside to snap it back into place and then reassemble carefully. It should make a clicking noise.

    • Before reassembling, you should clean up any material that has accumulated on the various parts. Be sure to keep water away from the motor, switches and other electrical components.

Заключение

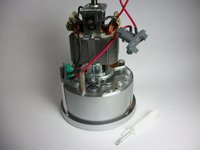
To reassemble your device, follow these instructions in reverse order.

56 участников успешно повторили данное руководство.

Angela Wong

Участник с: 01/22/15

1 090 Репутация

Автор 3 руководств

Команда

Cal Poly, Team 19-8, Maness Winter 2015 Участник Cal Poly, Team 19-8, Maness Winter 2015

CPSU-MANESS-W15S19G8

4 членов

Автор 10 руководств

44 Комментариев

Seems to be almost complete info, however, where and how do I get the replacement parts?

Thank you!

Love&Peace!

Glow

Glow Wo - Ответить

Could you please let me know where I might be able to obtain replacement activators? Mind broke when cleaning the machine.

Ron - Ответить

Thank you. I would have went nuts looking for the screw under the rubber pieces. Would have probably destroyed the whole machine.

Joe Bailey - Ответить

Thanks for the demonstration!

D S Jones - Ответить

Perfect! Nice little machine that can still be serviced, unlike most of what is made today.

cward6681 - Ответить

Добавить комментарий

Просмотр статистики:

За последние 24часов: 32

За последние 7 дней: 125

За последние 30 дней: 514

За всё время: 83,308