Перейти к основному содержанию
Присоединяйся к сообществу ремонтников - Создай аккаунт

Marco UP Series Electric Pump Electronic Sensor Replacement

Выберете то, что вам нужно

  1. Marco UP Series Electric Pump Electronic Sensor Replacement, Prepare the tools: шаг 1, изображение 1 из 1
    • The additional sensor with the joint and the heat shrink tubing is available as a replacement kit on www.marco.it .

    • Kits are only available as a registered user, and can be seen for each pump in their dedicated tab on the page.

    Спросите у FixBot

    Добавить комментарий

  2. Marco UP Series Electric Pump Electronic Sensor Replacement, Cut the plastic tie: шаг 2, изображение 1 из 1
    • Free the cables by cutting the plastic tie.

    • Don't cut the cables that connect the sensor to the pump.

    • Dont' damage the cables' insulation while cutting the plastic tie.

    Спросите у FixBot

    Добавить комментарий

  3. Marco UP Series Electric Pump Electronic Sensor Replacement, Cut the joint between the sensor and the motor: шаг 3, изображение 1 из 2 Marco UP Series Electric Pump Electronic Sensor Replacement, Cut the joint between the sensor and the motor: шаг 3, изображение 2 из 2
    • Use the pliers to cut the red and black cables before and after the joint.

    Спросите у FixBot

    Добавить комментарий

  4. Marco UP Series Electric Pump Electronic Sensor Replacement, Remove the old sensor: шаг 4, изображение 1 из 2 Marco UP Series Electric Pump Electronic Sensor Replacement, Remove the old sensor: шаг 4, изображение 2 из 2
    • Use the 17mm wrench to unscrew the sensor.

    Спросите у FixBot

    Добавить комментарий

  5. Marco UP Series Electric Pump Electronic Sensor Replacement, Screw in the new sensor: шаг 5, изображение 1 из 3 Marco UP Series Electric Pump Electronic Sensor Replacement, Screw in the new sensor: шаг 5, изображение 2 из 3 Marco UP Series Electric Pump Electronic Sensor Replacement, Screw in the new sensor: шаг 5, изображение 3 из 3
    • Screw the new sensor by hand for the initial part.

    Спросите у FixBot

    Добавить комментарий

  6. Marco UP Series Electric Pump Electronic Sensor Replacement, Tighten the sensor: шаг 6, изображение 1 из 1
    • Use the wrench to tighten it in place.

    • Don't over-tighten the screw!

    • Don't add PTFE tape on the screw: there's already an o-ring to seal the connection and it may cause problems to the non-return valve (check valve) underneath.

    Спросите у FixBot

    Добавить комментарий

  7. Marco UP Series Electric Pump Electronic Sensor Replacement, Check how long you want to strip off the cable: шаг 7, изображение 1 из 1
    • Use the joint as a reference on how much you need to remove.

    • Keep in mind that you want to have as much wire inside as possible, but you want to avoid that the peeled wire exits the joint.

    Спросите у FixBot

    Добавить комментарий

    • Use the cutting plier or (if you have it) the stripping plier to remove the sheath.

    • Try to be careful: you don't want to cut the wires inside, especially on the larger pumps.

    Спросите у FixBot

    Добавить комментарий

  8. Marco UP Series Electric Pump Electronic Sensor Replacement, Insert the heat shrink tubing: шаг 9, изображение 1 из 3 Marco UP Series Electric Pump Electronic Sensor Replacement, Insert the heat shrink tubing: шаг 9, изображение 2 из 3 Marco UP Series Electric Pump Electronic Sensor Replacement, Insert the heat shrink tubing: шаг 9, изображение 3 из 3
    • Insert the heat shink tubing on both motor's cables.

    Спросите у FixBot

    Добавить комментарий

  9. Marco UP Series Electric Pump Electronic Sensor Replacement, Insert the metal joints: шаг 10, изображение 1 из 1
    • The cable has to be totally inside the metal joint: if you have a longer peeled cable, cut it a little to have it aligned as in picture.

    • Don't insert the plastic sheath inside the metal joint: it worsens the connection and may cause overheating in the large pumps!

    Спросите у FixBot

    Добавить комментарий

  10. Marco UP Series Electric Pump Electronic Sensor Replacement, Press the metal joint: шаг 11, изображение 1 из 3 Marco UP Series Electric Pump Electronic Sensor Replacement, Press the metal joint: шаг 11, изображение 2 из 3 Marco UP Series Electric Pump Electronic Sensor Replacement, Press the metal joint: шаг 11, изображение 3 из 3
    • Start on the motor side, and press the metal joint on the cable.

    • To have a stronger force in closing the joint use the internal part of the plier, as showed in the picture.

    • Proceed with by inserting the other end, the short cable coming from the sensor.

    • Repeat the process also for the other cable.

    Спросите у FixBot

    Добавить комментарий

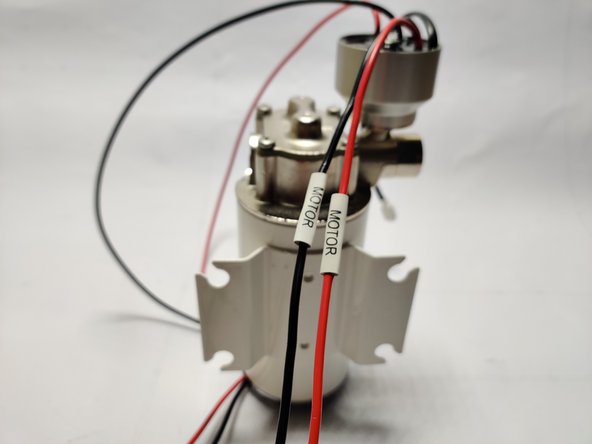
  11. Marco UP Series Electric Pump Electronic Sensor Replacement, Cover the metal joints with the heat shrink tubing: шаг 12, изображение 1 из 3 Marco UP Series Electric Pump Electronic Sensor Replacement, Cover the metal joints with the heat shrink tubing: шаг 12, изображение 2 из 3 Marco UP Series Electric Pump Electronic Sensor Replacement, Cover the metal joints with the heat shrink tubing: шаг 12, изображение 3 из 3
    • Insert the heat shrink tubing.

    • Make sure that it covers perfectly the joint (it must be centered!) on both ends .

    Спросите у FixBot

    Добавить комментарий

  12. Marco UP Series Electric Pump Electronic Sensor Replacement, Heat the tubes: шаг 13, изображение 1 из 2 Marco UP Series Electric Pump Electronic Sensor Replacement, Heat the tubes: шаг 13, изображение 2 из 2
    • Heat the tubes until they shink on the joint evenly.

    • Don't heat too much: you may melt the cables.

    • If you don't have a heat gun, you may also use a lighter, but don't touch the plastic with the flame: keep some distance.

    Спросите у FixBot

    Добавить комментарий

  13. Marco UP Series Electric Pump Electronic Sensor Replacement, Loop the wires: шаг 14, изображение 1 из 3 Marco UP Series Electric Pump Electronic Sensor Replacement, Loop the wires: шаг 14, изображение 2 из 3 Marco UP Series Electric Pump Electronic Sensor Replacement, Loop the wires: шаг 14, изображение 3 из 3
    • Loop the wires as shown in the pictures.

    Спросите у FixBot

    Добавить комментарий

  14. Marco UP Series Electric Pump Electronic Sensor Replacement, Add the plastic strap: шаг 15, изображение 1 из 3 Marco UP Series Electric Pump Electronic Sensor Replacement, Add the plastic strap: шаг 15, изображение 2 из 3 Marco UP Series Electric Pump Electronic Sensor Replacement, Add the plastic strap: шаг 15, изображение 3 из 3
    • Fix the cables using the plastic strap.

    • Cut the excess of the plastic strap using the cutting pliers.

    Спросите у FixBot

    Добавить комментарий

  15. Marco UP Series Electric Pump Electronic Sensor Replacement, You're done!: шаг 16, изображение 1 из 1
    • You can now enjoy your updated sensor!

    Спросите у FixBot

    Добавить комментарий

Финишная прямая

Отменить: Я не выполнил это руководство.

2 человек успешно провели ремонт по этому руководству.

Marco Spa

Участник с: 12/04/15

1 531 Репутация

Автор 5 руководств

1 Комментарий к руководству

Hello. Does this pumps works the same in horizontal or verItical position?

I have an horizontal installation and we always have air leaks to circuit problems.

Kind regards

Juan Correa - Ответить Поделиться

Добавить комментарий

Статистика просмотров:

За последние 24 часов: 1

За последние 7 дней: 17

За последние 30 дней: 74

За всё время: 4,767