Перейти к основному содержанию

MiTM Air Compressors AM1HE0205HD 2014 Power Cord Replacement

Выберете то, что вам нужно

  1. MiTM Air Compressors AM1HE0205HD 2014 Power Cord Replacement, Power off the compressor: шаг 1, изображение 1 из 2 MiTM Air Compressors AM1HE0205HD 2014 Power Cord Replacement, Power off the compressor: шаг 1, изображение 2 из 2
    • Before you begin, ensure the device is powered down and cool to the touch.

    • Ensure the compressor is unplugged.

    • Flip the pressure switch lever up to the off position.

  2. MiTM Air Compressors AM1HE0205HD 2014 Power Cord Replacement, Drain the air from the compressor: шаг 2, изображение 1 из 2 MiTM Air Compressors AM1HE0205HD 2014 Power Cord Replacement, Drain the air from the compressor: шаг 2, изображение 2 из 2
    • Pull the ring on the safety release valve away from the compressor tank to drain the air from the compressor.

    • Ensure all air is drained from the tank before beginning repairs.

  3. MiTM Air Compressors AM1HE0205HD 2014 Power Cord Replacement, Remove the pressure switch cover: шаг 3, изображение 1 из 1
    • Use a 5/16 inch socket to unscrew the bolt securing the pressure switch cover.

    • This is a captive bolt and will stay attached to the cover after you unscrew it.

  4. MiTM Air Compressors AM1HE0205HD 2014 Power Cord Replacement: шаг 4, изображение 1 из 2 MiTM Air Compressors AM1HE0205HD 2014 Power Cord Replacement: шаг 4, изображение 2 из 2
    • Remove the pressure switch cover.

  5. MiTM Air Compressors AM1HE0205HD 2014 Power Cord Replacement, Disconnect the power cord: шаг 5, изображение 1 из 2 MiTM Air Compressors AM1HE0205HD 2014 Power Cord Replacement, Disconnect the power cord: шаг 5, изображение 2 из 2
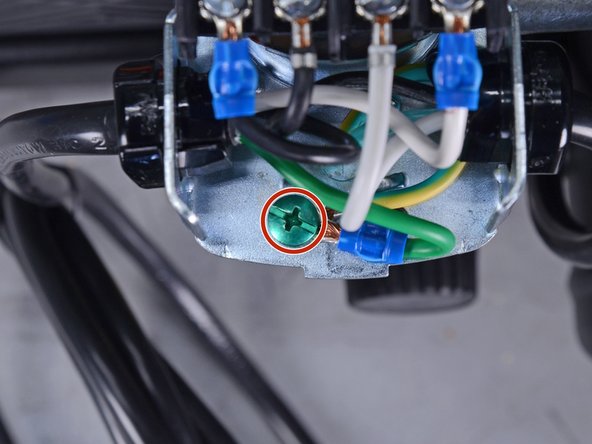
    • Use a Phillips driver to loosen the three screws securing the power cord wires.

  6. MiTM Air Compressors AM1HE0205HD 2014 Power Cord Replacement: шаг 6, изображение 1 из 2 MiTM Air Compressors AM1HE0205HD 2014 Power Cord Replacement: шаг 6, изображение 2 из 2
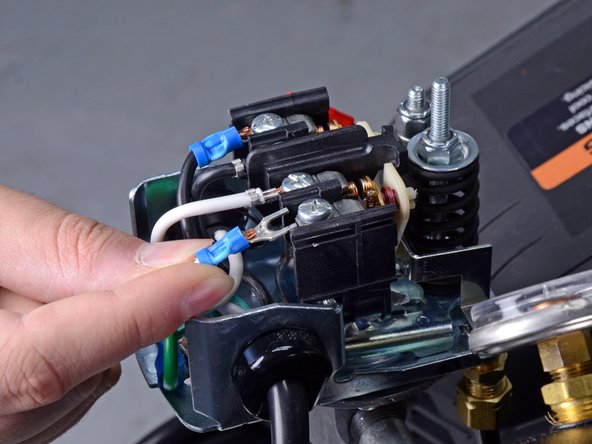
    • Slide the white power wire's spade terminal connector straight out from under its screw.

  7. MiTM Air Compressors AM1HE0205HD 2014 Power Cord Replacement: шаг 7, изображение 1 из 2 MiTM Air Compressors AM1HE0205HD 2014 Power Cord Replacement: шаг 7, изображение 2 из 2
    • Slide the black power wire's spade terminal connector straight out from under its screw.

    • Slide the green ground wire's spade terminal connector straight out from under its screw.

  8. MiTM Air Compressors AM1HE0205HD 2014 Power Cord Replacement, Remove the power cord: шаг 8, изображение 1 из 3 MiTM Air Compressors AM1HE0205HD 2014 Power Cord Replacement, Remove the power cord: шаг 8, изображение 2 из 3 MiTM Air Compressors AM1HE0205HD 2014 Power Cord Replacement, Remove the power cord: шаг 8, изображение 3 из 3
    • Use a pair of needle-nose pliers to squeeze the locking tab on the power cord bushing inwards, toward the cord.

    • While squeezing the locking tab, slide the bushing out of its hole in the pressure switch.

  9. MiTM Air Compressors AM1HE0205HD 2014 Power Cord Replacement: шаг 9, изображение 1 из 1
    • Remove the power cord.

  10. MiTM Air Compressors AM1HE0205HD 2014 Power Cord Replacement, Transfer the power cord bushing: шаг 10, изображение 1 из 1
    • If a new power cord bushing isn't included, make sure to transfer the old bushing to the new power cord.

  11. MiTM Air Compressors AM1HE0205HD 2014 Power Cord Replacement, Install new terminal connectors: шаг 11, изображение 1 из 2 MiTM Air Compressors AM1HE0205HD 2014 Power Cord Replacement, Install new terminal connectors: шаг 11, изображение 2 из 2
    • If the new power cord does not come with spade terminal connectors preinstalled, follow this step and the next to install new ones.

    • Slide a blue spade connector onto the stripped end of one of the power cord wires.

  12. MiTM Air Compressors AM1HE0205HD 2014 Power Cord Replacement: шаг 12, изображение 1 из 2 MiTM Air Compressors AM1HE0205HD 2014 Power Cord Replacement: шаг 12, изображение 2 из 2
    • Use a wire crimper at the 14 gauge (or blue) setting to crimp the spade terminal connector.

Заключение

To reassemble your device, follow these instructions in reverse order.

Adam O'Camb

Участник с: 04/11/15

196 656 Репутация

Автор 416 руководств

0 Комментариев

Добавить комментарий

Просмотр статистики:

За последние 24часов: 0

За последние 7 дней: 2

За последние 30 дней: 9

За всё время: 186