Выберете то, что вам нужно
-
-
Use an iOpener or heat gun to melt the adhesive.
-
Insert 21 opening picks under the display.
-
Slowly lift off the display.
Only separate the top, left and right edges, DO NOT SEPARATE THE BOTTOM. You *will* damage the ribbons on the bottom edge, slightly heat the bottom side after the other edges are freed and gently peel it off using the rest of the screen very, very gently. There is very little glue along the bottom edge.
As shown in Step 3, and in the device tear down article, there is a hard plastic bezel around the entire chassis, and the glass screen sits in a recess in this bezel. It is the glass that we are trying to remove. After softening the glue, insert your picks down into this recess to lever up the glass. Do NOT insert any long picks or a knife or screwdriver to hasten the separation. If you insert something longer than 4-5 mm into the gap then you might damage the electronic connections built into the back of the glass screen. If these connections are damaged, the display will be ruined (some part of the screen will go blank).
-
-
-
-
Remove the four ribbon cables connecting to the motherboard with a spudger.
-
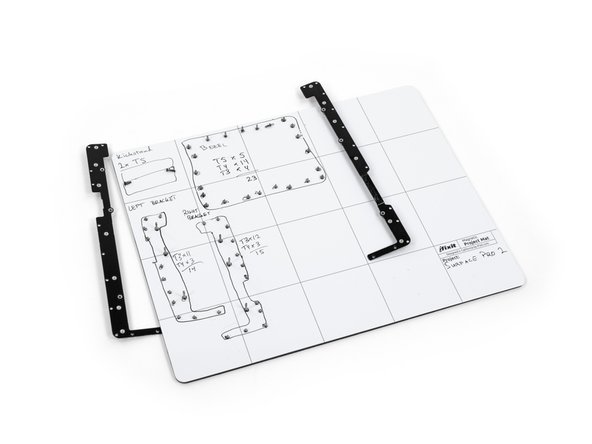
Remove the 52 screws securing the motherboard to the metal plates and the plastic bezel.
-
Lift off the motherboard.
what are the specs of all the ribbon cables ?
-
-
-
Unscrew the two screws on the mSATA SSD and remove the SSD. (Note: This image is from a first generation Surface Pro, but it works)
Carefully remove the screen from where the camera is. That is if you can melt the glue evenly, and lift carefully. The SSD is at the bottom of the unit. You need to remove the screws on the motherboard so as to life the board off its housing. Let the fun begin.
These units were made not to be taken apart. I take them apart to get to the SSD and toss out the rest. They are made not be able to be repaired. Most skill techs will laugh at you or ever thinking it is worth opening just to replace the SSD with a larger model.
If you want more and bigger SSD then buy one where you do not have to melt the glue that holding down the screen just to change the SSD.
-
To reassemble your device, follow these instructions in reverse order.
To reassemble your device, follow these instructions in reverse order.
Отменить: Я не выполнил это руководство.
22 участников успешно повторили данное руководство.
13 Комментариев
How do you glue the back on? It looks like the adhesive that holds it on is messed up bad when it's removed.
Hi Nate,
Have you figured this out? I was wondering the same thing.
Adi V -
You have to use double sided tape for electronics. They sell it on amazon. Use 5mm or wider to make sure the screen doesn’t fall out. Heat after application to make sure the glue sets properly.
Screen came off just fine using a hair dryer, but my Surface Pro 2 differs from these directions. Specifically, I got stuck not being able to remove the bezel because I don't have a T2 bit. My bezel screws are 5 x T5, 14 x T3, and 4 x T2. That doesn't match the photo shown here in step 3.
So have you been able to replace the SSD? I have multiple repair shops saying that none of the components can be replaced somehow
Wow. Why not just add a compartment to change it?
Hi all, i just followed the instructions and replaced the SSD but after I reassembled the device. The surface wouldn’t work at all , i have tried pressing the power button for 30 sec with no luck .
Please help ….
thanks
meaby it is blocked bu surface bios ? Meaby you have to disable boot keys or something like that
DId you figure this out?
Its unreparible according to all the best tech shops and other fit it online reviewers. I have all the tools to take it apart but after you heat it up it destroys the motherboard and security features. Its disposable. Plus surface pro 2 can be bought less that 120 dollars because it's old. I have one and if I let it sit for 2 weeks without a charger the hard drive looses its boot partition and it took a day to restore it. First windows 8 then it upgrades to win 10 pro and I add all the programs back
Did that three times till I got backerupper standard to make an image and now it only takes an hour to restore. This microsoft surface pro 2 and others I hear up to 6 are all the same . Trouble. They fixed it where they cant be fixed and you have to throw them away and buy the next modle
.This should mean class action lawsuit imo.


Is this really necessary? You will be working on the other side of the computer and I cannot see why this kickstand removal will help or hinder the main disassembly.
Dan Johnston - Ответить