Перейти к основному содержанию

Эта версия возможно содержит некорректные исправления. Переключить на последнюю проверенную версию.

Выберете то, что вам нужно

  1. Этот шаг не переведен. Помогите перевести

    : шаг 1, изображение 1 из 3 : шаг 1, изображение 2 из 3 : шаг 1, изображение 3 из 3
    • Insert the SIM card eject tool into the hole in the side of the SIM card tray and push to eject the tray.

    • Remove the SIM card tray.

    • If the SIM card does not fall free from the tray on its own, simply remove it with your fingers.

  2. Этот шаг не переведен. Помогите перевести

    : шаг 2, изображение 1 из 3 : шаг 2, изображение 2 из 3 : шаг 2, изображение 3 из 3
    • In the following steps you will be releasing the clips holding the phone's cases together. However, the back case is also secured with an adhesive pad. After separating the clips you will use an iOpener to allow the case to fully open. Do not attempt to fully open the phone before loosening the adhesive.

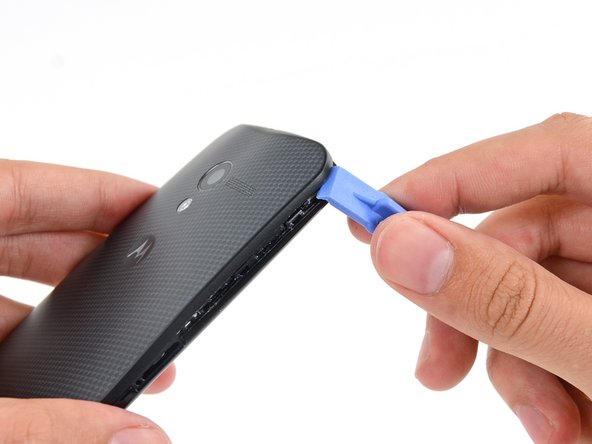
    • Insert a plastic opening tool into the seam between the front and rear covers near the SIM card slot.

    • Slide the plastic opening tool along the seam toward the upper corner.

  3. Этот шаг не переведен. Помогите перевести

    : шаг 3, изображение 1 из 2 : шаг 3, изображение 2 из 2
    • Carefully slide the plastic opening tool around the corner, freeing it from clips.

  4. Этот шаг не переведен. Помогите перевести

    : шаг 4, изображение 1 из 2 : шаг 4, изображение 2 из 2
    • Pry around the top right corner of the phone between the two covers.

  5. Этот шаг не переведен. Помогите перевести

    : шаг 5, изображение 1 из 3 : шаг 5, изображение 2 из 3 : шаг 5, изображение 3 из 3
    • Run the opening tool along the seam around all four sides, separating the remaining clips holding the cover on.

    • The plastic on the front cover is thinner near the buttons, and the buttons may move around. Go slowly to avoid damaging the buttons or the front cover.

    • Do not push the opening tool deep into phone, or you may damage internal components.

  6. Этот шаг не переведен. Помогите перевести

    : шаг 6, изображение 1 из 1
    • Heat an iOpener and lay it over the phone for approximately 90 seconds to loosen the adhesive securing the back cover.

  7. Этот шаг не переведен. Помогите перевести

    : шаг 7, изображение 1 из 3 : шаг 7, изображение 2 из 3 : шаг 7, изображение 3 из 3
    • Starting from the SIM slot side, carefully peel the back cover off of the phone.

    • The back cover is very flexible, but you don't want to damage any internal components by being too hasty.

    • There is a chance that the NFC coil may remain stubbornly adhered to the back cover. If that's the case, stop peeling the cover and reapply a heated iOpener to the back cover.

    • Do not separate the back cover entirely; it is still connected to the phone by the camera flash cable.

    • The flash cable is attached on the power/volume button side of the phone.

  8. Этот шаг не переведен. Помогите перевести

    : шаг 8, изображение 1 из 1
    • Gently set the back cover down in a way that exposes the camera flash cable connector, but does not put strain on it.

  9. Этот шаг не переведен. Помогите перевести

    : шаг 9, изображение 1 из 3 : шаг 9, изображение 2 из 3 : шаг 9, изображение 3 из 3
    • Use the tip of a spudger to flip up the retaining flap on the flash cable ZIF connector.

    • Be sure to pry only on the flap itself, not on the connector.

    • Pull the flash cable straight out of its socket.

  10. Этот шаг не переведен. Помогите перевести

    : шаг 10, изображение 1 из 1
    • Separate the back cover from the phone.

  11. Этот шаг не переведен. Помогите перевести

    : шаг 11, изображение 1 из 1
    • Remove the four 3 mm T3 Torx screws securing the lower antenna assembly to the phone.

  12. Этот шаг не переведен. Помогите перевести

    : шаг 12, изображение 1 из 3 : шаг 12, изображение 2 из 3 : шаг 12, изображение 3 из 3
    • Use the flat end of a spudger to pry up the lower antenna assembly and free it from the phone.

    • Remove the antenna assembly.

Финишная черта

9 участников успешно повторили данное руководство.

Sam Goldheart

Участник с: 10/18/12

465 869 Репутация

Автор 538 руководств

Команда

iFixit Участник iFixit

Staff

135 членов

Автор 17 207 руководств

2 Комментариев

I considered repairing this after ripping the connector in the battery replacement procedure. I probably will not miss it, don't have the part either

David Karr - Ответить

Добавить комментарий

Просмотр статистики:

За последние 24часов: 0

За последние 7 дней: 9

За последние 30 дней: 31

За всё время: 15,060