Перейти к основному содержанию

Эта версия возможно содержит некорректные исправления. Переключить на последнюю проверенную версию.

Абсолютно необходимое руководство
Это руководство предназначено только для использования в качестве обязательного условия для других руководств. Оно не полностью само по себе.

Выберете то, что вам нужно

  1. Этот шаг не переведен. Помогите перевести

    : шаг 1, изображение 1 из 2 : шаг 1, изображение 2 из 2
    • Before you begin, turn off your phone.

    • Heat an iOpener and apply it to the left edge of the phone for two minutes.

    • You may need to reheat and reapply the iOpener several times to get the phone warm enough. Follow the iOpener instructions to avoid overheating.

    • A hair dryer, heat gun, or hot plate may also be used, but be careful not to overheat the phone—the display and internal battery are both susceptible to heat damage.

    • As you wait, take note of the the following areas:

    • Display cable—be careful not to slice too deeply near the edge here, or you may damage the display cable.

    • Fingerprint sensor cable—be careful not to slice too deeply near the edge here, or you may damage the fingerprint sensor cable.

  2. Этот шаг не переведен. Помогите перевести

    : шаг 2, изображение 1 из 3 : шаг 2, изображение 2 из 3 : шаг 2, изображение 3 из 3
    • Apply a suction cup to the screen, as close to the heated edge as possible.

    • Pull on the suction cup with strong, steady force to create a gap in the seam.

    • Insert the point of an opening pick into the gap.

    • Depending on the age of your phone, this may be difficult. If you are having trouble, apply heat to the edge and try again.

  3. Этот шаг не переведен. Помогите перевести

    : шаг 3, изображение 1 из 3 : шаг 3, изображение 2 из 3 : шаг 3, изображение 3 из 3
    • Slide the opening pick along the edge to slice through the adhesive.

    • Leave an opening pick in the seam to prevent the adhesive from re-sealing.

  4. Этот шаг не переведен. Помогите перевести

    : шаг 4, изображение 1 из 3 : шаг 4, изображение 2 из 3 : шаг 4, изображение 3 из 3
    • Heat the top edge of the phone with an iOpener.

    • Carefully slice around the corner and through the top edge to separate the adhesive.

  5. Этот шаг не переведен. Помогите перевести

    : шаг 5, изображение 1 из 3 : шаг 5, изображение 2 из 3 : шаг 5, изображение 3 из 3
    • Heat the screen's right edge with an iOpener.

    • Be careful not to slice too deeply near the cables to avoid damaging them.

    • Use an opening pick to slice along the right edge to separate the adhesive.

  6. Этот шаг не переведен. Помогите перевести

    : шаг 6, изображение 1 из 2 : шаг 6, изображение 2 из 2
    • Repeat the previous steps to heat and slice the bottom edge of the phone.

  7. Этот шаг не переведен. Помогите перевести

    : шаг 7, изображение 1 из 2 : шаг 7, изображение 2 из 2
    • Do not try to remove the screen yet—it is still attached to the phone by delicate flex cables.

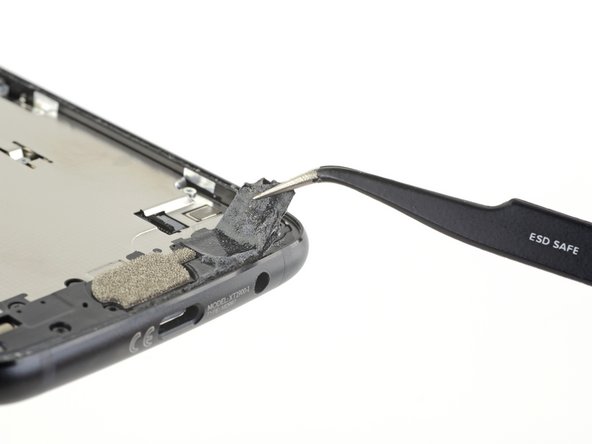
    • Carefully lift up the left edge of the screen and cut away remaining adhesives with an opening pick.

  8. Этот шаг не переведен. Помогите перевести

    : шаг 8, изображение 1 из 1
    • Swing open the screen and prop it up with a small box as you work on disconnecting the flex cables.

    • During reassembly, this is a good time to power on your phone and test all functions before sealing it up. Be sure to power your phone back down completely before you continue working.

  9. Этот шаг не переведен. Помогите перевести

    : шаг 9, изображение 1 из 2 : шаг 9, изображение 2 из 2
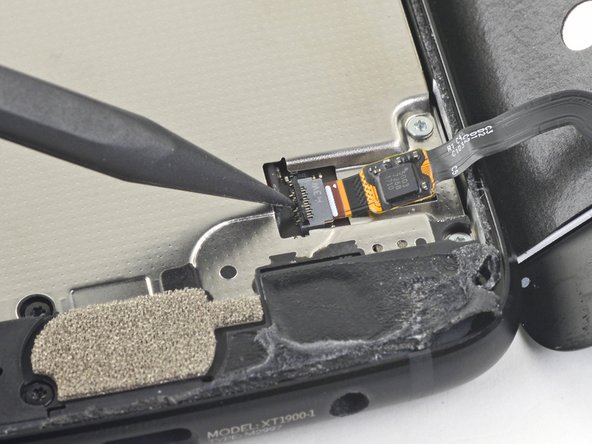
    • Slide the point of a spudger underneath the fingerprint sensor cable and gently pry up to loosen the cable from the phone.

    • Do not pull on the cable. It is still attached to the phone by a delicate ZIF socket.

  10. Этот шаг не переведен. Помогите перевести

    : шаг 10, изображение 1 из 3 : шаг 10, изображение 2 из 3 : шаг 10, изображение 3 из 3
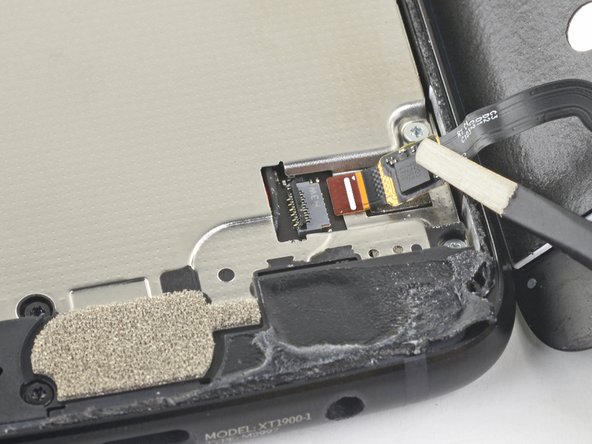
    • Use the point of a spudger to flip up the lock bar on the fingerprint sensor's ZIF socket, near the bottom right of the phone.

    • Use tweezers to carefully slide the fingerprint sensor cable out of the socket.

  11. Этот шаг не переведен. Помогите перевести

    : шаг 11, изображение 1 из 3 : шаг 11, изображение 2 из 3 : шаг 11, изображение 3 из 3
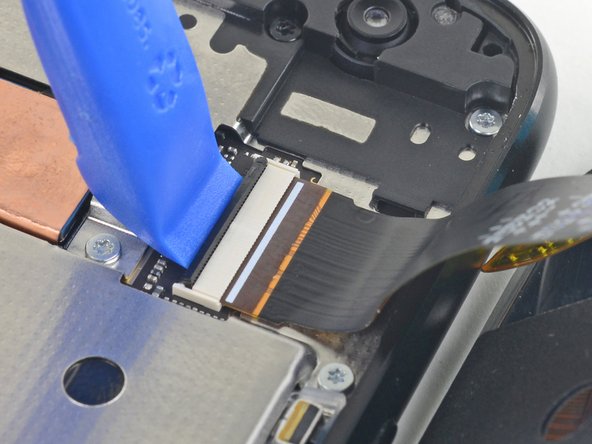
    • Use an opening tool to flip up the wide lock bar on the display cable's ZIF socket, near the top right of the phone.

    • Use tweezers to carefully slide the display cable out of the ZIF socket.

  12. Этот шаг не переведен. Помогите перевести

    : шаг 12, изображение 1 из 2 : шаг 12, изображение 2 из 2
    • Remove the screen.

    • During reassembly, follow this guide to clean the existing adhesive off and install custom-cut adhesives for your phone.

Финишная черта

Arthur Shi

Участник с: 01/03/18

252 726 Репутация

Автор 526 руководств

Команда

iFixit Участник iFixit

Staff

135 членов

Автор 16 817 руководств

0 Комментариев

Добавить комментарий

Просмотр статистики:

За последние 24часов: 0

За последние 7 дней: 0

За последние 30 дней: 0

За всё время: 67