Перейти к основному содержанию

Эта версия возможно содержит некорректные исправления. Переключить на последнюю проверенную версию.

Выберете то, что вам нужно

  1. Этот шаг не переведен. Помогите перевести

    : шаг 1, изображение 1 из 1
    • Power off your phone before you complete any replacement steps.

  2. Этот шаг не переведен. Помогите перевести

    : шаг 2, изображение 1 из 1
    • Heat the edges of your Motorola Moto Z2 Play screen for two to three minutes with a heat gun. You adjust the heat gun to 85 degrees centigrade, and be careful not to hold the heat gun on one position for too long; to avoid damaging, or "hotspotting" the LCD. The screen should be very warm, but not painful, to the touch. Reheat as necessary.

    • If screen is cracked put strong adhesive tape across the screen in order to avoid breaking the screen further and receiving cuts.

    • If you don’t have access to a heat gun, a hair dryer can be used.

  3. Этот шаг не переведен. Помогите перевести

    : шаг 3, изображение 1 из 1
    • Place suction cup in the middle of the screen and press down.

  4. Этот шаг не переведен. Помогите перевести

    : шаг 4, изображение 1 из 3 : шаг 4, изображение 2 из 3 : шаг 4, изображение 3 из 3
    • Pry the screen by wedging the plastic opening tool under the screen at the charging port.

    • Work your way around the screen with the plastic opening tool.

    • When you pry near the top-right and bottom-right corners, be careful not to pry too far, or you risk damaging the display cable.

    • Complete these steps carefully because the screen is delicate and can easily crack. If the screen begins to resist prying, reheat the adhesive with your heat gun.

  5. Этот шаг не переведен. Помогите перевести

    : шаг 5, изображение 1 из 3 : шаг 5, изображение 2 из 3 : шаг 5, изображение 3 из 3
    Инструмент, используемый на этом этапе:
    Plastic Cards
    $2.99
    Купить
    • Use a suction cup to lift up screen from left to right.

    • If you don’t have a suction cup, wedge a spudger or a small plastic card under the screen and lift slowly.

    • Failure to lift screen from left to right can cause damage to interior wires of your phone.

  6. Этот шаг не переведен. Помогите перевести

    : шаг 6, изображение 1 из 3 : шаг 6, изображение 2 из 3 : шаг 6, изображение 3 из 3
    • Identify ribbon connector at the top right of the phone.

    • Pry the black locking bar up gently with a plastic opening tool.

    • Remove the ribbon wires by pulling them out of the connector with a tweezer.

    • The locking bar is the small black bar located on the digitizer’s ZIF connector.

    • Be sure to push the locking bar back down using a spudger after you put the ribbon wire back in since the lock does not lock automatically.

  7. Этот шаг не переведен. Помогите перевести

    : шаг 7, изображение 1 из 3 : шаг 7, изображение 2 из 3 : шаг 7, изображение 3 из 3
    • Identify the ribbon cable, located at the bottom right of the phone.

    • If present, remove kapton (orange) tape covering the cable connector.

    • Flip up the small locking flap on the ZIF connector and use tweezers to slide the cable straight out of its socket.

    • Excessive force is not needed.

  8. Этот шаг не переведен. Помогите перевести

    : шаг 8, изображение 1 из 1
    • Lift the screen from the phone to completely detach.

    • If screen doesn't detach, go back to step 7 and 8 to make sure the bar is unlocked and ribbon connector is fully detached.

    • During reassembly, you may need to apply or replace the display adhesive on your display assembly. Use our display adhesive application guide to apply the adhesive and reseal your device.

  9. Этот шаг не переведен. Помогите перевести

    : шаг 9, изображение 1 из 2 : шаг 9, изображение 2 из 2
    • Remove the orange tape, located at the bottom right of the phone, using tweezers.

    • Do not discard tape.

  10. Этот шаг не переведен. Помогите перевести

    : шаг 10, изображение 1 из 2 : шаг 10, изображение 2 из 2
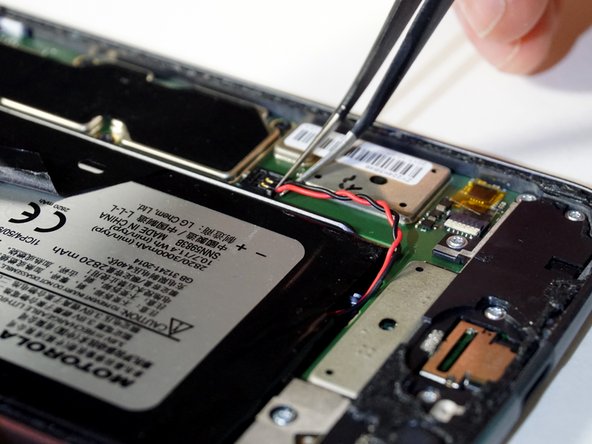
    • Detach the red and black battery wire by lifting up with tweezers.

  11. Этот шаг не переведен. Помогите перевести

    : шаг 11, изображение 1 из 2 : шаг 11, изображение 2 из 2
    • Peel back the black tape that is located on the battery.

    • Make sure you pull back gently so you can reuse the tape with reassembly.

  12. Этот шаг не переведен. Помогите перевести

    : шаг 12, изображение 1 из 3 : шаг 12, изображение 2 из 3 : шаг 12, изображение 3 из 3
    • Lift the black tape and slide a card under the battery.

    • Align the card parallel and under the battery.

    • Wedge the card further under the battery.

    • Lift the card up to assist in removing the battery from the adhesive.

  13. Этот шаг не переведен. Помогите перевести

    : шаг 13, изображение 1 из 1
    • Lift to remove the battery from the device completely.

  14. Этот шаг не переведен. Помогите перевести

    : шаг 14, изображение 1 из 1
    • Remove the three silver 2.6 mm T3 Torx screws on the speaker shell at the top of the phone with a screwdriver by turning counterclockwise.

    • Remove the four black 3.5 mm T3 Torx screws on the speaker shell at the top of the phone with a screwdriver by turning counterclockwise.

    • It is helpful to keep screws on a magnetic surface to avoid losing them.

  15. Этот шаг не переведен. Помогите перевести

    : шаг 15, изображение 1 из 1
    • Lift up the silver metallic tape using the tweezers.

  16. Этот шаг не переведен. Помогите перевести

    : шаг 16, изображение 1 из 3 : шаг 16, изображение 2 из 3 : шаг 16, изображение 3 из 3
    • Lift gently to completely remove speaker housing using tweezers.

    • Try lifting the speaker housing from both sides slightly before removing completely.

  17. Этот шаг не переведен. Помогите перевести

    : шаг 17, изображение 1 из 2 : шаг 17, изображение 2 из 2
    • Place the housing upside down in order to continue working.

    • Pry the speaker from the housing with a plastic opening tool.

    • When reassembling, make sure the metal connectors of speaker are in the bottom left and right corners (correct orientation).

    • Speaker clicks in on reassembly.

Финишная черта

Еще один человек закончил это руководство.

mitch miller

Участник с: 01/24/18

2 055 Репутация

Автор 8 руководств

Команда

Cal Poly, Team S19-G5, Livingston Winter 2018 Участник Cal Poly, Team S19-G5, Livingston Winter 2018

CPSU-LIVINGSTON-W18S19G5

4 членов

Автор 30 руководств

Один комментарий

Hi,

The guide was very detailed, kudos to that. Recently My phone fell of from my hand into glass of whisky :( hopefully no physical damage and i speedily switched off and dried it off . I tried to find any fault i found that when I am trying to play music through google music, youtube, any app or trying to call i am not able to hear any sound, yet the phone ringtone works, absolutely fine. Bluetooth and headphone jack when used its fine.

first . when i am dialing someone i am not able to hear any sound through normal ear piece, but i am able to hear when sound speaker is put on.

secondly, I am not able to hear any sound while playing videos or music in any app be it any app, chrome, youtube, google music.

Can you suggest me that what can be the issue..?

jacob alexander - Ответить

Добавить комментарий

Просмотр статистики:

За последние 24часов: 1

За последние 7 дней: 8

За последние 30 дней: 13

За всё время: 2,327