Перейти к основному содержанию

Motorola SLVR L9 Keypad Replacement

Выберете то, что вам нужно

  1. Motorola SLVR L9 Keypad Replacement, Battery: шаг 1, изображение 1 из 2 Motorola SLVR L9 Keypad Replacement, Battery: шаг 1, изображение 2 из 2
    • Turn the phone over so that the back of the phone is facing up.

  2. Motorola SLVR L9 Keypad Replacement: шаг 2, изображение 1 из 3 Motorola SLVR L9 Keypad Replacement: шаг 2, изображение 2 из 3 Motorola SLVR L9 Keypad Replacement: шаг 2, изображение 3 из 3
    • Press down on the silver battery cover latch located at the top of the phone.

    • Pull the battery cover down and away from the latch; then lift it up to remove the battery cover.

  3. Motorola SLVR L9 Keypad Replacement: шаг 3, изображение 1 из 3 Motorola SLVR L9 Keypad Replacement: шаг 3, изображение 2 из 3 Motorola SLVR L9 Keypad Replacement: шаг 3, изображение 3 из 3
    • To remove the battery, pull the battery up from the bottom center.

  4. Motorola SLVR L9 Keypad Replacement, Camera Lens Cover: шаг 4, изображение 1 из 2 Motorola SLVR L9 Keypad Replacement, Camera Lens Cover: шаг 4, изображение 2 из 2
    • Turn the phone over so that the back of the phone is facing towards you.

  5. Motorola SLVR L9 Keypad Replacement: шаг 5, изображение 1 из 3 Motorola SLVR L9 Keypad Replacement: шаг 5, изображение 2 из 3 Motorola SLVR L9 Keypad Replacement: шаг 5, изображение 3 из 3
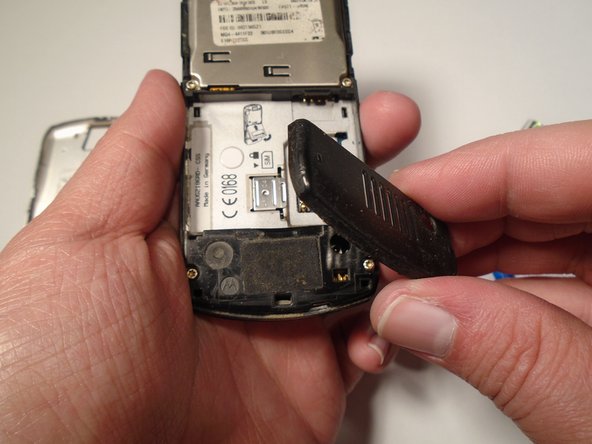
    • Press down on the battery cover latch located at the top of the phone.

    • Pull the battery cover down and away from the latch; then lift it up to remove the battery cover.

  6. Motorola SLVR L9 Keypad Replacement: шаг 6, изображение 1 из 1
    • Remove the four housing screws (1/8") from each corner of the transceiver PC board shield. Use a screwdriver with a T6 Torx screwdriver head to turn the screws counter-clockwise (left).

  7. Motorola SLVR L9 Keypad Replacement: шаг 7, изображение 1 из 2 Motorola SLVR L9 Keypad Replacement: шаг 7, изображение 2 из 2
    • Once you have removed all of the screws, lift the transceiver PC board shield up to remove it.

  8. Motorola SLVR L9 Keypad Replacement, Antenna Cover: шаг 8, изображение 1 из 3 Motorola SLVR L9 Keypad Replacement, Antenna Cover: шаг 8, изображение 2 из 3 Motorola SLVR L9 Keypad Replacement, Antenna Cover: шаг 8, изображение 3 из 3
    • Use the plastic opening tool to loosen the cover latch.

    • Once the cover latch has been loosened, gently pull the cover latch off of the device.

  9. Motorola SLVR L9 Keypad Replacement, Keypad: шаг 9, изображение 1 из 1
    • Use a screwdriver with a T6 Torx screwdriver head to remove both screws (1/8") from the speaker housing. Turn the screw counter-clockwise (left).

  10. Motorola SLVR L9 Keypad Replacement: шаг 10, изображение 1 из 3 Motorola SLVR L9 Keypad Replacement: шаг 10, изображение 2 из 3 Motorola SLVR L9 Keypad Replacement: шаг 10, изображение 3 из 3
    • Using the grooves around the edge of the phone, gently pull the front plate away from the phone until it is fully removed from the device.

  11. Motorola SLVR L9 Keypad Replacement: шаг 11, изображение 1 из 2 Motorola SLVR L9 Keypad Replacement: шаг 11, изображение 2 из 2
    • Lift the keypad up from the front plate to remove.

Заключение

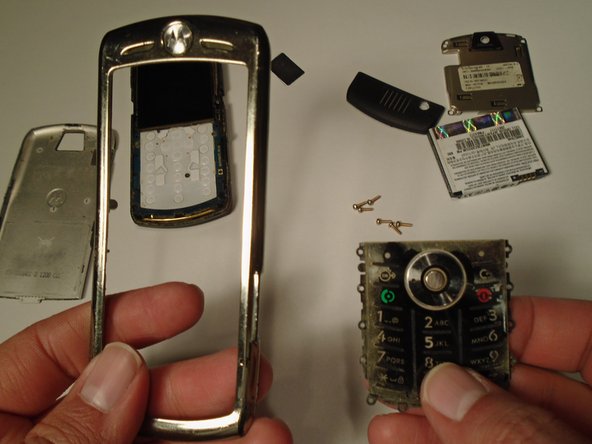
To reassemble your device, follow these instructions in reverse order.

Eric Lopez

Участник с: 10/13/15

201 Репутация

Автор 2 руководств

Команда

Sam Houston State, Team 1-5, Blackburne Fall 2015 Участник Sam Houston State, Team 1-5, Blackburne Fall 2015

SHSU-BLACKBURNE-F15S1G5

3 членов

Автор 5 руководств

0 Комментариев

Добавить комментарий

Просмотр статистики:

За последние 24часов: 0

За последние 7 дней: 1

За последние 30 дней: 9

За всё время: 336