Перейти к основному содержанию

Motorola SURFboard SB5101 Face Plate Replacement

Выберете то, что вам нужно

  1. Motorola SURFboard SB5101 Face Plate Replacement, Removing the Screw on the Back of the Device: шаг 1, изображение 1 из 3 Motorola SURFboard SB5101 Face Plate Replacement, Removing the Screw on the Back of the Device: шаг 1, изображение 2 из 3 Motorola SURFboard SB5101 Face Plate Replacement, Removing the Screw on the Back of the Device: шаг 1, изображение 3 из 3
    • Locate the single 1 cm screw on the back of the device (enclosed by a red circle in the image).

    • Using a screwdriver with a Torx 10 hex screw, begin removing the 1cm screw by turning the screwdriver counterclockwise.

    • Remove the screw and set aside.

  2. Motorola SURFboard SB5101 Face Plate Replacement, Unlocking Router: шаг 2, изображение 1 из 3 Motorola SURFboard SB5101 Face Plate Replacement, Unlocking Router: шаг 2, изображение 2 из 3 Motorola SURFboard SB5101 Face Plate Replacement, Unlocking Router: шаг 2, изображение 3 из 3
    • Rotate your device 90 degrees to the right so that the bottom of the device is facing you.

    • Locate the two horizontal slots on the bottom of the device.

    • You may need to remove the sticker on the bottom of the device to access these slots.

    • Insert the back end of the forceps into one of these slots. You may also use any other flat, narrow tool that fits into the slots.

    • Gently push the forceps into device. You should feel movement or hear a click, signifying this side of the device is unlocked.

    • Repeat with the other slot to completely unlock the device.

  3. Motorola SURFboard SB5101 Face Plate Replacement, Removing the Cover: шаг 3, изображение 1 из 3 Motorola SURFboard SB5101 Face Plate Replacement, Removing the Cover: шаг 3, изображение 2 из 3 Motorola SURFboard SB5101 Face Plate Replacement, Removing the Cover: шаг 3, изображение 3 из 3
    • Grab the top and the bottom of the device and gently pull the device open.

    • Continue pulling until you have completely removed the top cover of the device.

    • When reassembling your device, make sure the standby key is properly in place. See the Standby Key Guide for more information.

    • Also ensure that when you close the two sides of the cover the LED indicator lights are inside the information panel.

  4. Motorola SURFboard SB5101 Face Plate Replacement, Grabbing the Motherboard: шаг 4, изображение 1 из 2 Motorola SURFboard SB5101 Face Plate Replacement, Grabbing the Motherboard: шаг 4, изображение 2 из 2
    • After opening the router, grab the upper left corner of the sliver face plate and gently pull the motherboard out of the slot from within the case.

  5. Motorola SURFboard SB5101 Face Plate Replacement, Removing the Motherboard: шаг 5, изображение 1 из 3 Motorola SURFboard SB5101 Face Plate Replacement, Removing the Motherboard: шаг 5, изображение 2 из 3 Motorola SURFboard SB5101 Face Plate Replacement, Removing the Motherboard: шаг 5, изображение 3 из 3
    • Slowly lift the motherboard out of the case.

  6. Motorola SURFboard SB5101 Face Plate Replacement, Unscrew the Silver Antennae Jack Screw: шаг 6, изображение 1 из 3 Motorola SURFboard SB5101 Face Plate Replacement, Unscrew the Silver Antennae Jack Screw: шаг 6, изображение 2 из 3 Motorola SURFboard SB5101 Face Plate Replacement, Unscrew the Silver Antennae Jack Screw: шаг 6, изображение 3 из 3
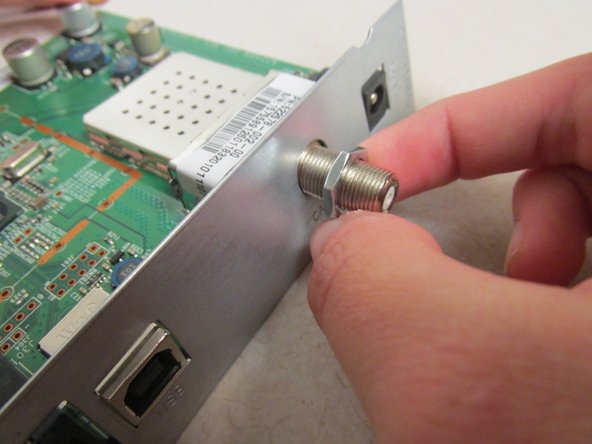
    • Begin by grabbing the washer on the silver antennae jack screw.

    • Start unscrewing the washer by turning it counterclockwise.

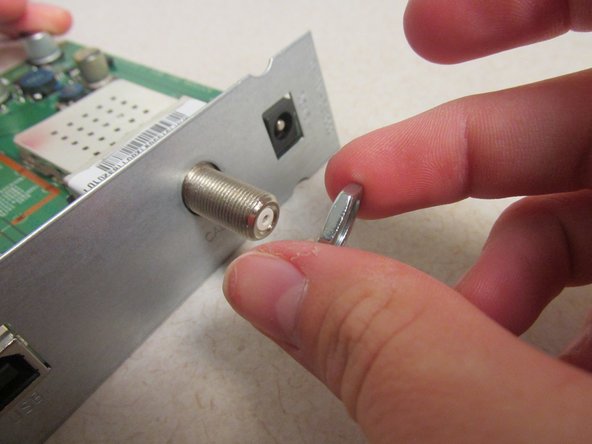
    • Continue to unscrew the washer until it comes off the screw.

    • If you cannot unscrew the washer with your finger, you may need to use a small wrench to grab the washer.

    • Set the washer aside.

  7. Motorola SURFboard SB5101 Face Plate Replacement, Removing the Face Plate: шаг 7, изображение 1 из 2 Motorola SURFboard SB5101 Face Plate Replacement, Removing the Face Plate: шаг 7, изображение 2 из 2
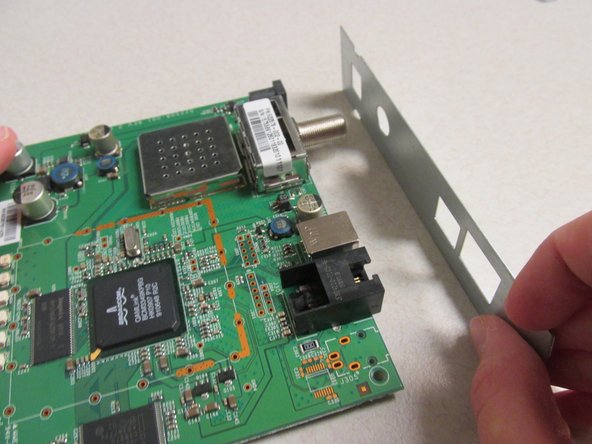
    • Grab both corner ends of the silver face plate.

    • Gently pull the face plate away from the router, gently wiggling it off the screw.

Заключение

Follow these directions in reverse order to replace a new face plate, or put the same faceplate back in place after you have finished working on the electrical components underneath.

2 участников успешно повторили данное руководство.

Cayce Rast

Участник с: 10/13/14

421 Репутация

Автор 3 руководств

Команда

Clemson, Team 1-2, Benson Fall 2014 Участник Clemson, Team 1-2, Benson Fall 2014

CLEM-BENSON-F14S1G2

3 членов

Автор 10 руководств

0 Комментариев

Добавить комментарий

Просмотр статистики:

За последние 24часов: 0

За последние 7 дней: 1

За последние 30 дней: 3

За всё время: 1,908