Введение
This guide to replace the heating plate of the Mr. Coffee BVMC-SJX33GT will be particularly useful if the heating plate your carafe sits on burns or corrodes in some way.
Make sure your coffee maker is unplugged and empty of all water before attempting to make any repairs.
Выберете то, что вам нужно
-
-
Locate the seven 13.5mm screws securing the base to the coffee maker.
-
Unscrew the screws using a #2 Phillips head screwdriver.
-
-
-
Also the front two screws are safety screws: they have a 6 sided star shape with a raised dimple in the center to prevent homebodies from casually opening the machine. (probably from the Sunbeam’s (owns Mr. Coffee) legal dept.) Anyway you will need a security bit to remove the screws and not a phillips screw driver.
-
-
-
-
Locate the metal clamps.
-
Using a pair of pliers or your fingers, slide clamps away from tube opening.
-
-
-
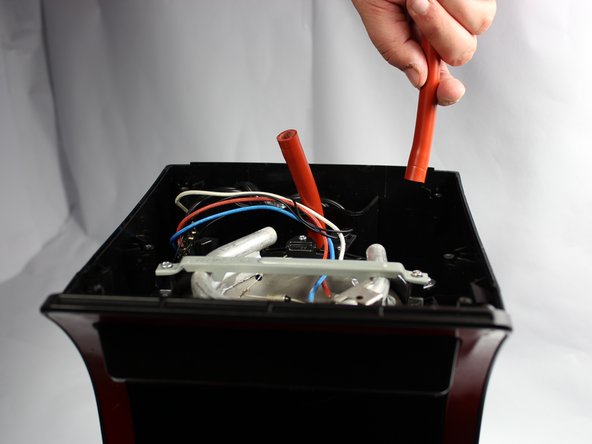
Using a plastic opening tool, loosen rubber hose from metal tubing.
-
Once loosened, grip the hose and pull it from the metal tubing.
-
-
-
Locate the other set of metal clamps.
-
Using needle nose pliers or your fingers remove these clamps by pinching the clamps and sliding them up the tubes.
-
-
-
Locate the two 17mm screws securing the bracing bar.
-
Unscrew the screws with a #2 Phillip's head screwdriver and remove the bracing bar
-
-
-
Using a finger to keep the heating plate in place, grip the metal tubing and gently pull it away from the plate.
-
Set the metal tubing aside.
-
To reassemble your device, follow these instructions in reverse order.
To reassemble your device, follow these instructions in reverse order.
Отменить: Я не выполнил это руководство.
2 участников успешно повторили данное руководство.
6 Комментариев
I need to know which of the various high-heat thermal paste should be used that will maintain re-bonding the heating tube to the heating plate. The manufacturer did not use thermal grease as it appears it will not maintain the bond between the heating tube and the heating element. They instead used a vertically stable paste that assumes a hardened consistency of chalk to best maintain the bond in the presence of water. However, I have yet to find the proper paste which bonds while tolerating the sufficient intermittent high heat ratings required. The manufacturer has been unable to provide any assistance or information. Can you please tell me what material to use in this circumstance. Thanks KB.
I am unfortunately unaware of the answer to this question. I hope someone else can answer it.
The two inline thermal fuses (brass cylinders with a black end) are far more likely to fail than the heating element. Check them first.
T99 or Super Lube
3 oz. Tube Heat Sink Compound
can be used with the heater.
Where can I obtain the heating plate? The coating has burned off and now rust corrosion has to scrubbed off after every use (including off the glass pot!!). Thanks.
Liked to video. Thanks for posting. Where can I purchase the black metal heating plate for Oster coffee maker or any maker?


